

How to Create a Start Speech Recognition Shortcut in Windows 10
When you set up Speech Recognition in Windows 10, it lets you control your PC with your voice alone, without needing a keyboard or mouse.
Using only your voice, you can open menus, click buttons and other objects on the screen, dictate text into documents, and write and send emails. Just about anything you do with your keyboard and mouse can be done with only your voice.
Speech Recognition is only available for the following languages: English (United States, United Kingdom, Canada, India, and Australia), French, German, Japanese, Mandarin (Chinese Simplified and Chinese Traditional), and Spanish.
See also:
This tutorial will show you how to create or download a Start Speech Recognition shortcut in Windows 10.
If you click on the Start Speech Recognition shortcut and have never set up Speech Recognition before, then the Set up Speech Recognition wizard will open for you to do so.
Contents
- Option One: To Download a Start Speech Recognition Shortcut
- Option Two: To Manually Create a Start Speech Recognition Shortcut
EXAMPLE: Start Speech Recognition

1 Click/tap on the Download button below to download the .zip file below.
2 Save the .zip file to your desktop.
3 Unblock the .zip file..
4 Open the .zip file, and extract (drag and drop) the shortcut to your desktop.
5 You can Pin to Taskbar, Pin to Start, add to All apps, add to Quick Launch, assign a keyboard shortcut to, or move this shortcut to where you like for easy use.
6 When finished, you can delete the downloaded .zip file if you like.
1 Right click or press and hold on an empty area on your desktop, and click/tap on New and Shortcut.
2 Copy and paste the location below into the location area, and click/tap on Next. (see screenshot below)
%windir%\Speech\Common\sapisvr.exe -SpeechUX -Startup
3 Type Start Speech Recognition for the name, and click/tap on the Finish button. (see screenshot below)
You could name this shortcut anything you would like though.
4 Right click or press and hold on the new Start Speech Recognition shortcut, and click/tap on Properties.
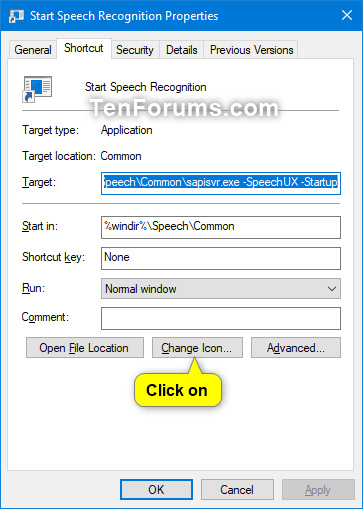
5 Click/tap on the Shortcut tab, then click/tap on the Change Icon button. (see screenshot below)
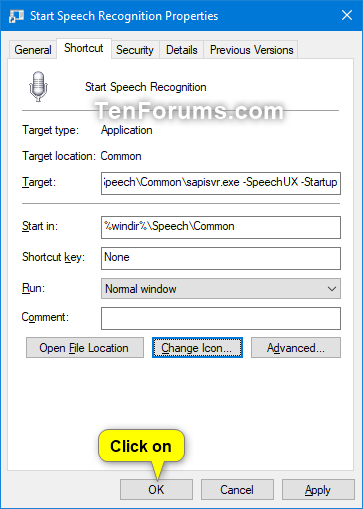
6 Click/tap on OK. (see screenshot below)
7 In the line under "Look for icons in this file", copy and paste the location below, and press Enter. (see screenshot below)
%SystemRoot%\System32\Speech\SpeechUX\SpeechUX.dll
8 Select the icon highlighted in blue above, and click/tap on OK. (see screenshot above)
You could use any icon that you would like instead though.
9 Click/tap on OK. (see screenshot below)
10 You can Pin to Taskbar, Pin to Start, add to All apps, add to Quick Launch, assign a keyboard shortcut to, or move this shortcut to where you like for easy use.
That's it,
Shawn Brink
Related Tutorials
- How to Set Up Speech Recognition in Windows 10
- How to Start Speech Recognition in Windows 10
- How to Add Start Speech Recognition Context Menu in Windows 10
- How to Add, Delete, and Change Speech Recognition Profiles in Windows 10
- How to Change Speech Recognition Language in Windows 10
- How to Turn On or Off Use Speech Recognition in Windows Mixed Reality in Windows 10
- How to Enable or Disable Run Speech Recognition at Startup in Windows 10
- How to Enable or Disable Document Review for Speech Recognition in Windows 10
- How to Enable or Disable Voice Activation for Speech Recognition in Windows 10
- How to Add, Delete, Prevent, and Edit Speech Recognition Dictionary Words in Windows 10
Create Start Speech Recognition Shortcut in Windows 10
Create Start Speech Recognition Shortcut in Windows 10
How to Create a Start Speech Recognition Shortcut in Windows 10Published by Shawn BrinkCategory: Apps & Features
21 May 2021


Tutorial Categories

Related Discussions
