

How to Turn On or Off Enhanced Mode for Search Indexer in Windows 10
Indexing the content of your PC helps you get faster results when your searching it for files, emails, or other local content.
The search index only includes your selected locations by default. These locations can be filtered for what file types (extensions), file properties, and file contents you want indexed.
Starting with Windows 10 build 18267, Microsoft added a new Enhanced Mode feature to improve search indexing that enables Windows to search all your folders and drives, instead of limiting search (Classic) to your documents, pictures, videos, and desktop by default.
Starting with Windows 10 build 19592, the Windows Search Platform (Indexer) has been updated with improved logic to help find better times to perform indexing of your files and avoiding heavily indexing while you are using your machine. An improvement was also made to significantly limit the amount of times the service indexes your files for content that doesnt have an impact on search experiences, and gives you a better experience on Windows.
This tutorial will show you how to turn on or off Enhanced mode for search indexer for all users in Windows 10.
You must be signed in as an administrator to turn on or off Enhanced mode for search indexer.
Turning on Enhanced mode for search indexer may reduce your battery life and increase CPU consumption.
Contents
- Option One: Turn On or Off Enhanced Mode for Search Indexer in Settings
- Option Two: Turn On or Off Enhanced Mode for Search Indexer in Registry Editor
1 Open Settings (Win+I), and click/tap on the Search icon.
2 Do step 3 (off) or step 4 (on) below for what you would like to do.
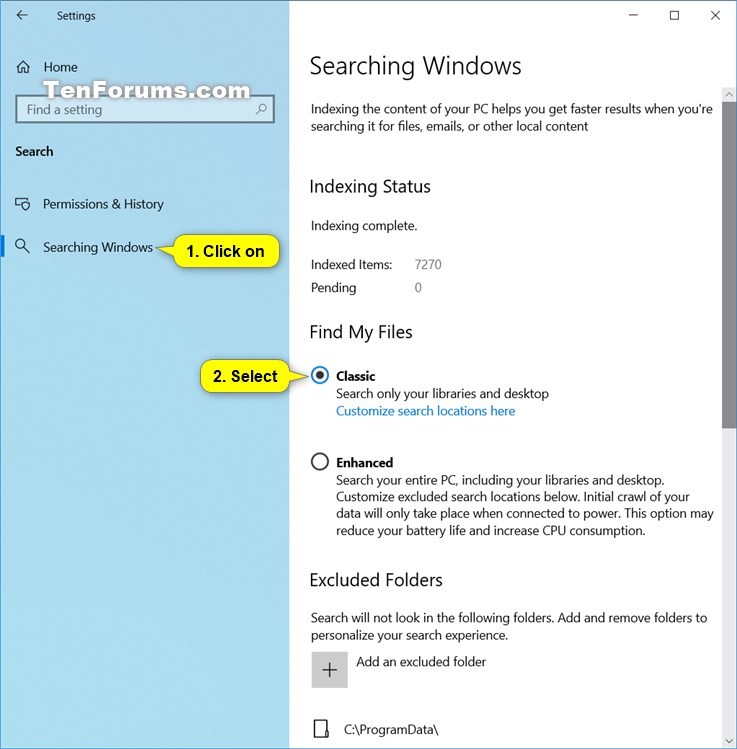
A) Click/tap on Searching Windows on the left side. (see screenshot below)
B) Select (dot) Classic under Find My Files on the right side, and go to step 5.
This is the default setting.
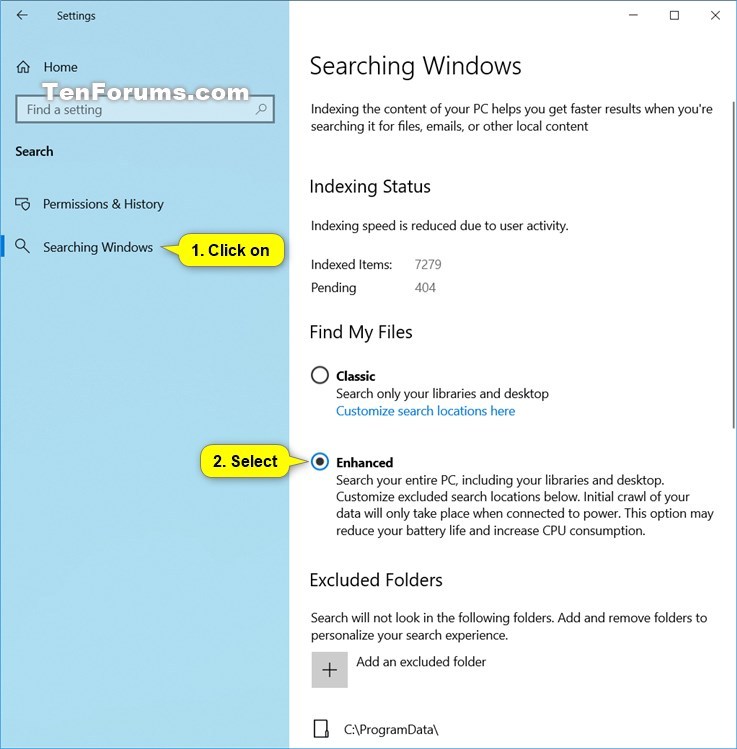
A) Click/tap on Searching Windows on the left side. (see screenshot below)
B) Select (dot) Enhanced under Find My Files on the right side.
C) A one-time indexing process (aka: rebuild) will now begin. When the indexing is complete, youll be able to find all your files almost instantly when you use Windows Search.
It will take about 15 minutes for search to begin returning these additional files in results. If you have lots of files, it may take longer. Make sure you plug in before you start, indexing is a resource-intensive activity.
D) Go to step 5.
5 When finished, you can close Settings if you like.
1 Press the Win + R keys to open Run, type regedit into Run, and click/tap on OK to open Registry Editor.
2 If prompted by UAC, click/tap on Yes.
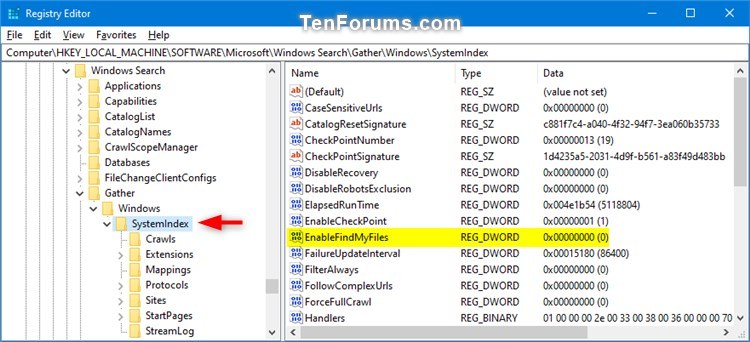
3 Navigate to the key below in the left pane of Registry Editor. (see screenshot below)
HKEY_LOCAL_MACHINE\SOFTWARE\Microsoft\Windows Search\Gather\Windows\SystemIndex
4 Change the owner of the SystemIndex registry key in the left pane to be the Administrators group. (see screenshot below step 3)
5 Set permissions of the SystemIndex registry key in the left pane to "Allow" the Administrators group "Full control". (see screenshot below step 3)
After you have done steps 4 and 5 once, you will not have to do them again to be able to do step 6 at any time afterwards.
6 Do step 7 (off) or step 8 (on) below for what you would like to do.
The .reg files below will modify the DWORD value in the registry key below. This is the same location in step 3.
HKEY_LOCAL_MACHINE\SOFTWARE\Microsoft\Windows Search\Gather\Windows\SystemIndex
EnableFindMyFiles DWORD
0 = Classic
1 = Enhanced
A) Click/tap on the Download button below to download the file below, and go to step 9 below.
Set_Find_My_Files_to_Classic_for_search_indexer.reg
Download
This is the default setting.
A) Click/tap on the Download button below to download the file below, and go to step 10 below.
Set_Find_My_Files_to_Enhanced_for_search_indexer.reg
Download
9 Save the .reg file to your desktop.
10 Double click/tap on the downloaded .reg file to merge it.
11 When prompted, click/tap on Run, Yes (UAC), Yes, and OK to approve the merge.
12 Either stop and start the Windows Search service OR Restart the computer to apply.
13 If you like, you can delete the downloaded .reg file.
That's it,
Shawn
Related Tutorials
- How to Enable or Disable Search Indexing in Windows
- How to Create an Indexing Options Shortcut in Windows 10
- How to Enable or Disable Indexer Backoff in Windows
- How to Reset and Rebuild Search Index in Windows 10
- How to Add or Remove Locations for Search Index in Windows 10
- How to Add or Remove Excluded Folders for Search Indexer in Windows 10
- How to Enable or Disable Modifying Indexed Locations in Windows
- How to Enable or Disable Advanced Indexing Options in Windows
- How to Add or Remove File Types for Search Index in Windows 10
- How to Turn On or Off Indexing Contents and Properties of Files on a Drive in Windows
- How to Turn On or Off to Index Encrypted Files in Windows 10
- How to Change Storage Location of Search Index in Windows 10
- How to Enable or Disable Indexing when on Battery Power in Windows
- How to Turn On or Off Search Indexer Respect Device Power Mode Settings in Windows 10
- How to Use Indexer Diagnostics App for Windows Search Issues in Windows 10
- How to Reset Windows Search in Windows 10
Turn On or Off Enhanced Mode for Search Indexer in Windows 10
-
-
-
New #3
Okay
- - - Updated - - -
@Brink
I asked this same in MDL & someone over there told me this,
"There seem to be another key "HKEY_LOCAL_MACHINE\SOFTWARE\Microsoft\PolicyManager\default\Search\AllowWindowsIndexer\Behavior " which is by default set to Classic Search while the AllowFindMyFiles\Behavior key were set to Enhanced Search by default."
though to share with you, can you take a good look at this & confirm whether making a pre-defined reg file is possible via this or not?
-
-
-
New #6
It turned out to be a different key location. It's a bit harder to change the value since you have to change the owner and permissions of the key first.
-
New #7
-
New #8
I don't know if it will work with NTLite or not considering the permissions.
Yeah, I'm going to wait to update the screenshots in Option One until after 1903 is released. I have a note in the steps for the difference to help for now though.
-
-
New #9
@Brink
There seems to be a problem, I tweaked the permission part & then the reg file working (earlier giving error as didn't checked the permission part) but even though in reg editor the values changed to 1, that doesn't reflect in Windows settings section visually.
Is that a glitch or what?

Turn On or Off Enhanced Mode for Search Indexer in Windows 10
How to Turn On or Off Enhanced Mode for Search Indexer in Windows 10Published by Shawn BrinkCategory: General Tips
28 Jan 2021

 Quote
Quote
Tutorial Categories

Related Discussions
