

How to Specify Screen Saver Timeout in Windows
A screen saver is a moving picture or pattern that displays on the screen(s) of your PC after you have not been active on the PC for specified period of time to wait. Screen savers were originally used to save older, monochromatic monitors from damage, but now they are mainly a way to personalize your PC or enhance its security by offering password protection.
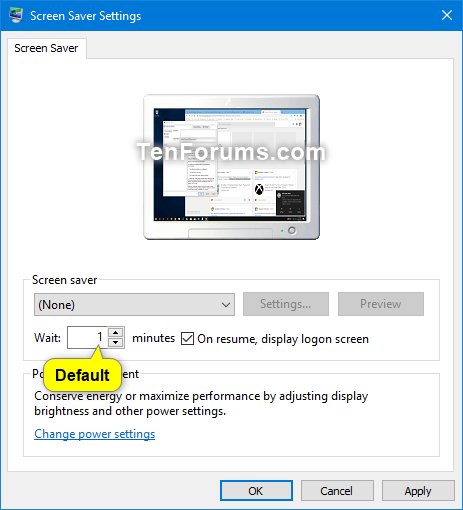
By default, users are able to set in their screen saver settings how many minutes to wait while inactive before the screen saver is launched.
If you like, you can specify for users how much user idle time must elapse before the screen saver is launched.
If specified, users will not be able to change the wait timeout in their screen saver settings.
This tutorial will show you how to specify a screen saver timeout period for specific or all users in Windows 7, Windows 8, and Windows 10.
You must be signed in as an administrator to specify a screen saver timeout.
If you specify a screen saver timeout period, you may also want to enable or disable screen saver password protection and specify a screen saver.
Contents
- Option One: Specify Screen Saver Timeout in Local Group Policy Editor
- Option Two: Specify Screen Saver Timeout for All Users in Registry Editor
EXAMPLE: Default and specified screen saver timeout
In Windows 7, the Local Group Policy Editor is only available in the Professional, Ultimate, and Enterprise editions.
In Windows 8, the Local Group Policy Editor is only available in the Pro and Enterprise editions.
In Windows 10, the Local Group Policy Editor is only available in the Pro, Enterprise, and Education editions.
All editions can use Option Two.
1 Open the all users, specific users or groups, or all users except administrators Local Group Policy Editor for how you want this policy applied.
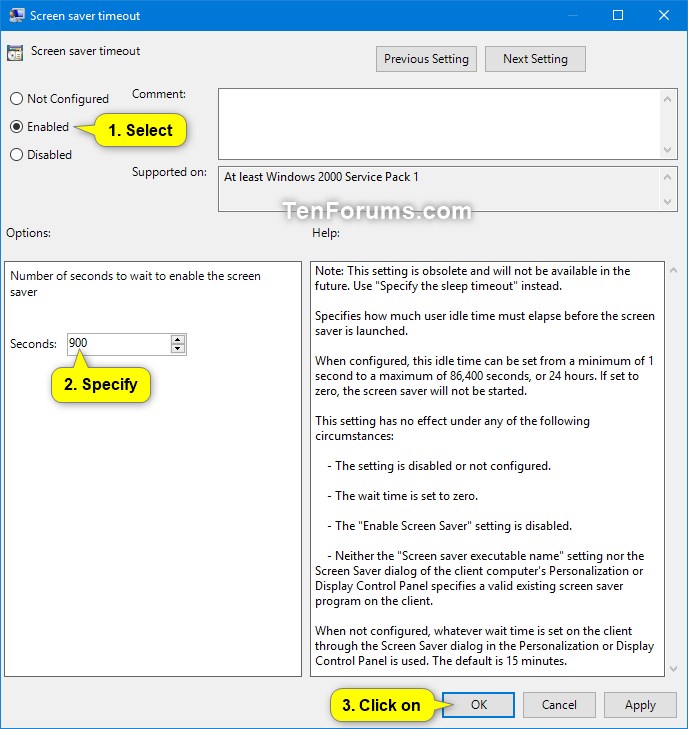
2 In the left pane of the Local Group Policy Editor, click/tap on to expand User Configuration, Administrative Templates, Control Panel, and Personalization. (see screenshot below)
3 In the right pane of Personalization, double click/tap on the Screen saver timeout policy to edit it. (see screenshot above)
4 Do step 5 (specify) or step 6 (default) below for what you would like to do.
A) Select (dot) Enabled, enter the number of seconds you want to wait to enable the screen saver in Options, click/tap on OK, and go to step 7 below. (see screenshot below)
If you enter 0 (zero), the screen saver will never be started and effectively disables screen saver.
A) Select (dot) either Not Configured or Disabled, click/tap on OK, and go to step 7 below. (see screenshot below)
Not Configured is the default setting.
7 When finished, you can close Local Group Policy Editor if you like.
1 Press the Win + R keys to open Run, type regedit into Run, and click/tap on OK to open Registry Editor.
2 Navigate to the key below in the left pane of Registry Editor. (see screenshot below)
HKEY_CURRENT_USER\Software\Policies\Microsoft\Windows\Control Panel\Desktop
3 In the right pane of the Desktop key, double click/tap on the ScreenSaveTimeOut REG_SZ (string) value to modify it. (see screenshot above)
If you wanted to use the default screen saver timeout for users to set for themselves, you would want to delete the ScreenSaveTimeOut value (if there) instead, and go to step 5 below.
If you do not have a ScreenSaveTimeOut REG_SZ (string) value, then right click or press and hold on an empty area in the right pane of the Desktop key, click/tap on New, click/tap on String Value, type ScreenSaveTimeOut for the name, and press Enter.
4 Enter the number of seconds you want to wait to enable the screen saver, and click/tap on OK. (see screenshot below)
If you enter 0 (zero), the screen saver will never be started and effectively disables screen saver.
5 Navigate to the key below in the left pane of Registry Editor. (see screenshot below)
HKEY_LOCAL_MACHINE\SOFTWARE\Policies\Microsoft\Windows\Control Panel\Desktop
6 In the right pane of the Desktop key, double click/tap on the ScreenSaveTimeOut REG_SZ (string) value to modify it. (see screenshot above)
If you wanted to use the default screen saver timeout for users to set for themselves, you would want to delete the ScreenSaveTimeOut value (if there) instead, and go to step 8 below.
If you do not have a ScreenSaveTimeOut REG_SZ (string) value, then right click or press and hold on an empty area in the right pane of the Desktop key, click/tap on New, click/tap on String Value, type ScreenSaveTimeOut for the name, and press Enter.
7 Enter the same number of seconds from step 4, and click/tap on OK. (see screenshot below)
If you enter 0 (zero), the screen saver will never be started and effectively disables screen saver.
8 You can now close Registry Editor if you like.
That's it,
Shawn
Related Tutorials
- How to Change Turn Off Display After Time in Windows 10
- How to Change Console lock display off timeout in Windows 10
- How to Enable or Disable Screen Saver in Windows
- How to Enable or Disable Changing Screen Saver in Windows
- How to Change Screen Saver Settings in Windows 10
- How to Create a Screen Saver Settings Shortcut in Windows 10
- How to Change Screen Saver Grace Period to Bypass Password Protection in Windows
- How to Enable or Disable Screen Saver Password Protection in Windows
- How to Specify a Screen Saver in Windows
Specify Screen Saver Timeout in Windows

Specify Screen Saver Timeout in Windows
How to Specify Screen Saver Timeout in WindowsPublished by Shawn BrinkCategory: General Tips
02 Mar 2020


Tutorial Categories

Related Discussions
