

How to Enable or Disable Delete Diagnostic Data in Windows 10
Microsoft uses Windows diagnostic data to focus their decisions and efforts to provide you with the most robust and valuable platform possible. By participating in the diagnostic data programs, you have a voice in the operating systems development, improving the overall product experience and quality through your insights.
Starting with Windows 10 build 17093, you can now delete the Windows Diagnostic Data that Microsoft has collected from your device.
Starting with Windows 10 version 1809, you can use a new group policy to control whether the Delete diagnostic data button is enabled in Diagnostic & Feedback Settings page.
If you enable this policy setting, the Delete diagnostic data button will be disabled in Settings page, preventing the deletion of diagnostic data collected by Microsoft from the device.
If you disable or don't configure this policy setting, the Delete diagnostic data button will be enabled in Settings page, which allows people to erase all diagnostic data collected by Microsoft from that device.
This tutorial will show you how to enable or disable the ability to delete diagnostic data for all users in Windows 10.
You must be signed in as an administrator to enable or disable delete diagnostic data.
Contents
- Option One: Enable or Disable Delete Diagnostic Data in Local Group Policy Editor
- Option Two: Enable or Disable Delete Diagnostic Data using a REG file
EXAMPLE: Delete button for diagnostic data disabled in Settings
The Local Group Policy Editor is only available in the Windows 10 Pro, Enterprise, and Education editions.
All editions can use Option Two below.
1 Open the Local Group Policy Editor.
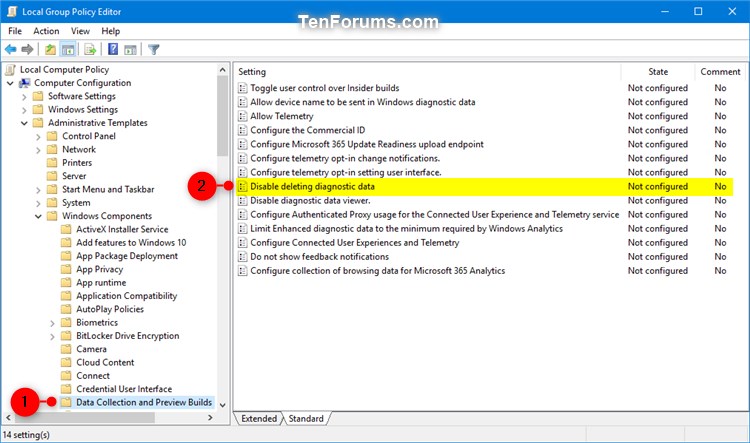
2 In the left pane of Local Group Policy Editor, navigate to the location below. (see screenshot below)
Computer Configuration\Administrative Templates\Windows Components\Data Collection and Preview Builds
3 In the right pane of Data Collection and Preview Builds in Local Group Policy Editor, double click/tap on the Disable deleting diagnostic data policy to edit it. (see screenshot above)
4 Do step 5 (enable) or step 6 (disable) below for what you would like to do.
A) Select (dot) Not Configured or Enabled, click/tap on OK, and go to step 7 below. (see screenshot below)
Not Configured is the default setting.
7 When finished, you can close the Local Group Policy Editor.
The downloadable .reg files below will add and modify the DWORD value in the registry key below.
HKEY_LOCAL_MACHINE\SOFTWARE\Policies\Microsoft\Windows\DataCollection
DisableDeviceDelete DWORD
(delete) = Enable
1 = Disable
1 Do step 2 (enable) or step 3 (disable) below for what you would like to do.
This is the default setting.
A) Click/tap on the Download button below to download the file below, and go to step 4 below.
Enable_Delete_diagnostic_data.reg
Download
A) Click/tap on the Download button below to download the file below, and go to step 4 below.
Disable_Delete_diagnostic_data.reg
Download
4 Save the .reg file to your desktop.
5 Double click/tap on the downloaded .reg file to merge it.
6 When prompted, click/tap on Run, Yes (UAC), Yes, and OK to approve the merge.
That's it,
Shawn
Related Tutorials
- How to Delete Diagnostic Data in Windows 10
- How to Change Diagnostic and Usage Data Settings in Windows 10
- How to Turn On or Off Tailored experiences with diagnostic data in Windows 10
- How to Enable or Disable Diagnostic Data Viewer in Windows 10
Enable or Disable Delete Diagnostic Data in Windows 10
-
-
New #2
Hello Paul,
Nar. This tutorial is only for enabling or disabling the ability to delete diagnostic data instead.
The policy you posted is below instead.
Change Diagnostic Data Settings in Windows 10
-
-
New #4
Hello @Brink,
If you enable this policy setting, the Delete diagnostic data button will be disabled in Settings page, preventing the deletion of diagnostic data collected by Microsoft from the device.
If you disable or don't configure this policy setting, the Delete diagnostic data button will be enabled in Settings page, which allows people to erase all diagnostic data collected by Microsoft from that device.
I don't know if it is me, but in order to be able to click theDeletebutton underDelete Diagnostic Data, you need to run theEnable_Delete_diagnostic_data.regfile.
-
-
-

Enable or Disable Delete Diagnostic Data in Windows 10
How to Enable or Disable Delete Diagnostic Data in Windows 10Published by Shawn BrinkCategory: Performance & Maintenance
18 Apr 2021


 Quote
Quote
Tutorial Categories

Related Discussions
