

Create Custom Provisioning Package used to Reset Windows 10 or Create Recovery Drive
Information
If you're having problems with Windows 10 on your PC, in some cases you may want to reset it or use a recovery drive which you have created.
If you have upgraded a computer from an earlier version of Windows, or clean-installed it yourself at some point, then normally a reset or a recovery drive will perform a clean install of Windows 10 and nothing else.
However this tutorial shows you how to customise the reset and recovery drive by saving your currently installed software applications, so that they get picked up by the reset process or the next time you create a recovery drive.
Windows 10 incorporates a new technology called Provisioning Packages, and this tutorial uses tool called scanstate, which is part of the free Windows Assessment and Deployment Kit (ADK) to capture currently-installed software into one of these packages.
Note
You must be signed in as an administrator to be able to perform this tutorial
It's best to run this computer soon after setting it up, when you know you have software that's working correctly. This tutorial preserves the state of your currently installed software (although it seems not to save settings). If your software is currently not working, then this tutorial may just preserve the broken state of your current computer, which means a future Reset would not help you.
The other reason to do this on a freshly set up PC is that the provisioning package seems to include other folders on your operating system drive, outside the C:\Users folders. So if you have a folder called C:\Software_Installers, that gets included as well. This can be useful but also can swell the size of the package if you have saved a lot of files outside the C:\Users folder.
Warning
This tutorial uses the same techniques which manufacturers of new Windows 10 computers are likely to be using to save customisations.
Therefore it is not intended for use on computers which came with Windows 10 pre-installed, as it may conflict with customisations which the manufacturer has already saved.
This tutorial writes a file to a folder called C:\Recovery\Customizations. This folder is a 'special' Windows folder and you can break Windows Reset and Recovery processes by putting the wrong file there.
A video walk-through of this process, with one or two variations, and showing testing of the Reset and Recovery Drive process:
Here's How:
Part One: Check for existing saved customisations
Part Two: Download the USMT from the ADK
Part Three: Prepare the scanstate tool and capture customisations
1. Open an elevated command prompt.
2. Type the following command and press enter:
dir c:\Recovery\Customizations /a
3. If this directory listing returns a file (see screenshot below), then there are customisations already present. If the file is present because you already ran this tutorial previously, then you should be OK. However if you didn't run this, then it looks like the manufacturer has already saved customisations and you should not run the rest of this tutorial.
If the directory doesn't exist, or is empty (for example as in the screenshot below) you should be good to continue with the rest of the tutorial.
4. Type exit and press Enter, to close the command prompt window.
5. This section installs part of the Windows Assessment and Deployment Kit (ADK), called the User State Migration Tool (USMT). To do this, click on the download button below to download the Setup program for the ADK. Save this on your computer and Run it once it has downloaded.
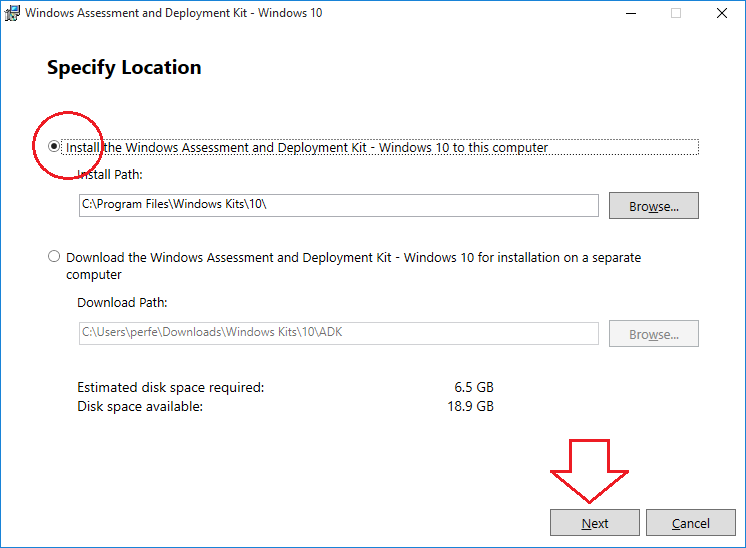
6. The ADK setup program will ask if you want to Install the Windows Assessment and Deployment Kit to this computer, or Download for installation on a separate computer. All you need to do for this tutorial is select the Install option, and click/tap next.
Optional: If you like, you could select the Download option to download the whole ADK to use other tools within the kit. This will result in a bigger data download than the minimum required for this tutorial.
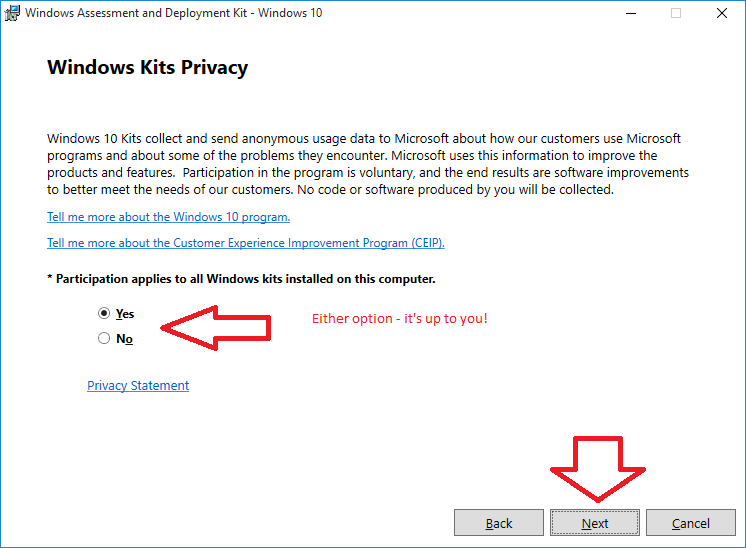
7. The ADK setup program will ask you if you are happy for anonymous usage data to be collected. Answer this question by selecting Yes or No, and then click/tap Next.
8. The ADK setup program will ask you if you accept the licence agreement. If you are happy to accept this, then click/tap Accept.
9. The ADK setup program will ask you which features you want to install. For the purpose of this tutorial, the only feature required to be selected is the User State Migration Tool (USMT). Select the features required, and click/tap Install. If the User Acccount Control dialog box is displayed, click/tap Yes to allow the app to make changes to your PC.
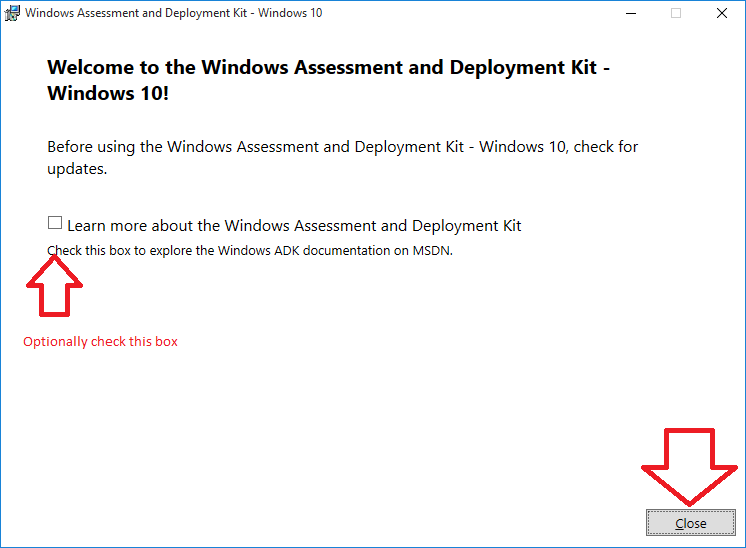
10. The ADK setup program will end with a Welcome message. If you like, check the box to learn more about the Windows Assessment and Deployment Kit, but it it not required for this tutorial. Click/tap Close to exit the setup program.
11. At the time of writing, the version of the scanstate tool in the ADK needs a workaround to allow it to run the command in this tutorial. The workaround is to copy files from two folders into one, so that all the files required by the scanstate tool are present in the same folder.
If you like to type in the commands yourself, goto step 16 below. If you want to download a file to run the commands, continue at step 12.
If you type in the commands yourself, there is the option of uninstalling the Windows ADK before saving the state of installed software. By uninstalling it means the Windows ADK would not be included in the Provisioning Package that is saved. Otherwise the Windows ADK would be restored by the Reset process or if you reinstalled Windows from a Recovery Drive.
To run the commands using a batch file
12. Either:
If you are running a 32-bit system, download this batch file to your computer.
OR
If you are running a 64-bit system, download this batch file to your computer.
13. Once the batch file has downloaded, right-click it and run as Administrator. You may get a message saying 'Windows Smartscreen protected your PC'. Click on 'More Info' and then 'Run Anyway', then answer Yes to the User Acccount Control dialog box.
14. This will create a folder called c:\usmt\scanstate which holds the merged scanstate files, and also writes the provisioning package containing your software to the folder C:\Recovery\Customizations. A log of the scanstate process is kept in the folder c:\usmt .
15. This completes the process of creating a provisioning package. Go to step 20 for some final steps.
To run the commands from the command prompt
16. Open an elevated command prompt.
Tip
There is a new feature in Windows 10: commands can be copied and pasted into command prompts using the normal Ctrl-C and Ctrl-V keyboard shortcuts.
However you may need to be careful not to copy the 'bullets' from the lists of commands below.
Either:
If you are running on 32-bit Windows 10, execute these commands at the command prompt by typing each command and pressing enter:
- c:
- md c:\usmt\scanstate
- cd c:\usmt\scanstate
- xcopy "C:\Program Files\Windows Kits\10\Assessment and Deployment Kit\windows setup\x86\sources"
- xcopy /s /y "C:\Program Files\Windows Kits\10\Assessment and Deployment Kit\User State Migration Tool\x86"
Or:
If you are running on 64-bit Windows 10, execute these commands at the command prompt by typing each command and pressing enter:
- c:
- md c:\usmt\scanstate
- cd c:\usmt\scanstate
- xcopy "C:\Program Files (x86)\Windows Kits\10\Assessment and Deployment Kit\windows setup\amd64\sources"
- xcopy /s /y "C:\Program Files (x86)\Windows Kits\10\Assessment and Deployment Kit\User State Migration Tool\amd64"
17. Optional Step:
At this point, you may want to uninstall the Windows Assessment and Deployment Kit.. You would do this if you didn't want to use the Windows ADK again for another purpose, and wanted to remove it from the Provisioning Package of applications that would be restored when you ran a Reset or Recovery Drive in future.
If you do this, leave the command prompt open as there is another command to run there.
To uninstall the Windows ADK, follow Option One or Option Three in this tutorial, and uninstall "Windows Assessment and Deployment Kit"
Apps - Uninstall in Windows 10
18. Return to the elevated command prompt (which should be in the c:\usmt\scanstate folder), for example by using the Alt-Tab keyboard combinations to switch applications until you get there.
From the command prompt, execute this command to save your software. This could take a while, depending on how much software is installed.
- scanstate /apps /ppkg c:\recovery\customizations\usmt.ppkg /o /v:13 /l:c:\usmt\scanstate.log
19. Type exit and press Enter, to close the command prompt window.
20. If you like, you can optionally delete the extra folder created to merge the scanstate files together. Navigate to the c:\usmt folder using File Explorer and delete it.
21.
Now that the customisations have been saved, you may wish to create a recovery drive. The recovery drive process should automatically includes these customisations if you use the option to 'Back up system files to the recovery drive' when yohu create it.
That's it!
David
Related Tutorials
- How to Reset Windows 10
- How to Create a Bootable USB Recovery Drive in Windows 10
- How to 'Recover from a drive' to Reset Windows 10
- How to Create and Customize a Windows 10 Image in Audit Mode with Sysprep Tool
- How to Create a Recovery Image used to Reset Windows 10
- How to Enable or Disable Windows Recovery Environment (WinRE) in Windows 10
Create Provisioning Package in Windows 10
-
-
-
New #3
Process worked great, but I ran into the dreaded "We can't create the recovery drive: A problem occurred while recreating the recovery drive" error.
Formatting was successful, but the last second before the error I saw "copying utilities". The only thing in the error log was:
Cryptographic Services failed while processing the OnIdentity() call in the System Writer Object.
Details:
AddLegacyDriverFiles: Unable to back up image of binary Microsoft Link-Layer Discovery Protocol.
System Error:
Access is denied.
.
Previous to this procedure I had been able to create a recovery drive with the checkbox checked. If I can't resolve, I'll just revert to the prior day's system image and undo what we did here.
-
New #4
Hmm I don't know - I've had problems with the recovery drive but they seem independent of this process.
Can you confirm that in the C:\Recovery\Customizations folder, you *only* have the one file?:
- usmt.ppkg
I think extra files in that folder can certainly cause problems.
-
-
New #6
to prevent the message right click on file and select Unblock13. Once the batch file has downloaded, right-click it and run as Administrator. You may get a message saying 'Windows Smartscreen protected your PC'. Click on 'More Info' and then 'Run Anyway', then answer Yes to the User Acccount Control dialog box.
-
New #7
-
New #8
I sometimes found that after a reboot (but changing nothing) the Recovery Drive worked at the second attempt - so that may be worth a try.
Then I would see what happens if you move that file to another folder (eg. C:\Temp)? Will the Create Recovery Drive process work then?
Also, how big is that usmt.ppkg file?
-
-
New #9
It seems to be working now. The only difference was to go to control panel>File Explorer Options and uncheck "hide protected operating system files". I already had "Show Hidden Files, Folders or Drives" selected. This time there was no Event Log "Access is Denied" message or error report. So far its running about 1/3 of the way.."backing up system files". I'll post if it completes.

Create Provisioning Package in Windows 10
Create Custom Provisioning Package used to Reset Windows 10 or Create Recovery DrivePublished by DavidYCategory: Installation & Upgrade
12 Feb 2019


 Quote
QuoteTutorial Categories

Related Discussions
