

How to Enable or Disable Remote Assistance Connections in Windows
Windows Remote Assistance lets someone you trust, such as a friend or technical support person whom you have contacted, take over your PC and fix a problem from wherever they are.
Remote Assistance is enabled by default in Windows, so you may want to disable Remote Assistance when not needed since it can be a security risk.
See also: Solve PC problems remotely with Remote Assistance and Easy Connect
This tutorial will show you how to enable or disable allowing Remote Assistance connections to your Windows 7, Windows 8, or Windows 10 computer.
You must be signed in as an administrator to enable or disable Remote Assistance connections.
Contents
- Option One: Enable or Disable Remote Assistance Connections in Remote Settings
- Option Two: Enable or Disable Remote Assistance Connections using a BAT file
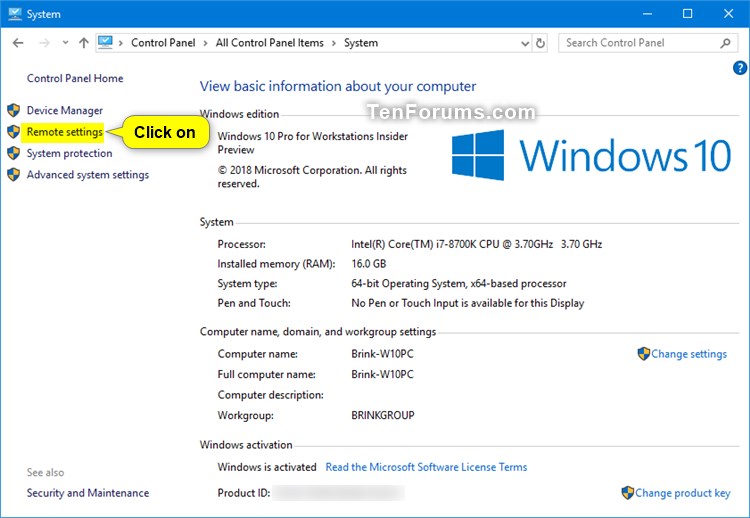
1 Open the Control Panel (icons view), and click/tap on the System icon.
Starting with Windows 10 build 20161, you will need to open Settings instead, click/tap on the System icon, and click/tap on About on the left side.
2 Click/tap on the Remote settings link on the left side. (see screenshot below)
Starting with Windows 10 build 20161, you will need to click/tap on About on the left side, and click/tap on the Advanced system settings link instead.
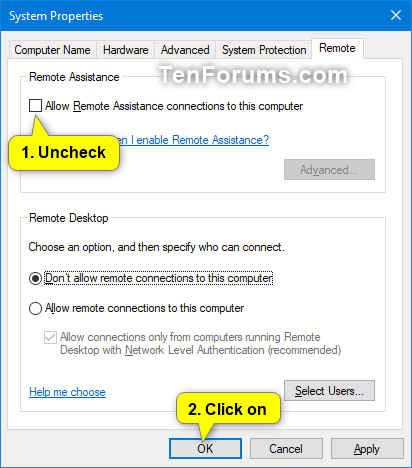
3 Do step 4 (enable) or step 5 (disable) below for what you want.
This is the default setting.
A) Check the Allow Remote Assistance connections to this computer box, click/tap on OK, and go to step 6. (see screenshots below)
If you like, you can click/tap on the Advanced button before clicking on OK to set limits for the use of Remote Assistance on your computer.

A) Uncheck the Allow Remote Assistance connections to this computer box, click/tap on OK, and go to step 6. (see screenshot below)
6 You can now close the System control panel window if you like.
1 Do step 2 (enable) or step 3 (disable) below for what you want.
This is the default setting.
A) Click/tap on the download button below to download the file below, and go to step 4.
Enable_Remote_Assistance_connections.bat
Download
Contents of .bat file:
REG ADD "HKLM\SYSTEM\CurrentControlSet\Control\Remote Assistance" /v fAllowToGetHelp /t REG_DWORD /d 1 /f

netsh advfirewall firewall set rule group="Remote Assistance" new enable=yes
A) Click/tap on the download button below to download the file below, and go to step 4.
Disable_Remote_Assistance_connections.bat
Download
Contents of .bat file:
REG ADD "HKLM\SYSTEM\CurrentControlSet\Control\Remote Assistance" /v fAllowToGetHelp /t REG_DWORD /d 0 /f

netsh advfirewall firewall set rule group="Remote Assistance" new enable=no
4 Save the .bat file to your desktop.
5 Unblock the .bat file.
6 Right click or press and hold on the downloaded .bat file, and click/tap on Run as administrator.
7 If prompted by UAC, click/tap on Yes to approve.
8 You will now notice an elevated command prompt quickly open and close to enable or disable Remote Assistance.
That's it,
Shawn Brink
Related Tutorials
- How to Use Windows Remote Assistance in Windows 7, 8 and 8.1
- How to Get and Give Remote Assistance with Quick Assist app in Windows 10
- How to Enable or Disable Remote Desktop Connections to a Windows 10 PC
- How to Add or Remove Troubleshooting Context Menu in Windows 10
Enable or Disable Remote Assistance Connections in Windows
-
New #1
Hello @Brink ,
,
Out of curiosity please, why did youNOTinclude theRegistry Key. . .
Disable:
Enable:Code:reg add "HKLM\System\CurrentControlSet\Control\Remote Assistance" /v "fAllowFullControl" /t REG_DWORD /d "0" /f
Code:reg add "HKLM\System\CurrentControlSet\Control\Remote Assistance" /v "fAllowFullControl" /t REG_DWORD /d "1" /f
Would the followingREGfiles work? . . .
Disable:
Enable:Code:Windows Registry Editor Version 5.00 "fAllowToGetHelp"=dword:00000000 "fEnableChatControl"=dword:00000000
Code:Windows Registry Editor Version 5.00 "fAllowToGetHelp"=dword:00000001 "fEnableChatControl"=dword:00000001
. . . or would you STILL need the following forDisableandEnablerespectfully, hence the reason for using aBATfile? . . .
Code:netsh advfirewall firewall set rule group="Remote Assistance" new enable=no netsh advfirewall firewall set rule group="Remote Assistance" new enable=yes
Thanks.

-
New #2
Hello @Paul Black,
I've only included the same settings in the BAT in option 2 that get changed when you check or uncheck Allow Remote Assistance invitations to be sent from this computer in option 1.
You would indeed need to toggle the firewall rule as well. It was just easier to do it all in a BAT file.
-

Enable or Disable Remote Assistance Connections in Windows
How to Enable or Disable Remote Assistance Connections in WindowsPublished by Shawn BrinkCategory: Network & Sharing
04 Aug 2022


 Quote
QuoteTutorial Categories

Related Discussions
