

How to Turn On or Off On-Screen Keyboard in Windows 10
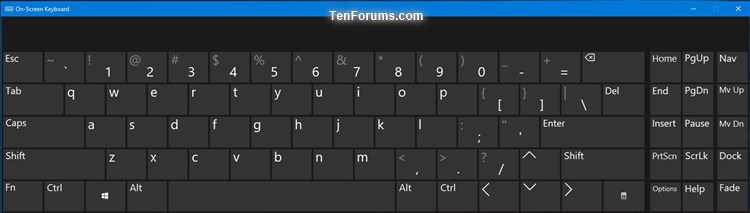
There are several different kinds of keyboards for PCs. The most common type is a physical, external keyboard that you plug into your PC. While Windows 10 has a touch keyboard, it also has a built-in Ease of Access tool called the On-Screen Keyboard (OSK) that can be used instead of a physical keyboard to move around a PC's screen or enter text. You dont need a touchscreen to use the OSK. It displays a visual keyboard with all the standard keys, so you can use your mouse or another pointing device to select keys, or use a physical single key or group of keys to cycle through the keys on the screen.
When you turn on the OSK, a keyboard appears on the screen that can be used to move around the screen and enter text. The keyboard will remain on the screen until you close it.
With the OSK open, you can click/tap on the Options key, and then choose the options you want:
- Use click sound - Use this option if you want to hear a sound when you press a key.
- Show keys to make it easier to move around the screen - Use this option if you want the keys to light up as you type.
- Turn on numeric keypad - Use this option to expand the OSK to show a numeric keypad.
- Click on keys - Use this mode if you prefer to click or tap the on-screen keys to enter text.
- Hover over keys - Use this mode if you use a mouse or joystick to point to a key. The characters you point to are entered automatically when you point to them for a specified time.
- Scan through keys - Use this mode if you want the OSK to continually scan the keyboard. Scan mode highlights areas where you can type keyboard characters by pressing a keyboard shortcut, using a switch input device, or using a device that simulates a mouse click.
- Use Text Prediction - Use this option if you want the OSK to suggest words for you as you type so you don't need to type each complete word.
This tutorial will show you different ways on how to turn on or off the On-Screen Keyboard (OSK) in Windows 10.
Contents
- Option One: Turn On or Off On-Screen Keyboard using Keyboard Shortcut
- Option Two: Turn On or Off On-Screen Keyboard in Settings
- Option Three: Turn On On-Screen Keyboard in Control Panel
- Option Four: Turn On On-Screen Keyboard in Start Menu All Apps
- Option Five: Turn On On-Screen Keyboard from Search
- Option Six: Turn On On-Screen Keyboard in Run
- Option Seven: Turn On On-Screen Keyboard on Sign-in Screen
EXAMPLE: On-Screen Keyboard
1 Press the Win + Ctrl + O keys to toggle on or off the On-Screen Keyboard.
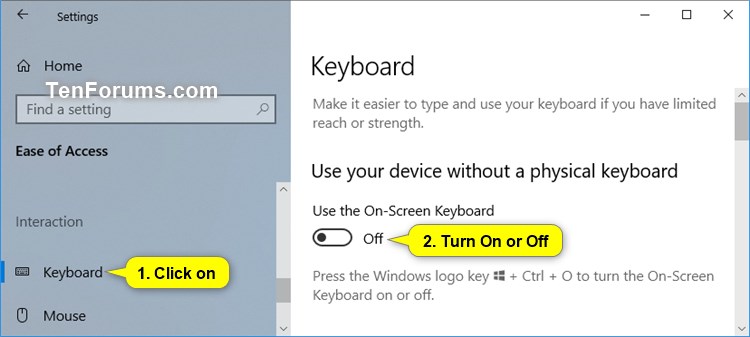
1 Open Settings, and click/tap on the Ease of Access icon.
Starting with Windows 10 build 21359, the Ease of Access category in Settings has been renamed to Accessibility.
2 Click/tap on Keyboard on the left side, and turn on or off (default) Use the On-Screen Keyboard for what you want on the right side. (see screenshot below)
3 When finished, you can close Settings if you like.
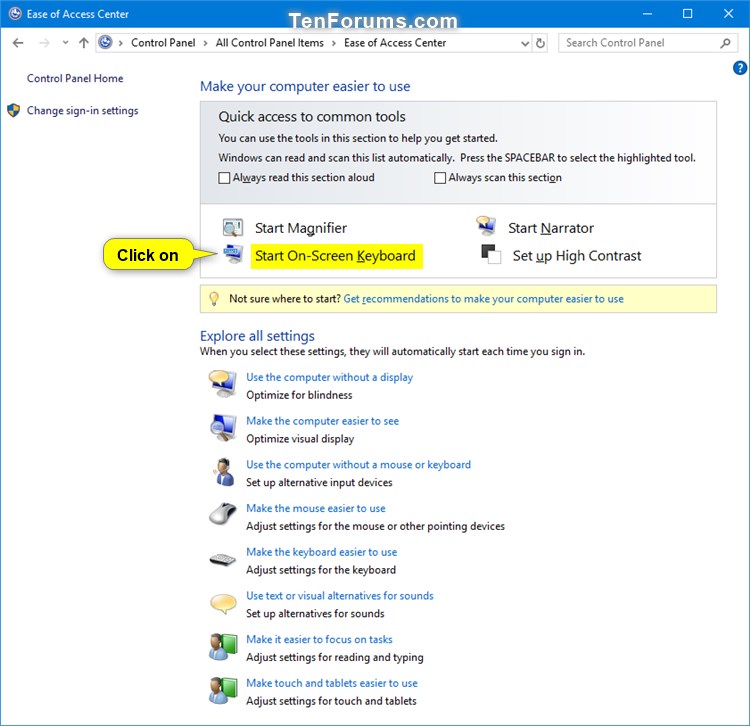
1 Open the Control Panel (icons view), and click/tap on the Ease of Access Center icon.
2 Click/tap on the Start On-Screen Keyboard link at the top. (see screenshot below)
3 When finished, you can close the Ease of Access Center if you like.
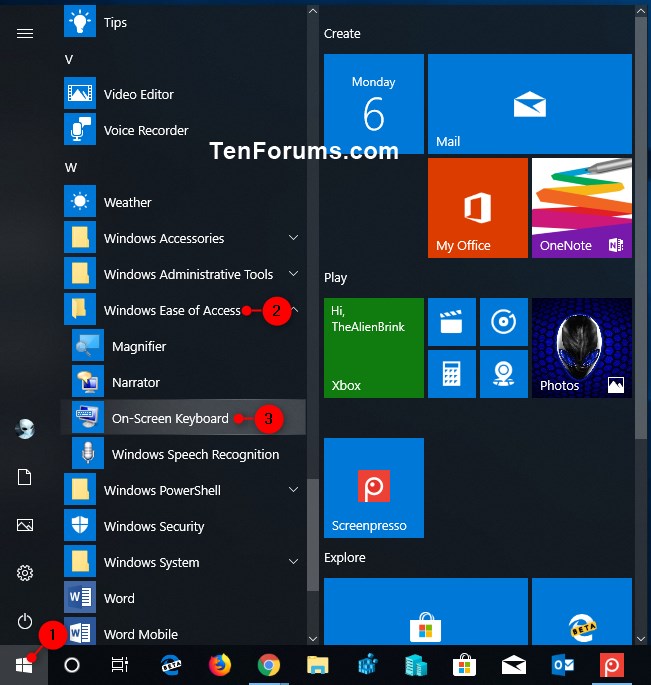
1 Open All Apps in the Start Menu. (see screenshot below)
2 Expand open the Windows Ease of Access folder in All Apps.
3 Click/tap on the On-Screen Keyboard shortcut.
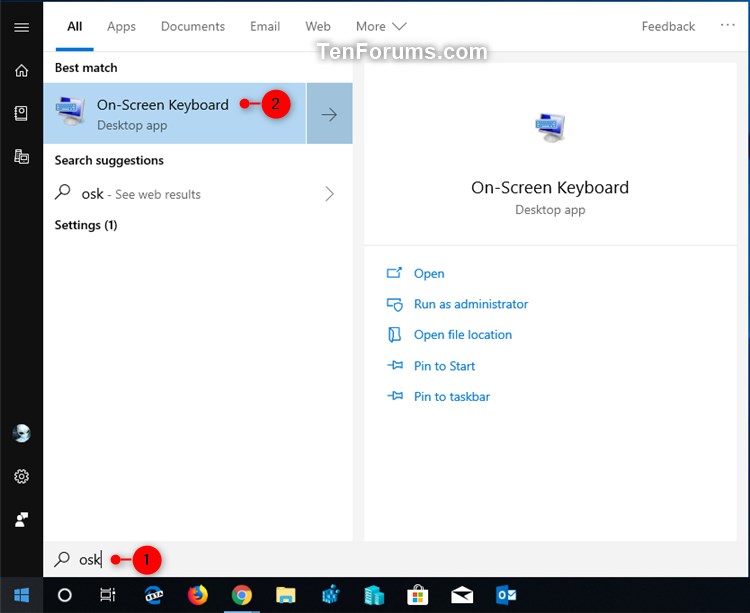
1 Open Search (Win+S), type osk, and click/tap on On-Screen Keyboard in the search results. (see screenshot below)
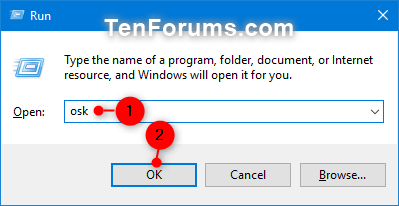
1 Open Run (Win+R), type osk, and press Enter or click/tap on OK . (see screenshot below)
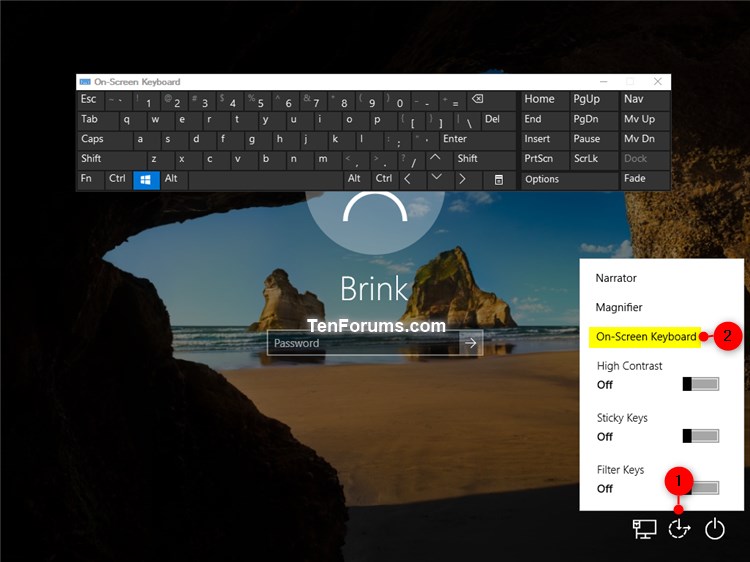
1 While on the sign-in screen, click/tap on the Ease of Access button in the lower-right corner. (see screenshot below)
2 Click/tap on On-Screen Keyboard.
That's it,
Shawn
Turn On or Off On-Screen Keyboard in Windows 10
-
New #1
On my Lenovo tablet I have W10 Home installed. Despite using a BT keyboard and having followed all the steps here and elsewhere the OSK still pops up when I double click on a file to install a programme and again at Startup. As far as I am concerned I have it, the Service and more all OFF.
Thankfully this is just a fall back machine should I need it.
Any help would be appreciated.Last edited by Ex_Brit; 22 Aug 2023 at 16:33.
-
New #2
Hello Peter,
Not sure why for when you double click a file unless OSK was set as the default app by mistake, but you can check below to make sure OSK isn't listed to run at startup.
Add, Delete, Enable, or Disable Startup Items in Windows 10
-
-
-
New #5
It still pops up, strangely when I uninstall something. Why anyone would need a keyboard during that action is beyond reason.
-
New #6
Hello @Brink,
Just in case you want to add a note to the Tutorial.
I noticed that when I perform my weekly OS clean, one command beingcleanmgr.exeamong others, and thenRestartthe computer, it adds back as activeWindowsInternal.ComposableShell.Experiences.TextInput.InputAppinProcesses. This behaviour is weird because I have it disabled inServices, which still shows as disabled inServicesafter theRestart.
I therefore need toEnd Taskfor that particularProcess.
I thought that this might help others.
-

Turn On or Off On-Screen Keyboard in Windows 10
How to Turn On or Off On-Screen Keyboard in Windows 10Published by Shawn BrinkCategory: General Tips
17 Apr 2021

 Quote
Quote
Tutorial Categories

Related Discussions
