

Information
According to Microsoft, Windows Admin Center (WAC) is "a lightweight, browser-based GUI platform and toolset for IT admins to remotely manage Windows Server and Windows 10 machines". As so often with tools intended for enterprise IT management, WAC can also be used by private users to manage a single Windows 10 computer or all Windows 10 computers on home network.
WAC contains Certificate management, Device Manager, Event Viewer, Windows Defender Firewall, local users and groups management, Task Manager (Processes), Registry editor, Task Scheduler, Services and Storage management. In addition, if Hyper-V is enabled and setup, WAC can replace Hyper-V Manager and Virtual Switch Manager offering complete Hyper-V and virtual machine management.
WAC also allows running elevated PowerShell on remotely managed computer, and can connect to it with built-in Remote Desktop client.
WAC is available as stable official release which at the moment is version 1804.25, and as Insider Preview version. WAC is free to download and use and can be used in all editions of Windows 10.
For more details about Windows Admin Center, see:
- Windows Admin Center | Microsoft Docs
- Windows Admin Center Overview | Microsoft Docs
- Announcing Windows Admin Center Insider Preview 1807 | Windows 10 Forums
This tutorial will show how to install and use WAC on Windows 10 computers in a workgroup. Regardless if you only have one laptop or a fleet of Windows 10 machines on your home network and workgroup, I sincerely recommend using WAC. It is Windows 10 PC management on steroids
Note
Please notice: Windows Admin Center can only be installed on Windows 10 version 1709 or later. Equally, remote management is only available on remote computers running version 1709 or later.
WAC showing computer overview:
(Click to open in pop-up, click pop-up twice to enlarge.)
Part One: Prerequisites Part Two: Install Windows Admin Center Part Three: Add Windows 10 Computers to WAC Part Four: Computer Overview Part Five: Certificate Management Part Six: Device Manager Part Seven: Event Viewer Part Eight: Windows Defender Firewall Part Nine: Local Users & Groups Part Ten: PowerShell Part Eleven: Processes (Task Manager) Part Twelwe: Registry Editor Part Thirteen: Remote Desktop Part Fourteen: Task Scheduler Part Fifteen: Services Part Sixteen: Storage Part Seventeen: Hyper-V
WAC is self-explanatory and quite easy to understand and use once installed and set up. Therefore, tutorial will cover installation and setup, parts One, Two and Three more detailed but covers only basics of parts Four through Seventeen.
In case you will have any questions, we are happy to answer them. Just post in this thread.
Notice that you can click / tap screenshots to open them in a pop-up, and click / tap again to enlarge them, click again to enlarge more. All screenshots from WAC Insider Preview version 1806.01002.
1.1) Windows Remote Management service (WinRM) must be running for WAC to work. Start Services (WIN + R, type Services, hit Enter), browse to WinRM service, right click it and select Properties.
1.2) Set WinRM Startup type to Automatic, click Start, click OK:
Notice that if Start button is greyed out, WinRM is already running. Just set start to Automatic and click OK.
1.3) Windows by default has an empty TrustedHosts list, a list that contains those remote computers (hosts) that you can remotely manage from a client without authentication. WAC is a remote management client running on localhost (127.0.0.1) and needs permission to connect to computers it manages, even when managed computer is the same where WAC is running.
Open an elevated PowerShell and enter following command to see your current TrustedHosts list:
Get-Item WSMan:\localhost\Client\TrustedHosts
Trusted computers (or domains) are listed under Value. List is as mentioned empty by default:
1.4) If the list is empty, add your computer to it with following command in elevated PowerShell, replacing ComputerName with actual NetBIOS name of your computer and when asked, press Y and Enter to confirm:
Set-Item WSMan:\localhost\Client\TrustedHosts -Value 'ComputerName'
You can add multiple computers by separating them with comma:
Set-Item WSMan:\localhost\Client\TrustedHosts -Value 'Computer1,Computer2,Computer3'
Alternatively, if you so prefer, you can use an asterisk (*) to trust all hosts:
Set-Item WSMan:\localhost\Client\TrustedHosts -Value '*'
1.5) Whenever you use Set-Item cmdlet to add trusted hosts, it overwrites previous list. In case your TrustedHosts already contains some hosts you do not want to remove from list, you can append the list in elevated PowerShell by first reading current list to a variable, then adding new hosts to said variable, and finally writing the variable content as new TrustedHost list.
Read current TrustedHosts list to variable, for instance $TrustedHosts:
$TrustedHosts=(get-item WSMan:\localhost\Client\TrustedHosts).value
Append list:
$TrustedHosts+=",NewHost1,NewHost2,NewHost3"
Notice that because comma separates hosts on the list, you must add a comma in the beginning of hosts you are adding to separate first newly added host from last on current list.
Finally, tell system to use contents of variable $TrustedHosts as TrustedHosts list:
Set-Item WSMan:\localhost\Client\TrustedHosts -Value $TrustedHosts
In screenshot I first checked my TrustedHosts list (#1), then appended it with two new hosts / computers as told above (#2), and when done checked the list once again (#3), being satisfied that list was appended exactly as I wanted:
Tip
TrustedHosts list can also be enabled and edited in Group Policy Editor (not available in Home and Single Language editions):
Computer Configuration > Administrative Templates > Windows Components > Windows Remote Management (WinRM) > WInRM Client > Trusted Hosts
1.6) In elevated PowerShell, add this registry entry (exactly as written):
REG ADD HKLM\SOFTWARE\Microsoft\Windows\CurrentVersion\Policies\System /v LocalAccountTokenFilterPolicy /t REG_DWORD /d 1
Notice: the above is a single line command, although shown as two lines in some forum skins. Copy full command and paste in PS.
1.7) Still in elevated PS, add a new firewall rule with following command:
Set-NetFirewallRule -Name WINRM-HTTP-In-TCP -RemoteAddress Any
1.8) Especially if you intend to manage multiple computers with WAC, rename all computers with a to you logical name (tutorial), and set network location to Private (tutorial).
2.1) Download WAC:
Download
Select WAC Insider Preview (#1 in screenshot) or latest general release (#2):
If downloading WAC Insider Preview, select Additional downloads > Windows Admin Center:
Version 1809 officially released today, September 20, 2018:
Tweet
— Twitter API (@user) View on Twitter
At the moment there is no preview version available.
Geeks, do not forget that although WAC is designed for server management, it works as well in normal home or business workgroup based network. I use it to manage my home network computers.
WAC is an excellent management tool even if you only have one PC.
WAC is very small, under 50 MB, and takes no resources when not running.
2.2) Run the installer. If you already modified the TrustedHosts list as told in steps 1.3 through 1.5, be sure to unselect the preset selection in Configure Gateway Endpoint prompt, highlighted yellow in screenshot:
If you leave it selected, TrustedHosts list will be reset to '*', all hosts trusted.
In same prompt, leave the default port number (6516) as it is.
2.3) Last prompt in installer shows example of a certificate which WAC requires. When starting WAC first time, you might be prompted for this. In that case, be sure to select Windows Admin Center Client:
2.4) WAC can be found and run from Start > W > Windows Admin Center
3.1) Run WAC. It opens in your default browser using secure URL https://localhost:6516/. Your computer will be added automatically, subject to WinRM and TrustedHosts being correctly configured as told in Part One:
3.2) Click the computer name, click Yes and accept possible UAC prompt to start managing it:
3.3) Overview of your computer will be shown:
3.4) To add other computers on your network to WAC, you must configure WinRM and TrustedHosts on each of them as told in Part One. On TrustedHosts list, use either '*' for all hosts, or NetBIOS (computer) name of the computer to be used to manage other computers, and the NetBIOS name of the managed computers.
For instance, if you will use computer MyMainDesktop to remotely manage computers MyLaptop and MyGamingRig, TrustedHosts list on all computers should be set to all hosts '*' or to contain at least both managing computer MyMainDesktop and all managed computers MyLaptop and MyGamingRig:
Set-Item WSMan:\localhost\Client\TrustedHosts -Value '*'
--OR --
Set-Item WSMan:\localhost\Client\TrustedHosts -Value 'MyMainDesktop,MyLaptop,MyGamingRig
3.5) Go back to Admin Center by clicking Windows Admin Center top left, then click Add:
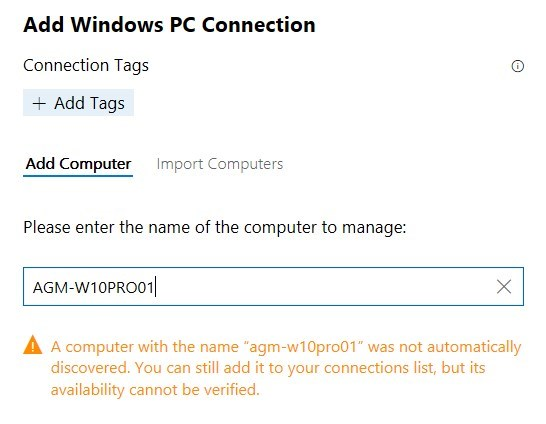
3.6) Select Add Windows PC connection:
3.7) Enter the computer name you want to add to WAC. If computer is online and correctly configured, you will get notified that it was found. Click Submit button on bottom right of the page:
3.8) If computer you are adding is offline or not configured correctly, it is not found:
3.9) Troubleshooting:
If computer is not found, check that it is on and online. If yes, check that WinRM service is running and TrustedHosts list contains all hosts '*' or the NetBIOS names of both computer you are using to manage it, and its own computer name.
If this does not help, computer is still not discovered, install WAC (Part Two) on target computer and run it once, connecting to local computer (step 3.1). Close WAC on target computer and try connecting from your management computer.
Last but not least, if connection cannot be established after above steps, set following additional services on target computer to start automatically and start them:
- Remote Access Auto Connection Manager
- Remote Access Connection Manager
- Remote Procedure Call (RPC)
- Remote Procedure Call (RPC) Locator
- Remote Registry
Restart target computer, check that WinRM and above mentioned additional services are running and try again.
4.1) Computer Overview shows information about the computer in question.
The top pane:
4.2) Using buttons on top, you can restart or shutdown computer, edit its ID (NetBIOS name) and edit some Settings:
4.3) Lower pane shows detailed information about CPU, Memory, all connected network adapters, and all present disks.
5.1) Selecting Certificates from navigation pane on left, you to check all present certificates and events related to them:
5.2) You can browse, export and renew certificates:
6.1) Select Devices on navigation pane to open Device Manager. It has not all functions of original Device Manager, for instance you cannot enable or disable power options (WOL and such). Anyway, you can enable and disable devices, update drivers and see very detailed device and driver information:
7.1) Selecting Events opens Event Viewer:
8.1) Select Firewall to get full control of Windows Defender Firewall:
8.2) You can add, edit and remove all Firewall rules:
9.1) In Local Users & Groups you can add and remove users and change user passwords:
9.2) To change user account type, select a user, Manage Membership and add / remove groups:
10.1) Option PowerShell is only available on navigation pane when managing remote hosts:
10.2) PowerShell in WAC is elevated. You can run all PowerShell cmdlets and commands in it as if you were using PowerShell directly on remote host.
11.1) Processes will show a huge amount of data from any process currently running in Windows:
12.1) Select Registry to get full access to Windows Registry Editor:
13.1) Remote Desktop option on navigation pane is only available when managing remote hosts and should allow Remote Desktop connection to remote host.
I've used WAC and its predecessor Project Honolulu for months now and never got WAC Remote Desktop to work, it being the only non-functioning part of WAC I have found.
When it connects, it only shows remote host's desktop at the moment connection was made and then freezes completely. Usually it does not work at all.
New WAC Insider Preview version 1807, released today July 18th 2018, has fixed Remote Desktop issue. It is now working as it should:
14.1) Navigation pane option Scheduled Tasks completely replaces traditional Task Scheduler, being in my subjective opinion, in addition to Hyper-V management, the best part of WAC:
14.2) Notice that I am using the Insider Preview version of WAC. Some task functions might not be available in latest official version.
15.1) Services will show all present services:
15.2) It allows you to disable and enable services, edit them and set recovery mode:
16.1) Storage effectively replaces Disk Management. It allows full control of all present physical and virtual disks:
]
17.1) Last two items on navigation pane, Virtual Machines and Virtual Switches are only shown if Hyper-V is enabled and set up.
Hyper-V Management with WAC is such a wide topic it requires its own tutorial, I will do it in near future.
Bug: Regardless if you select Dynamic Memory or not, virtual machines will be created with dynamic RAM. This selection has no effect:
WAC really makes Hyper-V Management easy!
That's it geeks. Post your questions about WAC in this thread.
Kari
Windows Admin Center - Centrally manage all your Windows 10 PCs
-
New #1
Thanks!
The configuration process seems to be pretty much the same as for Hyper-V Remote. But this is a really cool addition, as it taps remotely into pretty much all Windows remote enabled services.
-
-
-
New #4
I've edited Part 13 - Remote Desktop.
WAC Insider Preview version 1807 released today finally fixed Remote Desktop. It works now perfectly, as it should.
Kari
-
New #5
Version 1809 officially released today:
Tweet
— Twitter API (@user) View on Twitter
At the moment there is no preview version available.
Geeks, do not forget that although WAC is designed for server management, it works as well in normal home or business workgroup based network. I use it to manage my home network computers.
WAC is also excellent management tool even if you only have one PC.
Kari
-
New #6
I am going to try this. One question - I presume that a running hyper-V vm is the same as a remote pc ie you just enter its name in step 3.7?
-
New #7
You can add virtual machines exactly as physical ones, as long as virtual machines belong to same subnet (are not using Default Switch), and you've done prerequisites on each VM as told in Part One.
For VM management, you do not need to add virtual machines to WAC management panel, WAC will automatically add all your existing Hyper-V virtual machines and existing virtual switches. As soon as you start WAC, you can access them from navigation pane:

(Click to enlarge.)
When not adding VM to WAC management, there's no issues in using Default Switch. All VMs can be managed, edited and run selecting Virtual Machines on navigation pane:

Kari
-
-
-
Windows Admin Center - Centrally manage all your Windows 10 PCs
How to use Windows Admin Center for centralized Windows 10 computer managementPublished by Kari "Kalsarikänni" FinnCategory: General Tips
04 Oct 2018


 Quote
Quote

Tutorial Categories

Related Discussions
