

How to Enable or Disable Dimmed Secure Desktop for UAC prompt in Windows
When User Account Control (UAC) is enabled, Windows prompts for consent or prompts for credentials of a valid local administrator account before starting a program or task that requires a full administrator access token. This prompt ensures that no malicious software can be silently installed or run.
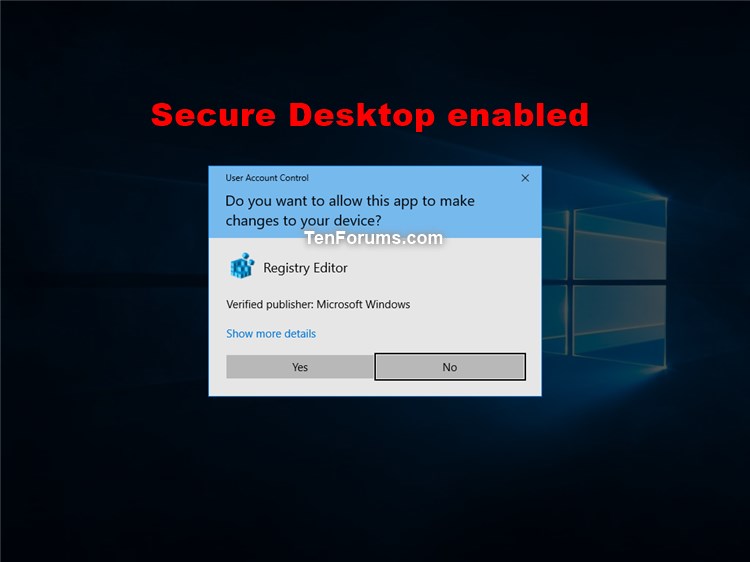
With the Always notify or Default UAC setting enabled, your desktop will be switched to the dimmed secure desktop when you get an elevation request by the User Account Control (UAC) prompt.
A user that is a member of the Administrators group can log on, browse the Web, and read e-mail while using a standard user access token. When the administrator needs to perform a task that requires the administrator access token, Windows 10 automatically prompts the user for Y/N approval. This prompt is called an elevation prompt for UAC consent prompt.
The user experience for standard users is different from that of administrators in Admin Approval Mode. The recommended and more secure method of running Windows 10 is to make your primary user account a standard user account. Running as a standard user helps to maximize security for a managed environment. With the built-in UAC elevation component, standard users can easily perform an administrative task by entering valid credentials for a local administrator account. The default, built-in UAC elevation component for standard users is the UAC credential prompt.
See also: How User Account Control works (Windows 10) | Microsoft Docs
The User Account Control: Switch to the secure desktop when prompting for elevation local security policy determines whether the UAC prompt is displayed on the interactive user's desktop or the dimmed secure desktop (default).
- If enabled (default), all elevation requests go to the secure desktop regardless of prompt behavior policy settings for administrators and standard users.
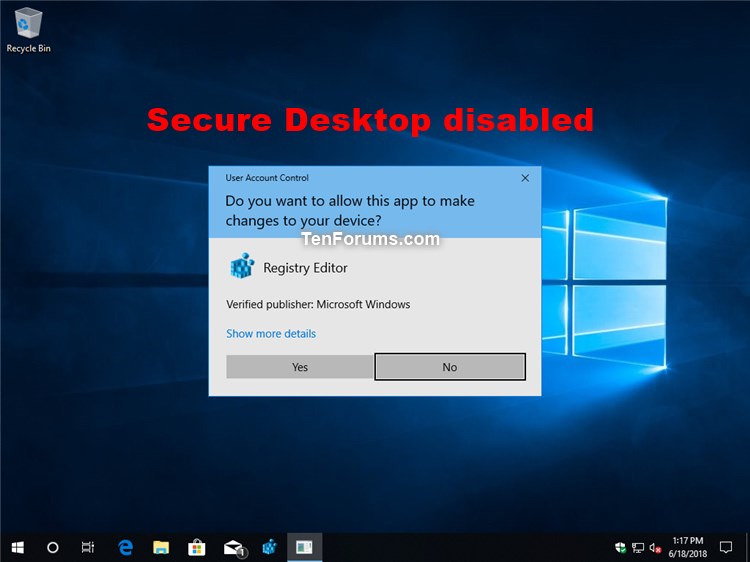
- If disabled, all elevation requests go to the interactive user's desktop. Prompt behavior policy settings for administrators and standard users are used.
This tutorial will show you how to enable or disable the User Account Control (UAC) prompt displaying on the dimmed secure desktop for all users in Windows 7, Windows 8, or Windows 10.
You must be signed in as an administrator to enable or disable the dimmed Secure Desktop for UAC prompt.
]If you disable the secure desktop, other apps might be able to interfere with the visual appearance of the UAC dialog box. This is a security risk, especially if there's malware on your PC.
Contents
- Option One: Turn On or Off Dimmed Secure Desktop for UAC prompt in UAC Settings
- Option Two: Enable or Disable Dimmed Secure Desktop for UAC prompt in Local Security Policy
- Option Three: Enable or Disable Dimmed Secure Desktop for UAC prompt using a REG file
EXAMPLE: UAC prompt on dimmed Secure Desktop enabled and disabled
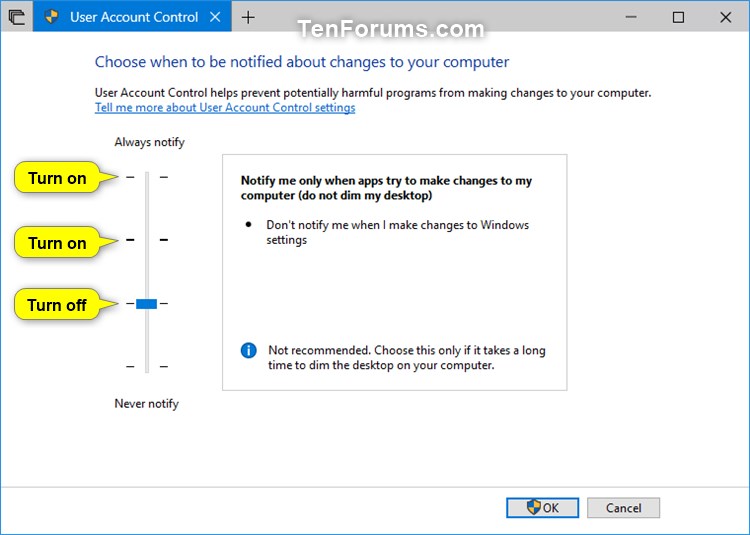
1 Change your User Account Control Settings to the level you want below: (see screenshot below)
A) Always notify (turn on secure desktop)
OR
B) Notify me only when apps try to make changes to my computer (default - turn on secure desktop)
OR
C) Notify me only when apps try to make changes to my computer (don't dim my desktop) (turn off secure desktop)
The Local Security Policy is only available in the Windows 7/8/10 Pro, Windows 7/8/10 Enterprise, and Windows 10 Education editions.
All editions can use Option Three below.
If disabled, this option will override Option One without affecting the UAC level setting.
1 Open the Local Security Policy (secpol.msc).
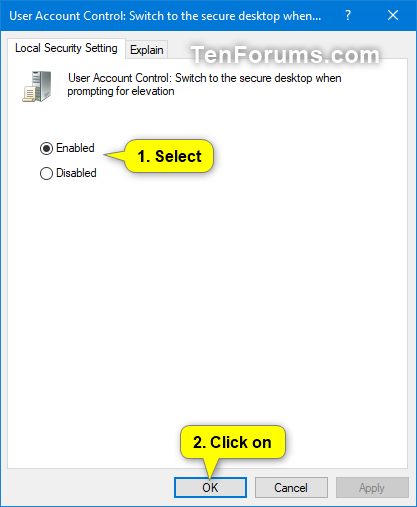
2 Expand open Local Policies and Security Options in the left pane of Local Security Policy, and double click/tap on the User Account Control: Switch to the secure desktop with prompting for elevation policy to edit it. (see screenshot below)
3 Do step 4 (enable) or step 5 (disable) below for what you would like to do.
This is the default setting.
A) Select (dot) Enabled, click/tap on OK, and go to step 6 below. (see screenshot below)
6 When finished, close the Local Security Policy window if you like.
If disabled, this option will override Option One without affecting the UAC level setting.
The downloadable .reg files below will modify the DWORD value in the registry key below.
HKEY_LOCAL_MACHINE\SOFTWARE\Microsoft\Windows\CurrentVersion\Policies\System
PromptOnSecureDesktop DWORD
0 = Disable
1 = Enable
1 Do step 2 (enable) or step 3 (disable) below for what you would like to do.
This is the default setting.
A) Click/tap on the Download button below to download the file below, and go to step 4 below.
Enable_secure_desktop_for_UAC_prompt.reg
Download
A) Click/tap on the Download button below to download the file below, and go to step 4 below.
Disable_secure_desktop_for_UAC_prompt.reg
Download
4 Save the .reg file to your desktop.
5 Double click/tap on the downloaded .reg file to merge it.
6 When prompted, click/tap on Run, Yes (UAC), Yes, and OK to approve the merge.
7 You can now delete the downloaded .reg file if you like.
That's it,
Shawn
Related Tutorials
- How to Enable or Disable User Account Control (UAC) in Windows
- How to Enable or Disable User Account Control (UAC) prompt for Built-in Administrator in Windows
- How to Change User Account Control (UAC) Settings in Windows 10
- How to Change User Account Control (UAC) prompt Behavior for Administrators in Windows
- How to Change User Account Control (UAC) prompt Behavior for Standard Users in Windows
- How to Hide or Show Administrators in UAC prompt for Standard Users in Windows
- How to Enable or Disable Ctrl+Alt+Delete Secure Desktop for UAC prompt in Windows
Enable or Disable Dimmed Secure Desktop for UAC prompt in Windows
-
New #1
It was very helpful to learn that the type of prompt (approval type or credentials type)
hinges on user account type.
>"Always notify or Default UAC setting" Alternative references to same setting? IF so, then you should add that the next lower setting also gets dimmed screen. (Yes I know, indicated in a screen shot elsewhere in the tutorial.)
Enable or Disable Dimmed Secure Desktop for UAC prompt in Windows
How to Enable or Disable Dimmed Secure Desktop for UAC prompt in WindowsPublished by Shawn BrinkCategory: User Accounts
21 Sep 2020


 Quote
QuoteTutorial Categories

Related Discussions
