

How to Change Text Size in Windows 10
Starting with Windows 10 build 17692, the ability to increase text size across the system is back and better than ever. You can use a new setting called Make everything bigger with a slider that will adjust text size across the system, win32 (desktop) apps, and UWP (Store) apps.
That means you can now make text bigger in Start menu, File Explorer, Settings, etc., without having to change the overall DPI scaling level of your system.
This tutorial will show you how to quickly change the text size across the system for your account in Windows 10.
Here's How:
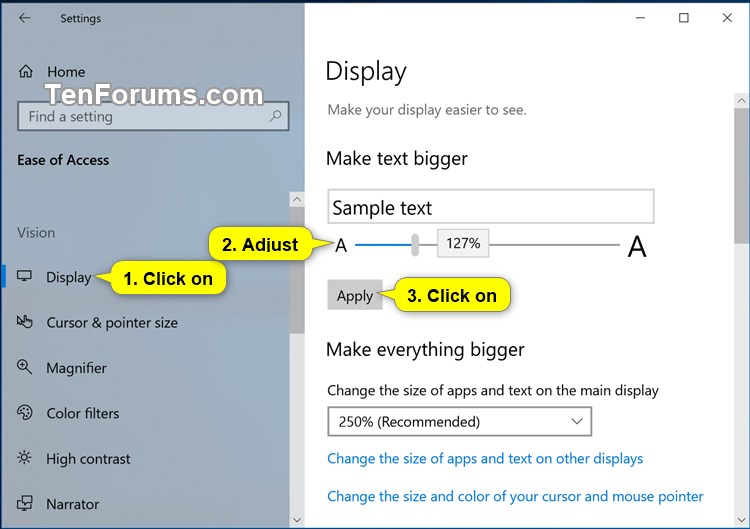
1 Open Settings, and click/tap on the Ease of Access icon.
Starting with Windows 10 build 21359, the Ease of Access category in Settings has been renamed to Accessibility.
2 Click/tap on Display on the left side. (see screenshot below)
3 Adjust the Make text bigger slider to the size you want on the right side.
You will see a preview of the selected text size above the slider.
4 When you have the slider adjusted to the text size you want, click/tap on Apply.
5 You can now close Settings if you like.
That's it,
Shawn
Related Tutorials
- How to Change the Default System Font in Windows 10
- How to Change your DPI Scaling Level for Displays in Windows 10
- How to Change Screen Resolution of Displays in Windows 10
- How to Change Text Size for Icons in Windows 10
- How to Change Text Size for Menus in Windows 10
- How to Change Text Size for Message Boxes in Windows 10
- How to Change Text Size for Title Bars in Windows 10
- How to Change Text Size for Tooltips in Windows 10
- How to Change Window Text Color in Windows 10
- How to Change Highlighted Text Color in Windows 10
- How to Change Font Size for Windows Terminal Profile in Windows 10
Change Text Size in Windows 10
-
New #1
I hope this comes to be a minor feature update between consumer builds. I know a lot of people this would help.
-
New #2
Nothing happened
Changed to 150% but nothing changed. Restart didn't change it either.
-
New #3
Hello Chuck,
Odd. Just to verify, did you click on the Apply button afterwards?
If so, does increasing it to higher percentage make any difference for you?
-
New #4
Not needed anymore
I found a font size changer. Works great so far. Thanks for the reply.
-
-
New #6
-
New #7
There are many.
Here's one...
Advanced System Font Changer
-
New #8
I think I may try this and change my DPI scaling back to 100%. Wonder if it will look better. The DPI scaling at 120% looks fuzzy at times.
-
-
New #9
I can change most font size, but not in the "Run" dialog (Win+r), is this hard coded?

Change Text Size in Windows 10
How to Change Text Size in Windows 10Published by Shawn BrinkCategory: General Tips
10 May 2021

 Quote
Quote
Tutorial Categories

Related Discussions
