

How to View Wireless Network Signal Strength in Windows 10
The performance of a wireless network connection depends greatly on its signal strength.
This tutorial will show you different ways to view the signal strength of wireless networks in Windows 10.
Contents
- Option One: View Signal Strength of Current Wireless Network Connection from Wireless Network icon on Taskbar
- Option Two: View Signal Strength of Wireless Networks from Available Networks
- Option Three: View Signal Strength of Current Wireless Network Connection in Settings
- Option Four: View Signal Strength of Wireless Network Connection in Settings
- Option Five: View Signal Strength of Wireless Network Connection in Network and Sharing Center
- Option Six: View Signal Strength of Wireless Network Connection in Network Connections
- Option Seven: View Signal Strength Percentage of Wireless Network Connections in Command Prompt
- Option Eight: View Signal Strength Percentage of Current Wireless Network Connection in PowerShell
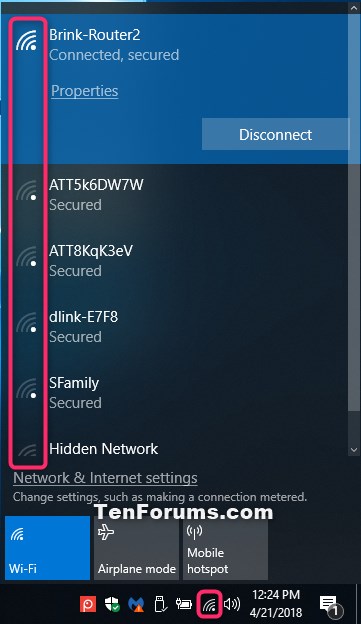
1 Look at the Wireless Network icon on the taskbar to see the signal strength bars of your current wireless network connection. (see screenshot below)
The more bars you have, the stronger the signal strength.
1 Click/tap on the Wireless Network icon on the taskbar, and look at the signal strength bars of each available wireless network connection.
The more bars you have, the stronger the signal strength.
1 Open Settings, and click/tap on the Network & Internet icon.
2 Click/tap on Status on the left side, and look at the signal strength bars of your current wireless network connection under "Network status" on the right side. (see screenshot below)
The more bars you have, the stronger the signal strength.
1 Open Settings, and click/tap on the Network & Internet icon.
2 Click/tap on Wi-Fi on the left side, and look at the signal strength bars of a wireless network connection on the right side. (see screenshot below)
The more bars you have, the stronger the signal strength.
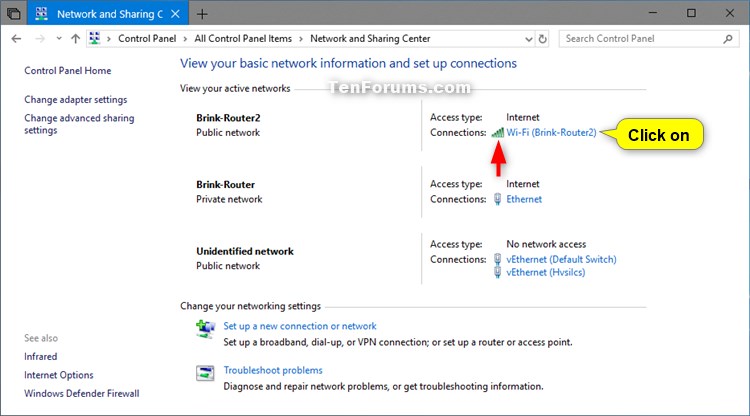
1 Open the Control Panel (icons view), and click/tap on the Network and Sharing Center icon.
2 Look at the signal strength bars of your wireless network connection. (see screenshot below)
The more bars you have, the stronger the signal strength.
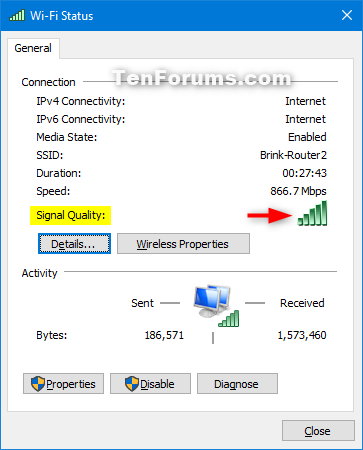
3 If you like, you can also click/tap on the link of your wireless network connection to see its properties. (see screenshot above and below)
The more bars you have, the stronger the signal strength.
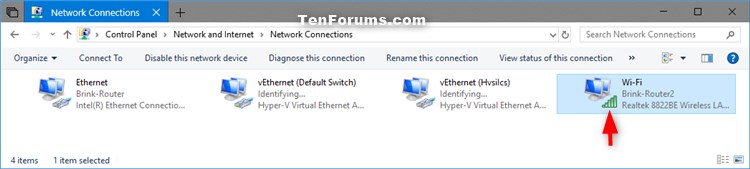
1 Open the Control Panel (icons view), and click/tap on the Network and Sharing Center icon.
2 Click/tap on the Change adapter settings link on the left side. (see screenshot below)
3 Look at the signal strength bars of your wireless network connection. (see screenshot below)
The more bars you have, the stronger the signal strength.
4 If you like, you can also click/tap on the wireless network connection to see its properties. (see screenshot above and below)
The more bars you have, the stronger the signal strength.
1 Open a command prompt.
2 Copy and paste the command below into the command prompt, and press Enter. (see screenshot below)
netsh wlan show interfaces
3 You will now see the Signal strength percentage of your wireless network connections.
The higher the percentage, the stronger the signal strength.
1 Open PowerShell.
2 Copy and paste the command below into PowerShell, and press Enter. (see screenshot below)
(netsh wlan show interfaces) -Match '^\s+Signal' -Replace '^\s+Signal\s+:\s+',''
3 You will now see the Signal strength percentage of your current wireless network connection.
The higher the percentage, the stronger the signal strength.
That's it,
Shawn
Related Tutorials
- How to Add a Wireless Network Profile in Windows 10
- How to Connect To a Wireless Network in Windows 10
- How to See Network Adapter Speed in Windows 10
- How to Create a WLAN Report in Windows 10
- How to Change Preferred Band for Wireless Network Adapter in Windows
View Wireless Network Signal Strength in Windows 10

View Wireless Network Signal Strength in Windows 10
How to View Wireless Network Signal Strength in Windows 10Published by Shawn BrinkCategory: Network & Sharing
06 Mar 2020


Tutorial Categories

Related Discussions
