

How to Enable or Disable Moving User App Data to Non-system Volumes in Windows 10
In Windows 10, users can move their installed Windows apps from the Microsoft Store to another drive.
The default location is This PC on the Windows C: drive (system volume) in the %ProgramFiles%\WindowsApps (apps) and %LocalAppData%\Packages (user app data) folders.
If you like, you can allow or prevent users' app data from moving to another location when an app is moved or installed on another location.
If prevented, all users' app data will stay on the system volume, regardless of where the app is installed.
If allowed, then when an app is moved to a different volume, the users' app data will also move to this volume.
This tutorial will show you how to enable or disable users' app data from moving to another location when an app from the Microsoft Store is moved or installed on another location in Windows 10.
You must be signed in as an administrator to enable or disable moving user app data.
- Option One: Enable or Disable Moving User App Data to Non-system Volumes in Local Group Policy Editor
- Option Two: Enable or Disable Moving User App Data to Non-system Volumes using a REG file
The Local Group Policy Editor is only available in the Windows 10 Pro, Enterprise, and Education editions.
All editions can use Option Two below.
1. Open the Local Group Policy Editor.
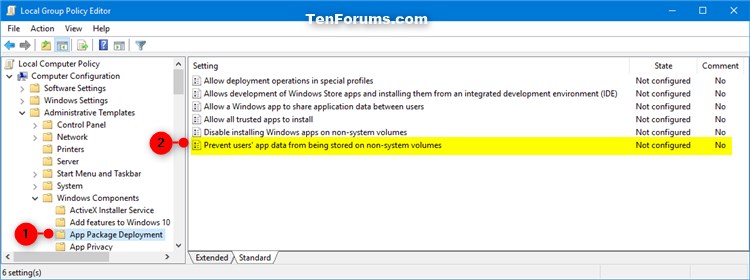
2. In the left pane of Local Group Policy Editor, navigate to the location below. (see screenshot below)
Computer Configuration\Administrative Templates\Windows Components\App Package Deployment
3. In the right pane of App Package Deployment in Local Group Policy Editor, double click/tap on the Prevent users' app data from being stored on non-system volumes policy to edit it. (see screenshot above)
4. Do step 5 (enable) or step 6 (disable) below for what you would like to do.
A) Select (dot) Not Configured or Disabled, click/tap on OK, and go to step 7 below. (see screenshot below)
7. When finished, you can close the Local Group Policy Editor.
8. Restart the computer to apply.
HKEY_LOCAL_MACHINE\SOFTWARE\Policies\Microsoft\Windows\Appx
RestrictAppDataToSystemVolume DWORD
0 or delete = Enable
1 = Disable
1. Do step 2 (enable) or step 3 (disable) below for what you would like to do.
A) Click/tap on the Download button below to download the file below, and go to step 4 below.
Allow_user_app_data_to_be_stored_on_non-system_drives.reg
Download
A) Click/tap on the Download button below to download the file below, and go to step 4 below.
Prevent_user_app_data_to_be_stored_on_non-system_drives.reg
Download
4. Save the .reg file to your desktop.
5. Double click/tap on the downloaded .reg file to merge it.
6. When prompted, click/tap on Run, OK (UAC), Yes, and OK to approve the merge.
7. Restart the computer to apply.
8. If you like, you can delete the downloaded .reg file if you like.
That's it,
Shawn
Related Tutorials
- How to Move Apps to another Drive in Windows 10
- How to Change Location where New Apps will Install and Save to in Windows 10
- How to Enable or Disable Changing Apps Save Location in Windows 10
Enable or Disable Moving User App Data in Windows 10

Enable or Disable Moving User App Data in Windows 10
How to Enable or Disable Moving User App Data to Non-system Volumes in Windows 10Published by Shawn BrinkCategory: Apps & Features
03 May 2019

Tutorial Categories

Related Discussions
