

How to Enable or Disable Network Adapters in Windows
A network adapter is a computer hardware component that connects a computer to a computer network known as a network connection.
This tutorial will show you different ways to enable or disable a network adapter (NIC) or network connections in Windows 7, Windows 8, and Windows 10.
You must be signed in as an administrator to enable or disable network adapters.
Contents
- Option One: Enable or Disable Network Adapter in Network Connections
- Option Two: Enable or Disable Network Adapter in Device Manager
- Option Three: Enable or Disable Network Adapter using Netsh Command
- Option Four: Enable or Disable Network Adapter using WMIC Command
- Option Five: Enable or Disable Network Adapter in PowerShell
1 Do step 2 (Settings) or step 3 (Control Panel) below for how you would like to open Network Connections.
2 Open Settings, and click/tap on the Network & Internet icon.
This step is only available in Windows 10.
A) Click/tap on Status on the left side, click/tap on Change adapter options on the right side, and go to step 4. (see screenshot below)
3 Open the Control Panel (icons view), and click/tap on the Network and Sharing Center icon.
A) Click/tap on the Change adapter settings link on the left side, and go to step 4. (see screenshot below)
4 Do step 5 (disable) or step 6 (enable) below for what you want to do.
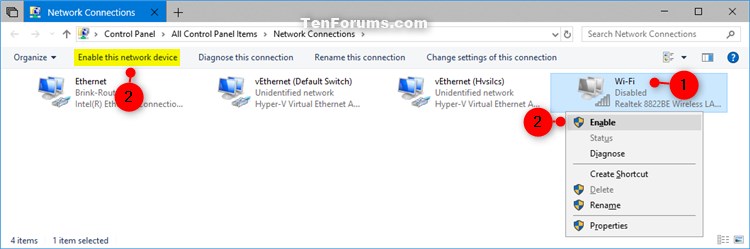
A) Select the network connection (ex: "Wi-Fi") you want to disable, click/tap on Disable this network device in the toolbar, and go to step 7. (see screenshot below)
OR
B) Right click or press and hold on the network connection (ex: "Wi-Fi") you want to disable, click/tap on Disable, and go to step 7.
A) Click/tap on the disabled network connection (ex: "Wi-Fi") you want to enable, and go to step 7. (see screenshot below)
OR
B) Select the disabled network connection (ex: "Wi-Fi") you want to enable, click/tap on Enable this network device in the toolbar, and go to step 7.
OR
C) Right click or press and hold on the disabled network connection (ex: "Wi-Fi") you want to enable, click/tap on Enable, and go to step 7.
7 When finished, you can close Network Connections and Network and Sharing Center if you like.
1 Open Device Manager.
2 Do step 3 (disable) or step 4 (enable) below for what you want to do.
A) Expand open Network adapters, right click or press and hold on the network adapter you want to disable, and click/tap on Disable device. (see screenshot below)
B) Click/tap on Yes to confirm, and go to step 5. (see screenshot below)
A) Expand open Network adapters, right click or press and hold on the disabled network adapter you want to enable, click/tap on Enable device, and go to step 5. (see screenshot below)
5 When finished, you can close Device Manager if you like.
1 Open an elevated command prompt.
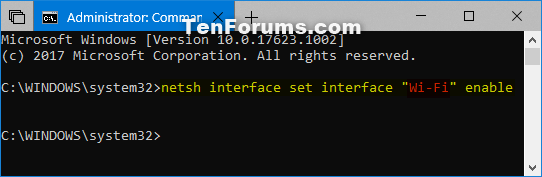
2 Type the command below into the elevated command prompt, and press Enter. Make note of the Interface Name (ex: "Wi-Fi") for the network adapter you want to enable or disable. (see screenshot below)
netsh interface show interface
3 Do step 4 (disable) or step 5 (enable) below for what you want to do.
A) Type the command below into the elevated command prompt, press Enter, and go to step 6.
netsh interface set interface "Interface Name" disable
Substitute Interface Name in the command above with the actual Interface Name (ex: "Wi-Fi") from step 2 you want to disable.
For example:netsh interface set interface "Wi-Fi" disable
A) Type the command below into the elevated command prompt, press Enter, and go to step 6.
netsh interface set interface "Interface Name" enable
Substitute Interface Name in the command above with the actual Interface Name (ex: "Wi-Fi") from step 2 you want to enable.
For example:netsh interface set interface "Wi-Fi" enable
6 When finished, you can close the elevated command prompt if you like.
1 Open an elevated command prompt.
2 Type the command below into the elevated command prompt, and press Enter. Make note of the Index number (ex: 1) for the network adapter you want to enable or disable. (see screenshot below)
wmic nic get name, index
3 Do step 4 (disable) or step 5 (enable) below for what you want to do.
A) Type the command below into the elevated command prompt, press Enter, and go to step 6.
wmic path win32_networkadapter where index=Index number call disable
Substitute Index number in the command above with the actual Index number (ex: 1) from step 2 of the network adapter you want to disable.
For example:wmic path win32_networkadapter where index=1 call disable
A) Type the command below into the elevated command prompt, press Enter, and go to step 6.
wmic path win32_networkadapter where index=Index number call enable
Substitute Index number in the command above with the actual Index number (ex: 1) from step 2 of the network adapter you want to enable.
For example:wmic path win32_networkadapter where index=1 call enable
6 When finished, you can close the elevated command prompt if you like.
This option is only available in Windows 8.1 and Windows 10.
1 Open an elevated PowerShell.
2 Type the command below into the elevated Powershell, and press Enter. Make note of the network adapter Name (ex: "Wi-Fi") you want to enable or disable. (see screenshot below)
To see more usage options for the Get-NetAdapter command, see: Get-NetAdapter | Microsoft Docs
Get-NetAdapter | format-list
3 Do step 4 (disable) or step 5 (enable) below for what you want to do.
To see more usage options for the Disable-NetAdapter command, see: Disable-NetAdapter | Microsoft Docs
A) Type the command below into the elevated Powershell, press Enter, and go to step 6.
Disable-NetAdapter -Name "network adapter name" -Confirm:$false
Substitute network adapter name in the command above with the actual network adapter Name (ex: "Wi-Fi") from step 2 you want to disable.
For example:Disable-NetAdapter -Name "Wi-Fi" -Confirm:$false
To see more usage options for the Enable-NetAdapter command, see: Enable-NetAdapter | Microsoft Docs
A) Type the command below into the elevated Powershell, press Enter, and go to step 6.
Enable-NetAdapter -Name "network adapter name" -Confirm:$false
Substitute network adapter name in the command above with the actual network adapter Name (ex: "Wi-Fi") from step 2 you want to enable.
For example:Enable-NetAdapter -Name "Wi-Fi" -Confirm:$false
6 When finished, you can close the elevated Powershell if you like.
That's it,
Shawn
Related Tutorials
- How to Change Network Adapter Connection Priorities in Windows 10
- How to Cleanup and Reset Network Adapters in Windows 10
- How to See Network Adapter Speed in Windows 10
- How to Rename a Network Adapter in Windows
- How to Create Network Connections Shortcut in Windows 10
- How to Change Preferred Band for Wireless Network Adapter in Windows
Enable or Disable Network Adapters in Windows
-
-
New #2
Hello Aleks, :)
The -Confirm:$false part of the command in Option Five is to not have to confirm y/n to disable the network adapter.
You could use -Confirm:$true instead to have it prompt for confirmation. It will also prompt for confirmation by default if -Confirm:$false or -Confirm:$true is not included in the command.
-
New #3
THANK YOu!

-
-
New #5
I wish there was a feature like Airplane mode when using WiFi to disconnect a hard wired Ethernet connection.
-
New #6
Hello Steve,
I haven't tested this, but you could test changing the network adapter connection priority order using an option in the tutorial below to make Wi-Fi have a higher priority than Ethernet to see if that may do the trick.
Change Network Adapter Connection Priorities in Windows 10

Enable or Disable Network Adapters in Windows
How to Enable or Disable Network Adapters in WindowsPublished by Shawn BrinkCategory: Network & Sharing
06 Mar 2020


 Quote
Quote
Tutorial Categories

Related Discussions
