

Information
Quick Create is a feature in Hyper-V allowing users to setup new virtual machines with a few mouse clicks. At the moment, Quick Create offers users a quick setup of Windows 10 Developer Environment, Windows 10 PRO edition with Visual Studio pre-installed:
This at the moment "default" Quick Create option can change in the future as it allows Microsoft to offer any of their pre-set virtual machines to users.
However, it's easy to change default Online Gallery as it is called to show your own preset virtual machines and quickly set them up from local or online repository:
A repository or Online Gallery is where all pre-set virtual hard disks are located, to be used with Hyper-V Quick Create. When creating a personal VM Online Gallery, first thing to do is to decide if it will for just you personally, or if you want other users on your network or on Internet to access it.
If you are just trying to make creating new Windows virtual machines faster and simpler for your own purposes, you can create repository on any hard disk, internal or external, on your PC, or in case you want all your computers to be able to access it, on a network share or local NAS.
If you want your repository to be accessible over the Internet, you might be tempted to use Microsoft Azure or upload your virtual hard disk files to an FTP server, to a storage space on your own domain, and so on.
This tutorial will show how to setup your own local Virtual Machine repository on local PC or network share. Just to give an example, I will also show how to use Microsoft Azure Blob Storage for an Online Gallery, accessible over the Internet and available to everyone knowing the link.
Once again I ask you to trust me: tutorial might be quite long because I will try to make instructions clear enough for even virtualization and Hyper-V newbies to follow and it might look complicated, but this really is quite easy and relatively fast!
Part One: Copy or upload virtual hard disks to repository Part Two: Make Quick Create configuration files Part Three: Add virtual machines to Quick Create Online Gallery
1.1) When you have selected the location of your repository, copy existing virtual hard disk files you want to be included in your Online Gallery to it. Alternatively, upload virtual hard disks to your online storage.
For instance, if you have set up a VM in Hyper-V called W10PROv1709, and it's VHDX file is called W10PROv1709.vhdx, copy that single VHDX file from folder where it is located to your repository folder. Only the VHDX file is needed.
Notice that Quick Create can only create Generation 2 virtual machines and virtual hard disks (UEFI / GPT). You can't use virtual hard disks from Generation 1 virtual machines.
1.2) In case you want, you can just create a new Generation 2 VM, clean install Windows, shut down VM, copy the VHDX to repository and delete the new VM.
Tip
A practical tip: When creating new VM just to get a VHDX to repository, shut down the VM when OOBE (Windows Welcome) starts showing the region and keyboard layout selection screen.
This way, when you use the VHDX in Quick Create, new VM has Windows fully installed but it does not have any user accounts, allowing you to start from scratch.
This, not creating a user account is especially important in case you allow other users to create virtual machines from your repository.
1.3) If you want to, you can also create new virtual hard disks in Disk Management or using DISKPART. Notice that any virtual hard disk file to be used in Quick Create needs to be partitioned correctly (tutorial). When created, you can then deploy Windows with DISM (tutorial).
My recommendation is to use Hyper-V instead of doing this manually; it makes everything automatically correct.
2.1) Each virtual hard disk in your Online Gallery needs a configuration file. These configuration files are in JSON file format, with extension .json.
2.2) Below a sample Online Gallery configuration file:
Code:{ "images": [ { "name": "Windows 10 PRO EN-GB", "version": "Insider Preview 1803 Build 17618", "locale": "EN-GB", "publisher": "TenForums.com", "lastUpdated": "08-MAR-2018", "description": [ "\n", "Following software has been pre-installed:\n", "- Office 2016 Pro Plus\n", "- Visual Studio Enterprise 2017\n", "- Windows ADK for Windows 10\n" ], "config": { "secureBoot": true }, "requirements": { "diskSpace": 0 }, "disk": { "uri":"file://H:/VHD_Repo/W10PRO_EN-GB.vhdx", "hash":"sha256:CD662725B917EAF17BCE0AE27D62A75D427DAF69DBAB610DE83D4E283EE535FD", "size":8862564352, "archiveRelativePath": "" }, "logo": { "uri":"file://E:/Users/Kari/OneDrive/Pictures/Hyper-V/TF_Logo.jpg", "hash":"sha256:567577C39FFD817A30752FC50004137F85EEB84DD8988C3F6F4EEFC2DDA0BD57", "size":8325, "archiveRelativePath": "" }, "symbol": { "uri":"file://E:/Users/Kari/OneDrive/Pictures/Hyper-V/W10_35.jpg", "hash":"sha256:B64B86CB68A35BBFC642D0725D5C570041DFEF66986C4A77EABFDDCB6D33467D", "size":1913, "archiveRelativePath": "" }, "thumbnail": { "uri":"file://E:/Users/Kari/OneDrive/Pictures/Hyper-V/W10G-TF.jpg", "hash":"sha256:3630837726027EB4E5DCD5259577886ECB7F1EF61332086656D64FF6AAFD4268", "size":39466, "archiveRelativePath": "" }, "details": [ { "name": "Space required", "value": "256 GB" }, { "name": "Additional info", "value": "Boots to OOBE (no users)" } ] } ] }
Download the above sample JSON script: Sample.zip. Remember to unblock the ZIP archive first (tutorial), then extract it (tutorial). ZIP archive contains file Sample.json which can be opened and edited in Notepad or any other plain text / code editor.
I recommend using Code Writer, available free on Store: Code Writer
2.3) Open the extracted JSON file, edit it as you need to. In following steps short instructions for each block. First a screenshot to explain how different blocks affect what's seen in Quick Create interface:
Numbers in screenshot refer to following steps below:
- Step 2.5, VM description and basic information
- Step 2.12, logo image
- Step 2.13, symbol image
- Step 2.14, thumbnail image
- Step 2.15, additional information
2.4) A Hyper-V Online Gallery configuration file starts and ends with curly brackets (black highlight in below sample), followed by label "images" and a colon. Next an opening square bracket (blue highlight) and an opening curly bracket (red highlight), and their closing counterparts at the end of the script:
Code:{ "images": [ { Rest of the script goes here } ] }
2.5) OK. First in script is basic information about your VM / VHDX file. Notice that everything within double quotes ("Everything here") can be whatever information / text you want to show in Quick Create. Be precise and informative. Do notice that every bracket, double quote and comma is important to keep syntax correct:
Code:"name": "Windows 10 PRO EN-GB", "version": "Insider Preview 1803 Build 17618", "locale": "EN-GB", "publisher": "TenForums.com", "lastUpdated": "08-MAR-2018", "description": [ "\n", "Following software has been pre-installed:\n", "- Office 2016 Pro Plus\n", "- Visual Studio Enterprise 2017\n", "- Windows ADK for Windows 10\n" ],
Line breaks (\n) must be added manually after each line of text, otherwise lines will be written in Quick Create without breaks following each other. Line break alone in double quotes ("\n") adds an empty line.
In this sample I have added British English W10 PRO x64 build 17618 virtual hard disk to my VHD repository folder and am creating Quick Create entry for it.
2.6) Enable (true) or disable (false) Secure Boot for this VM:
Code:"config": { "secureBoot": true },
2.7) Minimum space requirement in bytes:
Code:"requirements": { "diskSpace": 0 },
Leaving it to 0 will show no warning. To calculate how much storage space on your default Virtual Hard Disks drive will be required, simply double the maximum size of the dynamically expanding VHDX file and add a few GBs to assure functionality.
An easy "rule of thumb": a VM needs double the size of its maximum VHD size. A VM with a 50 GB virtual hard disk needs 100 GB free storage space on host to function properly.
For instance, if you have created a VM using the default 127 GB dynamically expanding VHDX, although its file size on host after clean installing Windows 10 to VM is only about 10 GB, it might and is allowed to grow to full 127 GB size when more software will be installed and files added. In addition, to run a VM requires an equivalent of its maximum file size (127 GB in this case) free storage space on same drive to expand when used.
Changing the DiskSpace value for instance to 280,000,000,000 bytes would show this warning when user selects this VM in Quick Create:
Notice that you must enter size in bytes without separators:
Code:"requirements": { "diskSpace": 280000000000 },
2.8) Next the most important part, the location of the VHDX file:
Code:"disk": { "uri":"file://H:/VHD_Repo/W10PRO_EN-GB.vhdx", "hash":"sha256:CD662725B917EAF17BCE0AE27D62A75D427DAF69DBAB610DE83D4E283EE535FD", "size":8862564352, "archiveRelativePath": "" },
2.9) The location URI (Universal Resource Identifier), repository where VHDX is stored can be any of the following:
- http://
http://myfilestorage.mysite.com/W10PRx64.vhdx
- https://
https://myfilestorage.mysite.com/W10PRx64.vhdx
- ftp://
ftp://myfilestorage.myFTPServer.com/W10PRx64.vhdx
- file://
file://MyComputer/MyExternalHDD_Storage/VirtualHardDisks/W10PRx64.vhdx
If your VHDX repository folder is called VHDX_Repo on local PC's drive F: and the VHDX file name is W10PRx64.vhdx, the URI would be as follows:
file://F:/VHDX_Repo/W10PRx64.vhdx
Note
Notice that if your URI is a network location like a share on another PC or NAS, you need to use IP plus port number. In most cases port 8080 works, if not consult your NAS manual.
I have a WD MyCloud Mirror NAS using port 8080, my URI would be something like this:
http://192.168.2.106:8080/Public/VHDX_Repo/W10PRx64.vhdx
In case you have access to Azure Blob Storage, the URI would be as follows:
https://STORAGE_ACCOUNT.blob.core.windows.net/RESOURCE_GROUP/FOLDER/FILENAME.vhdx
2.10) An SHA256 hash for the VHDX file is required. You'll get it with an elevated PowerShell, with following command:
Get-FileHash -Path "PATH\FILENAME" -Algorithm SHA256
In screenshot I am getting SHA256 hash for a VHDX file W10 PRO IP x64 EN-GB (Skippy).vhdx in D:\Virtual Hard Disks folder:
(Click to enlarge.)
Double click hash value in PowerShell and press Enter to copy it to Clipboard, paste in your configuration file.
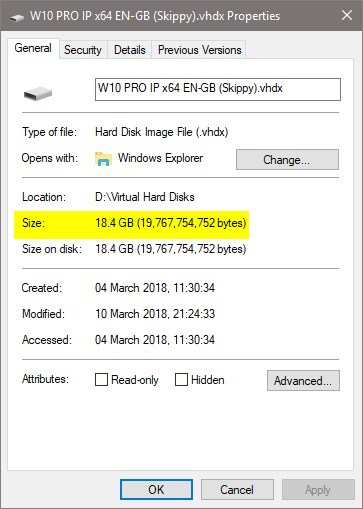
2.11) File size is given in bytes, without separators. You'll find the exact size in bytes by right clicking the VHDX file and selecting Properties:
The size of VHDX shown in above screenshot would be given as 19767754752. In case Properties shows different Size and Size on disk, use Size.
2.12) Logo is a 130 * 30 pixel JPG image. Get SHA256 hash as told above in 2.10, and size as told in 2.11:
Code:"logo": { "uri":"file://E:/Users/Kari/OneDrive/Pictures/Hyper-V/TF_Logo.jpg", "hash":"sha256:567577C39FFD817A30752FC50004137F85EEB84DD8988C3F6F4EEFC2DDA0BD57", "size":8325, "archiveRelativePath": "" },
2.13) Symbol is a 35 * 35 pixel JPG image:
2.14) Thumbnail is a 800 * 450 pixel image:Code:"symbol": { "uri":"file://E:/Users/Kari/OneDrive/Pictures/Hyper-V/W10_35.jpg", "hash":"sha256:B64B86CB68A35BBFC642D0725D5C570041DFEF66986C4A77EABFDDCB6D33467D", "size":1913, "archiveRelativePath": "" },
Code:"thumbnail": { "uri":"file://E:/Users/Kari/OneDrive/Pictures/Hyper-V/W10G-TF.jpg", "hash":"sha256:3630837726027EB4E5DCD5259577886ECB7F1EF61332086656D64FF6AAFD4268", "size":39466, "archiveRelativePath": "" },
2.15) Details shows additional information in Quick Create. For instance, I am too lazy to count the required minimum disk space as in step 2.7 above, using Details block instead:
Code:"details": [ { "name": "Space required", "value": "256 GB" }, { "name": "Additional info", "value": "Boots to OOBE (no users)" } ]
Notice that in each block (steps 2.5 through this step), the closing bracket is always followed by a comma but in last block, like here in Details, the last block ends without comma.
Let's see this again:
Code:"details": [ { "name": "Space required", "value": "256 GB" }, < Here's a comma after the closing bracket { "name": "Additional info", "value": "Boots to OOBE (no users)" } < Last closing bracket in last block, no following comma ]
So, let's say I was not this lazy and had added the minimum space requirement in step 2.7. In that case I wouldn't need to add space requirement here in Details, in which case instead of two pieces of additional information I would only have one.
In that case I would leave the comma away after closing bracket, the Details block being:
Code:"details": [ { "name": "Additional info", "value": "Boots to OOBE (no users)" } < Last closing bracket in last block, no following comma ]
2.16) Save the JSON configuration file naming it as you wish, with extension .json. Notice that you need a JSON file separately for each VM you want to add to Quick Create.
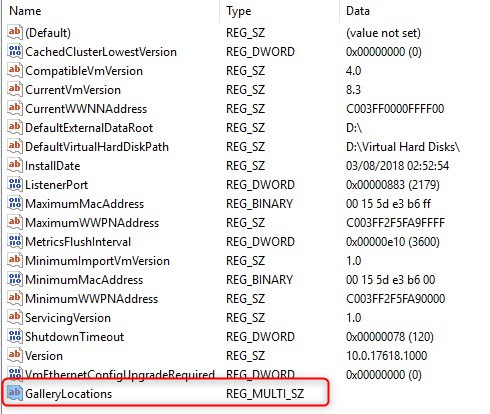
3.1) Open Registry Editor (WIN + R or Cortana, type regedit, hit Enter). Browse to following key:
HKEY_LOCAL_MACHINE\SOFTWARE\Microsoft\Windows NT\CurrentVersion\Virtualization
3.2) Right click the right pane, select New > Multi-String Value:
3.3) Rename the new Multi-String Value as GalleryLocations:
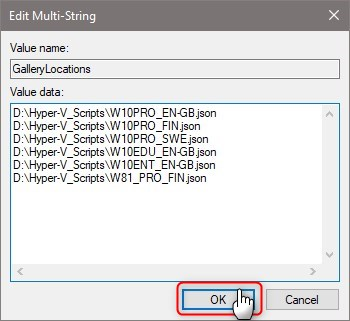
3.4) Double click Multi-String Value GalleryLocations, add all your JSON files, one file in one line, click OK to save:
That's it! You have now created your own Hyper-V Online Gallery and can create new virtual machines with pre-installed Windows with a single mouse click:
Kari
Related Tutorials
Hyper-V - Create Custom Virtual Machine Gallery
-
-
New #2
So...instead of going to hack the registry, could this script be used instead?
Just a thought... :)Code:[string[]]$gallerylocations = ( # Custom images "\\contoso\vmgallerysample\contoso.json", # Official Windows 10 developer images "https://go.microsoft.com/fwlink/?linkid=851584" ) $registrypath = "HKLM:\SOFTWARE\Microsoft\Windows NT\CurrentVersion\Virtualization" Set-ItemProperty -Path $registrypath -Name GalleryLocations -Value $gallerylocations
-
New #3
Thanks!
Yes.
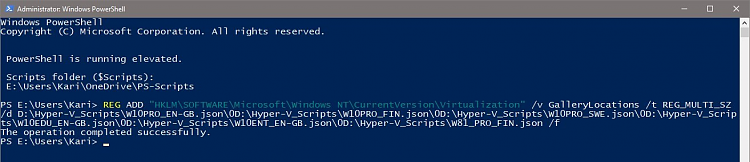
Or, a robust but not as elegant command / script:
This would create value (/v switch) GalleryLocations as Multi-String Value (/t REG_MULTI_SZ) and add configuration files listed after /d switch, in this example all six configuration files shown in screenshots in tutorial. Separator between two configuration files is \0 (Windows default).REG ADD "HKLM\SOFTWARE\Microsoft\Windows NT\CurrentVersion\Virtualization" /v GalleryLocations /t REG_MULTI_SZ /d D:\Hyper-V_Scripts\W10PRO_EN-GB.json\0D:\Hyper-V_Scripts\W10PRO_FIN.json\0D:\Hyper-V_Scripts\W10PRO_SWE.json\0D:\Hyper-V_Scripts\W10EDU_EN-GB.json\0D:\Hyper-V_Scripts\W10ENT_EN-GB.json\0D:\Hyper-V_Scripts\W81_PRO_FIN.json /f
If the GalleryLocations already exists with some configuration files, the switch /f at the end erases them overwriting with new values without prompting user. Without /f, user would be asked if overwrite or not.
Kari
-
New #4
I think we have a suitable coding project candidate here to make things even easier.
Just click, drag and drop, type and commit project. Done!
-
New #5
It looks like the activation for Windows 10 Developer Environment, Windows 10 PRO edition with Visual Studio pre-installed. deactivates after 60 days, according the EULA.
https://windowsdev.azureedge.net/eul...la20151118.pdf
-
Hyper-V - Create Custom Virtual Machine Gallery
How to create a virtual machine repository for Hyper-V Quick CreatePublished by Kari "Kalsarikänni" FinnCategory: Virtualization
19 Sep 2018


 Quote
Quote
Tutorial Categories

Related Discussions
