Add or Remove Empty Recycle Bin Context Menu for Recycle Bin in Windows
The Recycle Bin provides a safety net when deleting files or folders. When you delete any of these items from a hard disk, Windows places it in the Recycle Bin and the Recycle Bin icon changes from empty to full.
If you have multiple hard drives, partitions, or an external hard drive connected to your PC, each location will have its own $Recycle.Bin and Recycle Bin settings. Removable drives, such as USB flash drives and memory cards, will not have a Recycle Bin. Files deleted from removable drives are permanently deleted.
Items in the Recycle Bin still take up hard disk space and can be undeleted or restored back to their original location. When the Recycle Bin of a drive reaches its maximum storage size, Windows will automatically permanently delete (empty) older files in the Recycle Bin location to accommodate the most recently deleted files and folders.
Each user account on the PC will have their own separate Recycle Bin, and will be referenced by their Security Identifier (SID) in each drive's $Recycle.Bin.
When you manually empty the Recycle Bin, all files in the Recycle Bin will be permanently deleted to free up disk space.
This tutorial will show you how to add or remove the default Empty Recycle Bin context menu item of the Recycle Bin for all users in Windows 7, Windows 8, and Windows 10.
Removing the Empty Recycle Bin context menu does not prevent users from using other methods to empty their Recycle Bin.
You must be signed in as an administrator to add or remove this context menu.
EXAMPLE: "Empty Recycle Bin" context menu item for Recycle Bin
Here's How:
1 Press the Win + R keys to open Run, type regedit into Run, and click/tap on OK to open Registry Editor.
2 Navigate to the key below in the left pane of Registry Editor. (see screenshot below)
HKEY_CLASSES_ROOT\CLSID\{645FF040-5081-101B-9F08-00AA002F954E}\shell\empty
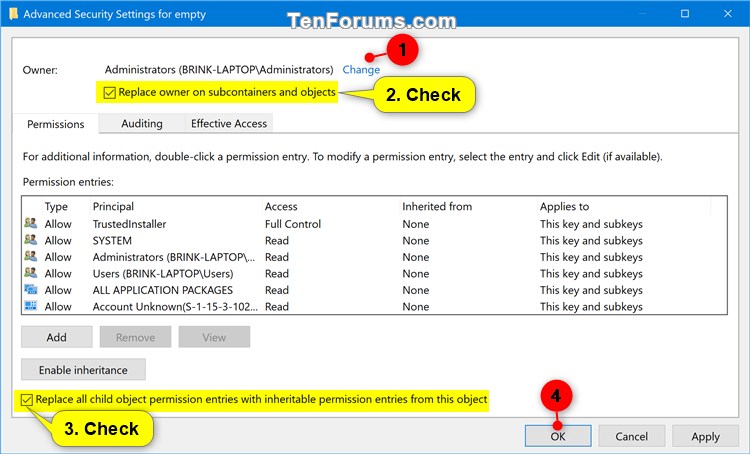
3 Change the owner (click on link) of the empty key in the left pane of Registry Editor to be the Administrators group.
4 While changing the owner, check Replace owner on subcontainers and objects, check Replace all child object permissions entries with inheritable permissions from this object, click/tap on OK, and click/tap on Yes to confirm. (see screenshot below)

5 Set permissions (click on link) of the empty key in the left pane of Registry Editor to Allow the Administrators group Full control.
6 You can now close Registry Editor.
7 Do step 8 (add) or step 9 (remove) below for what you would like to do.
This is the default setting.
A) Click/tap on the Download button below to download the file below, and go to step 10 below.
Add_Empty_Recycle_Bin_context_menu.reg
Download
A) Click/tap on the Download button below to download the file below, and go to step 10 below.
Remove_Empty_Recycle_Bin_context_menu.reg
Download
10 Save the .reg file to your desktop.
11 Double click/tap on the downloaded .reg file to merge it.
12 When prompted, click/tap on Run, Yes (UAC), Yes, and OK to approve the merge.
13 You can now delete the downloaded .reg file if you like.
That's it,
Shawn
Related Tutorials
- How to Empty Recycle Bin in Windows 10
- How to Add Empty Recycle Bin to Context Menu in Windows 10
- How to Add or Remove Properties from Recycle Bin Context Menu in Windows
- How to Customize Delete Confirmation Dialog Prompt Details in Windows
- How to Turn On or Off Recycle Bin Delete Confirmation in Windows 10
- How to Set Recycle Bin to Permanently Delete Files Immediately in Windows 10
- How to Change Maximum Storage Size for Recycle Bin in Windows 10
- How to Add or Remove Recycle Bin in Navigation Pane of File Explorer in Windows 10
- How to Pin Recycle Bin to Taskbar in Windows 10
- How to Add or Remove Recycle Bin Desktop Icon in Windows 10
- How to Fix Corrupted Recycle Bin in Windows
- How to Change the Default Recycle Bin Icon in Windows 10
Remove Empty Recycle Bin from Context Menu of Recycle Bin in Windows

Remove Empty Recycle Bin from Context Menu of Recycle Bin in Windows
Add or Remove Empty Recycle Bin Context Menu for Recycle Bin in WindowsPublished by Shawn BrinkCategory: Customization
17 Mar 2020
Tutorial Categories


Related Discussions


