

How to Change Screen Refresh Rate of a Display in Windows 10
The refresh rate is the number of frames per second your monitor can display. Hertz frequency is used as the measurement at which the screen is redrawn.
Using a high frequency rate will usually give clearer visibility, which results in less strain on your eyes and headaches.
The available refresh rates for a display will depend on the monitor, its driver, and the set screen resolution.
This tutorial will show you how to change the screen refresh rate of each separate display connected to the PC for all users in Windows 10.
Contents
- Option One: Change Screen Refresh Rate of Display in Settings
- Option Two: Change Screen Refresh Rate of Display in NVIDIA Control Panel
- Option Three: Change Screen Refresh Rate of Display in Intel Graphics Control Panel
1 Open Settings, and click/tap on the System icon.
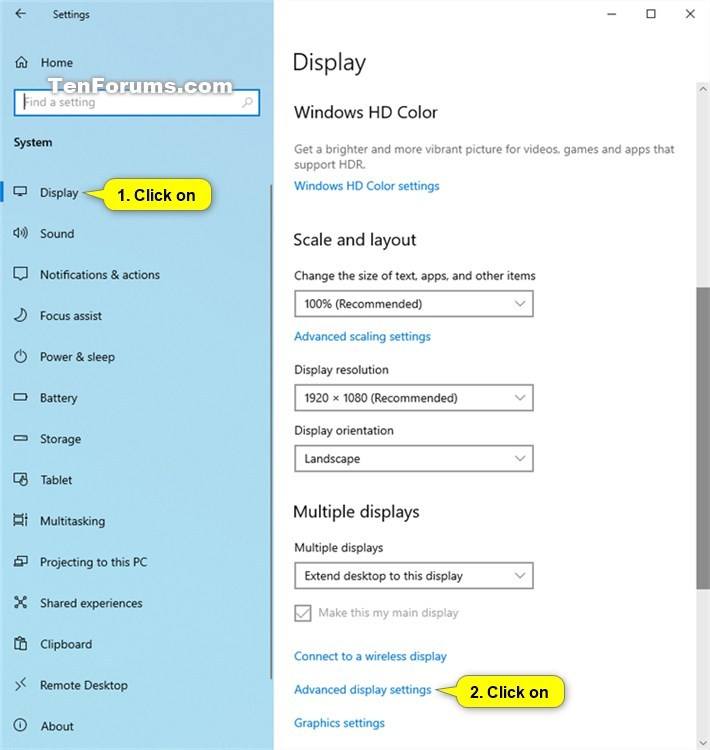
2 Click/tap on Display on the left side, and click/tap on the Advanced display settings link on the right side towards the bottom. (see screenshot below)
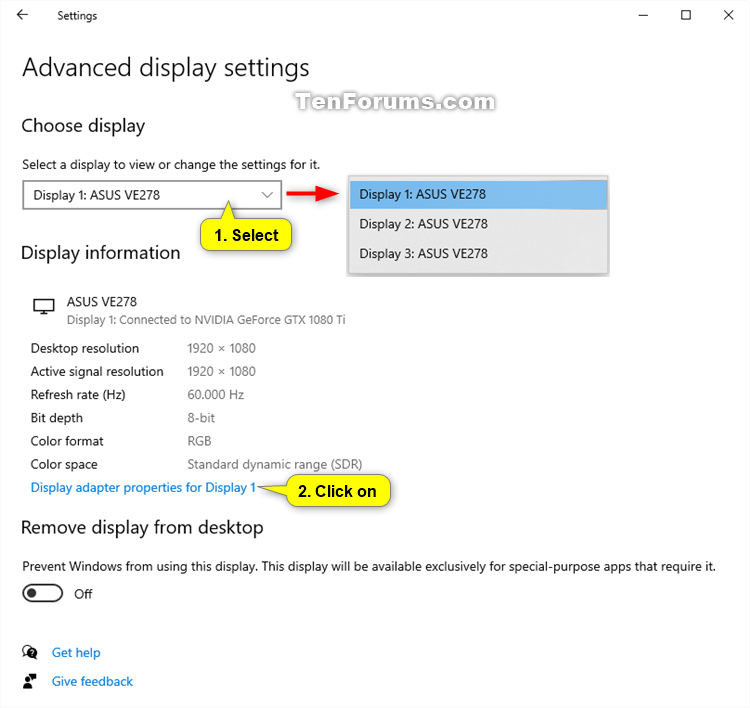
3 Select a display you want to change refresh rate of in the Choose display drop menu, and click/tap on the Display adapter properties for Display # link. (see screenshots below)
Starting with Windows 10 build 20236, you will now be able to change the refresh rate directly in Advanced display settings.
4 Do step 5 (select) or step 6 (display mode) below for how you would like to change the screen refresh rate of the selected display.
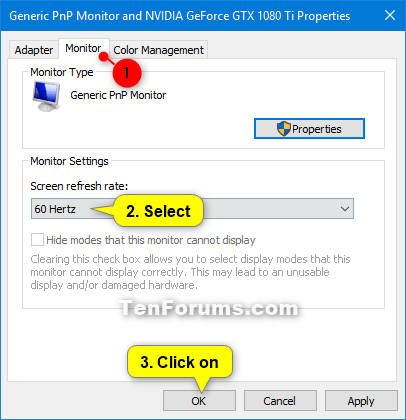
A) Click/tap on the Monitor tab. (see screenshot below)
B) Select a Screen refresh rate in the drop menu you want for the selected display.
C) Click/tap on OK, and go to step 7 below.
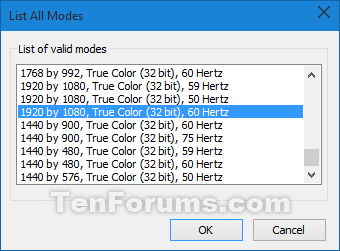
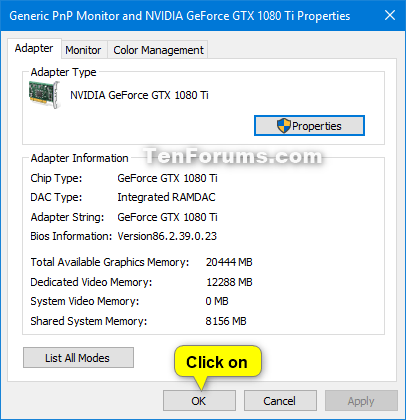
A) In the Adapter tab, click/tap on the List All Modes button. (see screenshot below)
B) Select a display mode you want that has the screen resolution and screen refresh rate you want for the selected display, and click/tap on OK. (see screenshot below)
C) Click/tap on OK, and go to step 7 below. (see screenshot below)
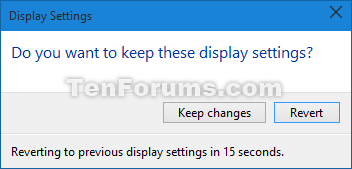
7 If the selected screen refresh rate or display mode looks good to you, click/tap on Keep changes. (see screenshot below)
You will have 15 seconds to select Keep changes or Revert before it will automatically revert back to the previous screen refresh rate or display mode.
This can be handy if the changes prevented you from being able to see this dialog.
8 When finished, you can close Settings if you like.
This option is only available if you have NVIDIA graphics and drivers installed.
1 Open the NVIDIA Control Panel (ex: from desktop context menu or notification icon).
2 Click/tap on the Change resolution link under Display in the left pane. (see screenshot below)
3 Select the display you want to change the refresh rate for under Select the displays you want to use on the right side, select the refresh rate you want for this display in the refresh rate drop menu, and click/tap on Apply. (see screenshot below)
4 Click/tap on Yes in the Apply Changes dialog when prompt to confirm. (see screenshot below)
If needed, your changes will automatically revert in 20 seconds if you wait and do not click/tap on Yes before this time is up.
5 You can now close the NVIDIA Control Panel if you like.
This option is only available if you have Intel graphics and drivers installed.
1 Open the Intel Graphics Control Panel.
2 Click/tap on the Display icon. (see screenshot below)
3 If you have more than one display connected to your computer, select the display you want to change the refresh rate of in the Select Display drop menu. (see screenshot below step 4)
4 Select an available refresh rate you want for this display in the Refresh Rate drop menu, and click/tap on Apply. (see screenshot below)
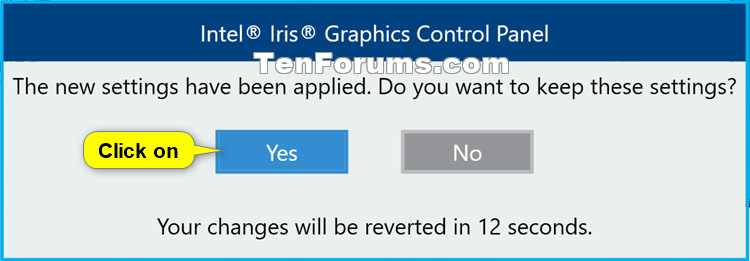
5 Click/tap on Yes to confirm. (see screenshot below)
If needed, your changes will automatically revert in 15 seconds if you wait and do not click/tap on Yes before this time is up.
6 You can now close the Intel Graphics Control Panel if you like.
That's it,
Shawn Brink
Related Tutorials
- How to Change Screen Resolution of a Display in Windows 10
- How to Change your DPI Scaling Level for Displays in Windows 10
- How to Turn On or Off Variable Refresh Rate for Games in Windows 10
- How to Clear and Reset External Display Cache in Windows 10
- How to Change Display Orientation in Windows 10
- How to Remove Display from Desktop in Windows 10
Change Screen Refresh Rate of Display in Windows 10
Change Screen Refresh Rate of Display in Windows 10
How to Change Screen Refresh Rate of a Display in Windows 10Published by Shawn BrinkCategory: Hardware & Drivers
07 Aug 2021


Tutorial Categories

Related Discussions
