

How to Delete Diagnostic Data in Windows 10
Microsoft uses Windows diagnostic data to focus their decisions and efforts to provide you with the most robust and valuable platform possible. By participating in the diagnostic data programs, you have a voice in the operating systems development, improving the overall product experience and quality through your insights.
Starting with Windows 10 build 17093, you can now delete the Windows Diagnostic Data that Microsoft has collected from your device.
The backend cloud system is currently under development and will be available to complete the Delete requests prior to public release of RS4.
This tutorial will show you how to delete diagnostic data that has been collected by Microsoft from your Windows 10 device.
Here's How:
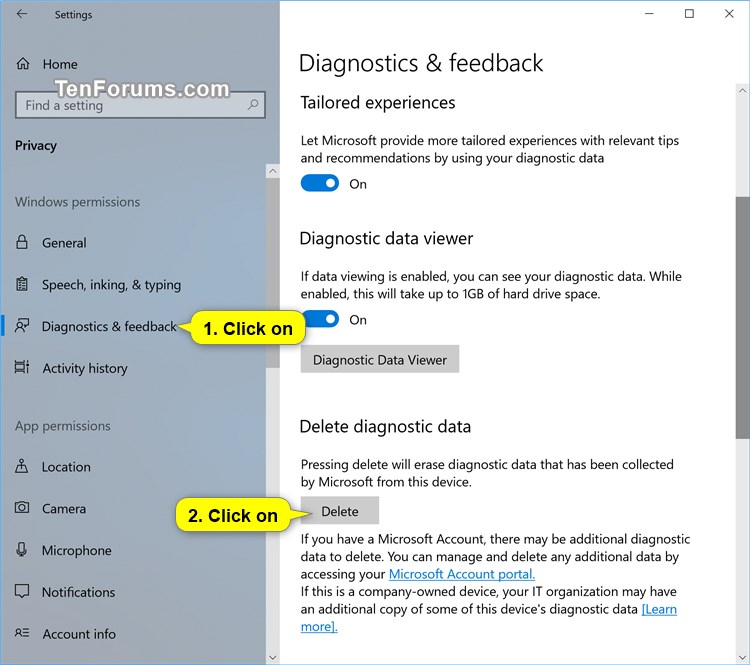
1. Open Settings, and click/tap on the Privacy icon.
2. Click/tap on Diagnostics & feedback on the left side, and click/tap on the Delete button under the Delete diagnostic data section on the right side. (see screenshot below)
3. You will now see a dated Last delete request message appear next to the Delete button indicating the data will be deleted. (see screenshot below)
That's it,
Shawn
Related Tutorials
- How to Enable or Disable Delete Diagnostic Data in Windows 10
- How to Change Diagnostic and Usage Data Settings in Windows 10
- How to Turn On or Off Tailored experiences with diagnostic data in Windows 10
- How to Enable or Disable Diagnostic Data Viewer in Windows 10
- How to Use Microsoft Privacy Dashboard to Manage Your Privacy on the Cloud in Windows 10
- How to Turn On or Off Improve Inking & Typing Recognition in Windows 10
Delete Diagnostic Data in Windows 10
-
New #1
Is it possible to remove the "Last Delete Request" text? I couldn't find it in the registry and disable/enable doesn't work either.
Update: I found what I think is it at this registry key:
Computer\HKEY_LOCAL_MACHINE\SOFTWARE\Microsoft\Windows\CurrentVersion\Diagnostics\DiagTrack\DeviceDeleteRequest
TIL Ctrl+F search in Registry can only find String type registry values. For example it won't find 0x1d7a2d53eaa9876 (this is a windows 64 bit big endian data value for a date) even if you search directly for it.Last edited by yesir360; 05 Sep 2021 at 23:39.

Delete Diagnostic Data in Windows 10
How to Delete Diagnostic Data in Windows 10Published by Shawn BrinkCategory: General Tips
17 Sep 2018


 Quote
QuoteTutorial Categories

Related Discussions
