

How to Turn On or Off Tabs in apps (Sets) in Windows 10
Warning
Sets is no longer available in Windows 10.
Sets shell provided tab experience is no more in Windows 10
Microsoft had announced a new Windows 10 feature called Sets (Microsoft may end up calling it something else by the time it ships) which would be coming to Windows Insiders as a controlled study. The concept behind Sets is to make sure that everything related to your task: relevant webpages, research documents, necessary files and applications, is connected and available to you in one click. Office (starting with Mail & Calendar and OneNote), Windows, and Edge become more integrated to create a seamless experience, so you can get back to whats important and be productive, recapturing that moment, saving time Microsoft believes thats the true value of Sets.
Sets: With all the elements that go into a task, sometimes convincing yourself to get started is the hardest part. Sets help you keep webpages, documents, files, and apps connected, while remaining just one click away. When you close a file that includes a group of tabs, itll help you bring those tabs back to life the next time you open it. Whether its something you pick up later in the day or in a couple weeks, Sets is being designed to help you keep the important things together.
Add tabs to apps: To help fuel Sets, most apps will be able to add app and web tabs. When you select a link in something like an e-mail, itll open in a new tab next to the app you were using. Selecting the plus (+) in an app will take you to a new tab page, which will help you jump to your next location. You might already know where you want to go, or just need a little bit of inspiration. From here, youll be able to search your PC and the internet, access customized feeds, open frequently used websites and apps, and get suggestions based on your recent activity.
Here are a few keyboard shortcuts you can try out:
- Win+Ctrl+Tab Switch to the next tab
- Win+Ctrl+Shift+Tab Switch to the previous tab
- Win+Ctrl+1 through 8 Switch to a specific tab
- Win+Ctrl+9 Switch to the last tab
- Ctrl+T or Win+Ctrl+T Open a new tab
- Ctrl+W or Win+Ctrl+W Close the current active tab
For more details about Sets, see: Introducing Sets - Windows Insider
This tutorial will show you how to turn on or off the Sets feature to have tabs in apps for your account in Windows 10.
Sets is available for all Insiders who have opted in to Skip Ahead. Since Sets is an experiment, it requires a configuration setting to kick in for it to show up. If you dont see Sets yet, try rebooting your PC.
Enable Sets Manually in Windows 10 RS5 builds Solved - Windows 10 Forums
Starting with Windows 10 build 17666, Sets can no longer be turned on or off.
Instead, you can now only enable or disable Sets via a group policy for specific or all users.
How to Enable or Disable Sets in Windows 10
- Option One: Turn On or Off Tabs in apps (Sets) in Settings
- Option Two: Turn On or Off Tabs in apps (Sets) using a REG file
EXAMPLE: Sets in Windows 10
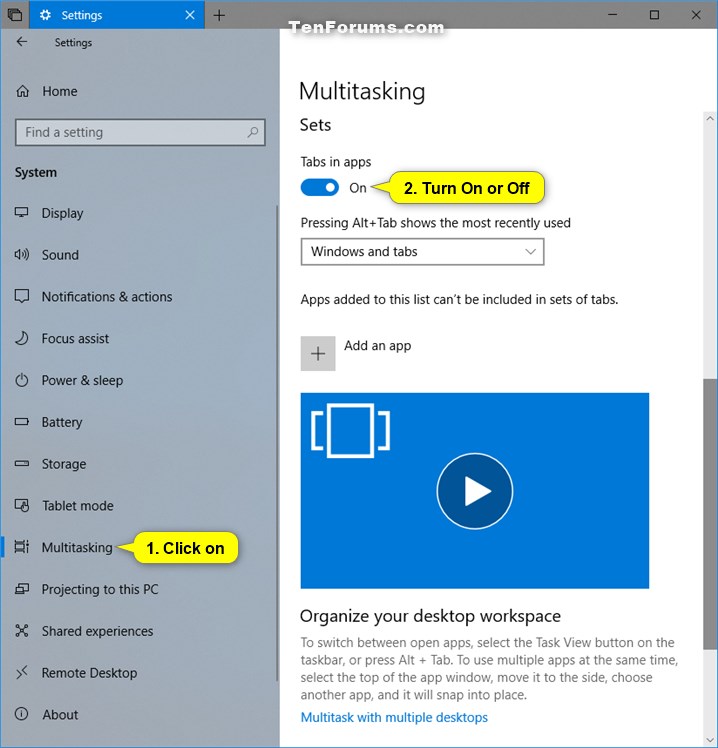
1. Open Settings, and click/tap on the System icon.
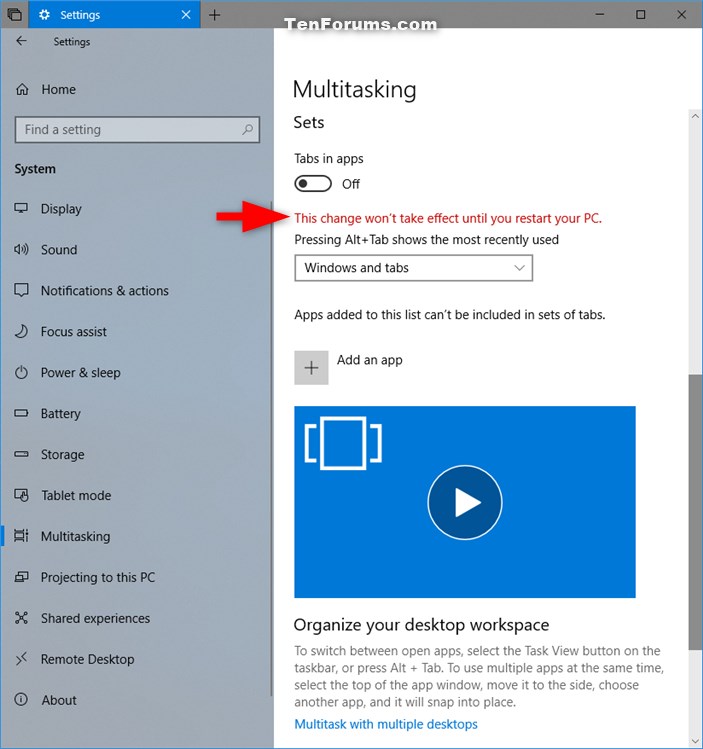
2. Click/tap on Multitasking on the left side, and turn on (default) or off Tabs in apps for what you want under Sets on the right side. (see screenshots below)
3. Restart the computer to apply.
Code:HKEY_CURRENT_USER\Software\Microsoft\Windows\CurrentVersion\CloudStore\Store\Cache\DefaultAccount\$$windows.data.tabshell\Current
Data BINARY
02,00,00,00,51,1a,48,fb,c1,cd,d3,01,00,00,00,00,43,42,01,00,00 (hex) = On
02,00,00,00,7a,fa,5c,b5,bd,cd,d3,01,00,00,00,00,43,42,01,00,02,00,00 (hex) = Off
1. Do step 2 (on) or step 3 (off) below for what you would like to do.
A) Click/tap on the Download button below to download the file below, and go to step 4 below.
Turn_ON_Sets-Tabs_in_apps.reg
Download
A) Click/tap on the Download button below to download the file below, and go to step 4 below.
Turn_OFF_Sets-Tabs_in_apps.reg
Download
4. Save the .reg file to your desktop.
5. Double click/tap on the downloaded .reg file to merge it.
6. When prompted, click/tap on Run, Yes (UAC), Yes, and OK to approve the merge.
7. Restart the computer to apply.
8. If you like, you can now delete the downloaded .reg file.
That's it,
Shawn
Related Tutorials
- How to Enable or Disable Sets in Windows 10
- How to Turn On or Off Showing Tabs for Sets in Alt+Tab in Windows 10
- How to Add or Remove Apps to Not be Included in Sets of Tabs in Windows 10
- How to Change how Apps and Websites Automatically Open for Sets in Windows 10
- How to Open Folder in New Tab in Windows 10 File Explorer
- How to Open App in New Tab for Sets in Windows 10
- How to Change New Tab Page Settings for Sets in Windows 10
Turn On or Off Tabs in apps (Sets) in Windows 10
-
-
-
-
-
-
New #6
You would need to scroll down further on the right side in your screenshot to see it if there.
MS didn't mention anything about Sets being available for only certain locations.
As a test if you like, change your location to "United States" and/or language to "English (United States)" to see if Sets may be available after that.
-
-
-
-
New #9
I just tested by switching to UK location and display language then restarting, and I still have Sets.
I'm not sure why you don't have Sets available either.

Turn On or Off Tabs in apps (Sets) in Windows 10
How to Turn On or Off Tabs in apps (Sets) in Windows 10Published by Shawn BrinkCategory: Apps & Features
22 Apr 2019

 Quote
Quote
Tutorial Categories

Related Discussions
