

How to Add a Shared Printer in Windows 10
Network printers are able to connect directly to your network using Wi-Fi or Ethernet, and are available to anyone on the same network by default.
If you have a printer connected to and setup on your computer instead, then you will need to share the printer before it will be available to anyone on the same network.
Network printer sharing allows another computer on your network to print to the printer connected to your computer on the same network.
The HomeGroup service will no longer be available starting with Windows 10 build 17063. The user profile used for sharing and the file/folder/printer shares will continue to work.
This tutorial will show you how to add a shared printer without using HomeGroup in Windows 10.
Requirements to add a shared printer:
- You must be on the same network as the computer the shared printer is connected to.
- The shared printer must be powered on.
- File and printer sharing must be turned on for both computers.
- You will need to know either the IP address or computer name of the PC the shared printer is connected to.
- You will need to know the share name of the shared printer.
You must be signed in as an administrator to add a shared printer to your PC.
Contents
- Option One: Add Shared Printer in Settings
- Option Two: Add Shared Printer in Control Panel
- Option Three: Add Shared Printer in PowerShell
1 Open Settings, and click/tap on the Devices icon.
2 Click/tap on Printers & scanners on the left side, and click/tap on Add a printer or scanner on the right side. (see screenshot below)
3 Click/tap on the The printer that I want isn't listed link on the right side when available. (see screenshot below)
4 Select (dot) the Select a shared printer by name option, type in network path of the shared printer, and click/tap on Next. (see screenshots below)
You can use the IP address or computer name of the PC the shared printer is connected to.
For example:
\\Computer name\Share name of shared printer
OR
\\IP Address\Share name of shared printer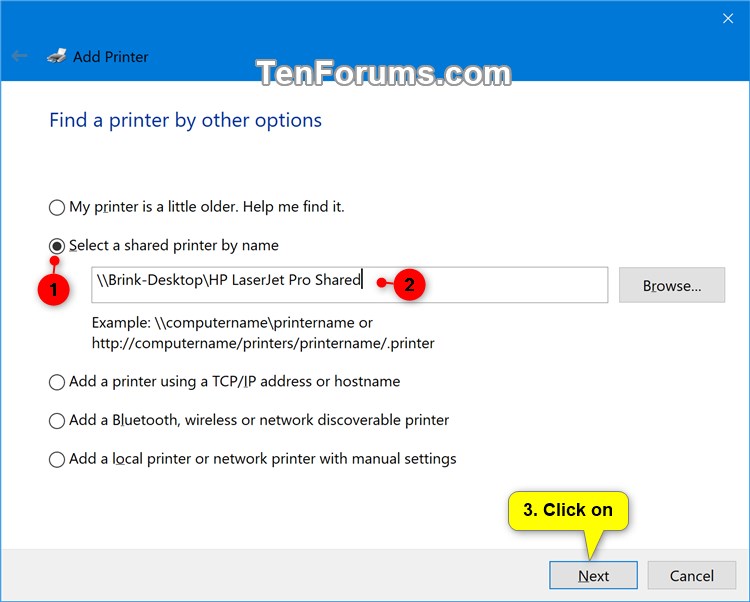
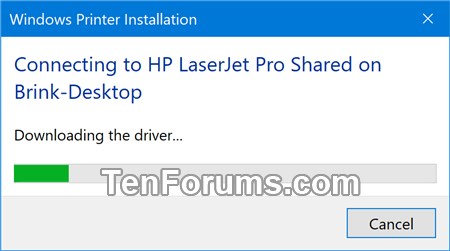
5 Your PC will now try to locate the shared printer, then download and install the driver from the computer the shared printer is connected to. (see screenshots below)
If drivers for your 32-bit or 64-bit Windows 10 is not available from the computer the shared printer is connected to, then you will need to manually find and install the driver for the printer instead.
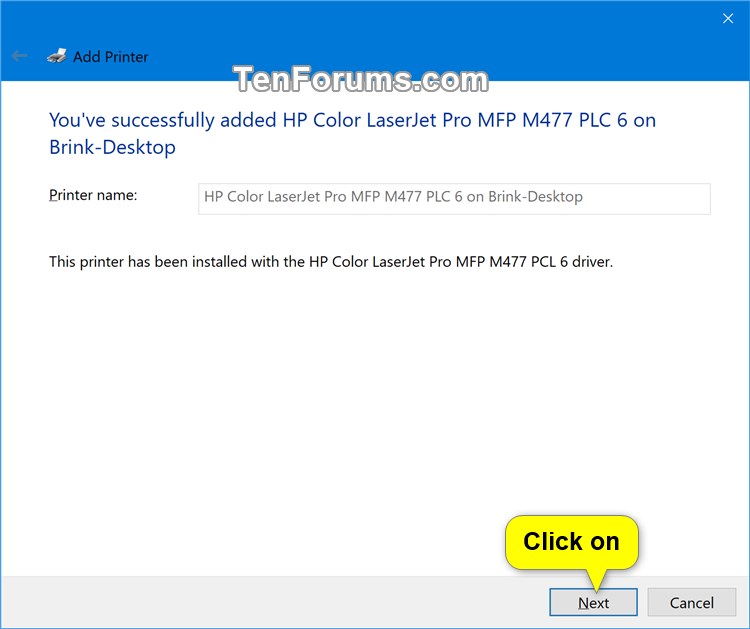
6 Click/tap on Next if the shared printer has been successfully added. (see screenshot below)
7 If you like, you can Print a test page to check if the shared printer is working properly. Click/tap on Finish when done. (see screenshot below)
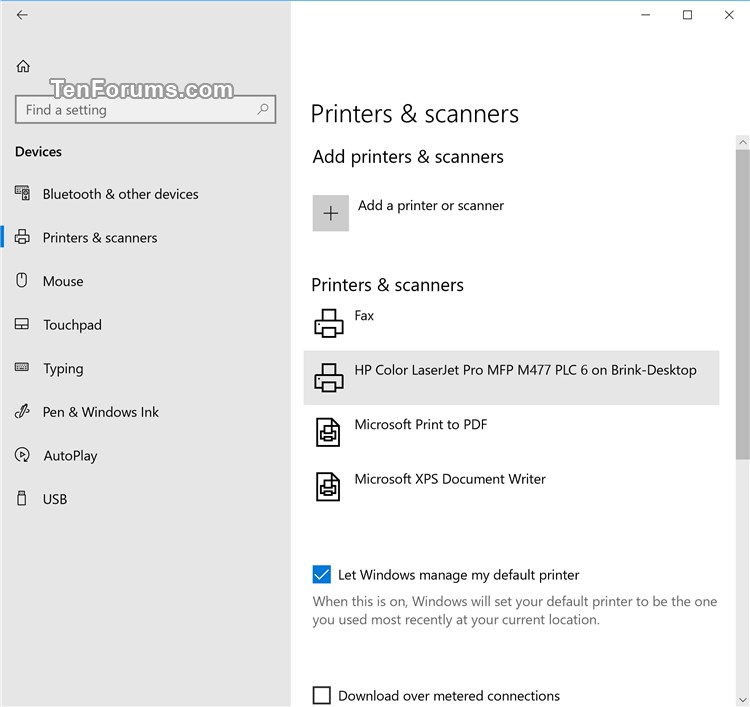
8 The shared printer will now be available on your PC. (see screenshot below)
9 You can now close Settings if you like.
1 Open the Control Panel (icons view), and click/tap on the Devices and Printers icon.
2 Click/tap on Add a printer on the toolbar. (see screenshot below)
3 Click/tap on the The printer that I want isn't listed link at the bottom when available. (see screenshot below)
4 Select (dot) the Select a shared printer by name option, type in network path of the shared printer, and click/tap on Next. (see screenshots below)
You can use the IP address or computer name of the PC the shared printer is connected to.[/I]
For example:
\\Computer name\Share name of shared printer
OR
\\IP Address\Share name of shared printer
5 Your PC will now try to locate the shared printer, and then download and install the driver from the computer the shared printer is connected to. (see screenshots below)
If drivers for your 32-bit or 64-bit Windows 10 is not available from the computer the shared printer is connected to, then you will need to manually find and install the driver for the printer instead.
6 Click/tap on Next if the shared printer has been successfully added. (see screenshot below)
7 If you like, you can Print a test page to check if the shared printer is working properly. Click/tap on Finish when done. (see screenshot below)
8 The shared printer will now be available on your PC. (see screenshot below)
9 You can now close Devices and Printers if you like.
To see more usage options for the Add-Printer command, see: Add-Printer | Microsoft Docs
1 Open an elevated PowerShell.
2 Type the command below you want to use into the elevated PowerShell, and press Enter. (see screenshots below)
(Use computer name to add shared printer)
Add-Printer -ConnectionName "\\Computer Name\Share Name"
OR
(Use IP Address to add shared printer)
Add-Printer -ConnectionName "\\IP Address\Share Name"
Substitute Computer Name in the command above with the actual computer name (ex: "Brink-Desktop") the shared printer is connected to.
Substitute IP Address in the command above with the actual IP address (ex: "192.168.1.124") of the computer the shared printer is connected to.
Substitute Share Name in the command above with the actual share name (ex: "HP LaserJet Pro Shared") of the shared printer you want to add.
For example:
(Use computer name to add shared printer)
Add-Printer -ConnectionName "\\Brink-Desktop\HP LaserJet Pro Shared"
OR
(Use IP Address to add shared printer)
Add-Printer -ConnectionName "\\192.168.1.124\HP LaserJet Pro Shared"
3 You can now close the elevated PowerShell if you like.
That's it,
Shawn Brink
Related Tutorials
- How to Share a Printer in Windows 10
- How to Create a Printers Folder Shortcut in Windows
- How to Rename a Printer in Windows 10
- How to Backup and Restore Printers in Windows
- How to Remove a Printer in Windows 10
- How to Uninstall a Printer Driver in Windows 10
- How to List All Installed Printers in Windows 10
- How to Enable or Disable Printer Sharing with Windows Sandbox in Windows 10
Add Shared Printer in Windows 10
-
New #1
Yes, but...Credentials
I struggled with sharing a printer attached to a replacement computer. I found nothing wrong in the tutorial, but couldn't get connected. It turns out that the problem was more general. So first see if you can see folders on the printer host machine from another in your network. If not, make sure file and print sharing are set up. I hit "enter your network credentials" errors. Since the whole computer couldn't be seen, obviously its printer couldn't either. The fix was in working through logging on to microsoft.com with both my host machine's administrator and setting permissions there, then the client machine as its user and setting permissions there. Both machines required validating user via a text message sent to the phone.
I"m not sure I got the details right, but the general strategy is true. Get the network file and print sharing working first, then worry about printers and other devices.
BTW, the password nightmare seems to be improved now that Microsoft has set up the integrated login system with permissions. Mind you, I've still not spent the unknown amount of time needed to get login to Skype working, so they're not done yet.
Bob, now in Albuquerque
Add Shared Printer in Windows 10
How to Add a Shared Printer in Windows 10Published by Shawn BrinkCategory: Network & Sharing
20 Jan 2024


 Quote
QuoteTutorial Categories

Related Discussions
