

How to Open and Use Timeline in Windows 10
Timeline is available in Windows 10 starting with build 17063.
It can be difficult to get back to stuff you were working on in the past. You might sometimes forget which site or app you were using or where you saved a file. Now you can finally close apps without worryingwith Timeline, you can get right back to where you left off.
Timeline introduces a new way to resume past activities you started on this PC, other Windows PCs, and iOS/Android devices. Timeline enhances Task View, allowing you to switch between currently running apps and past activities.
In Timeline, a user activity is the combination of a specific app and a specific piece of content you were working on at a specific time. Each activity links right back to a webpage, document, article, playlist, or task, saving you time when you want to resume that activity later.
App developers are working hard to enhance their apps by creating high-quality activity cards to appear in Timeline. In this Preview release, you can see and resume web-browsing activities in Microsoft Edge, files you opened in apps like Microsoft Office including Word, Excel, PowerPoint, and OneNote, and updated UWP versions of Maps, News, Money, Sports, and Weather.
If you have more than one PC, try using Timeline on all of themyoull see the same activities no matter which PC youre using. And if an activity from one PC used a modern app that you dont have installed on another PC, Windows will help you install that app.
This tutorial will show you how to open and use Timeline to resume past activities for your local account or Microsoft account in Windows 10.
You will need to turn on "Collect Activities" for your account on this PC and "Filter activities from accounts" (if available) for your Microsoft account before Timeline will be able to show your past activities.
Starting with Windows 10 17083, Microsoft added the option to delete everything from a given hour or day from the context menu. When you are in the default view, you will see a new clear all from day option when right-clicking on an activity. If you clicked see all to see activities for just one day, this option changes to allow you to clear all from hour instead. Because this option can clear a lot of activities at once, we will ask you to confirm this choice before deleting the activities.
Timeline requires the Windows Search service to be enabled, running, and set to Automatic (Delayed Start).
Starting in July 2021, if you have your activity history synced across your devices through your Microsoft account (MSA), you'll no longer have the option to upload new activity in Timeline. You'll still be able to use Timeline and see your activity history (information about recent apps, websites and files) on your local device. AAD-connected accounts won't be impacted.
Here's How:
1 Either click/tap on the Task View icon on the taskbar, or press the Win+Tab keys to see your Timeline. (see screenshots below)
If you have more than one display, then:
1) If you press the Win + Tab keys, Timeline will show on your main display by default.
2) If you click/tap on the Task View icon, then Timeline will show on the same display that the taskbar was on.
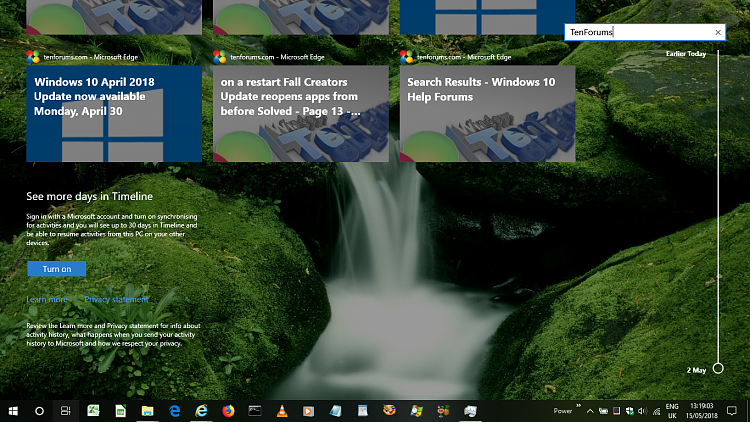
2 The default view of Timeline shows snapshots of the most relevant activities from earlier in the day or a specific past date. A new annotated scrollbar makes it easy to get back to past activities. (see screenshot below)
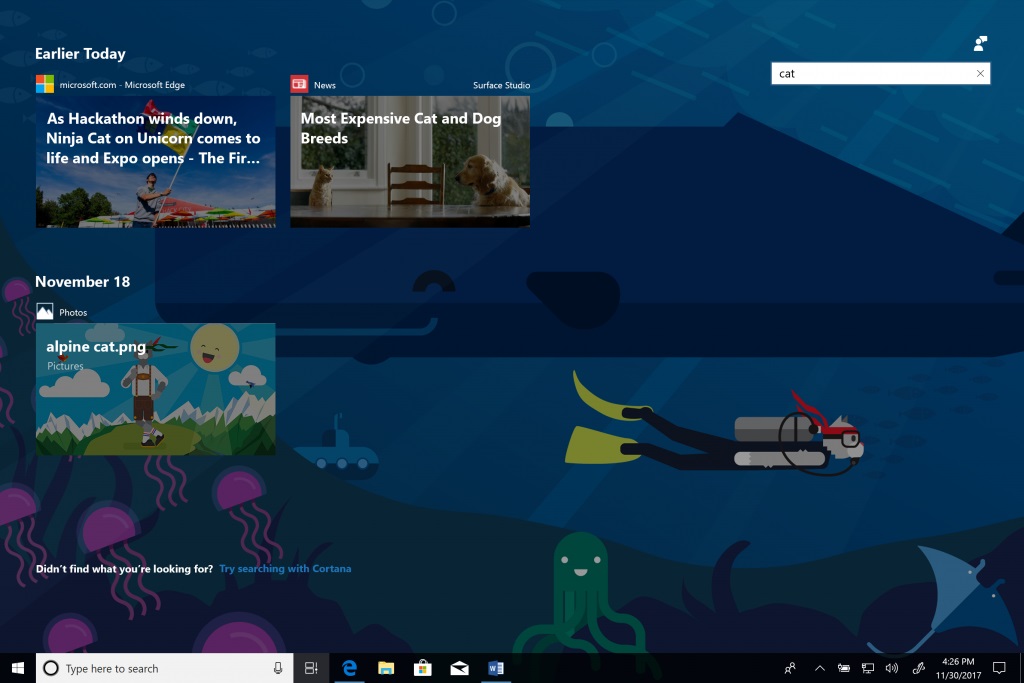
3 You can click/tap on a See all link next to a date header to see all the activities that happened for that single day. Your activities will be organized into groups by hour to help you find tasks you know you worked on that morning, or whenever. (see screenshot above and below)
You can click/tap on the See only top activities link next to the day's header to return to the default view of Timeline.
4 If you cant find the activity you are looking for in the default view, you can click/tap on the Search icon in the upper-right corner of Timeline to open the search box to search for it. (see screenshot above and below)
You can also press the Ctrl + F keys to open the search box.
5 When you find the activity you are looking for, you can click/tap on the activity to open and resume it.
Microsoft would love to hear your feedback, so please press the feedback button in the upper-right corner of Timeline if you have any problems or suggestions.
That's it,
Shawn
Related Tutorials
- How to Enable or Disable Timeline in Windows 10
- How to Turn On or Off Timeline Suggestions in Windows 10
- How to Hide or Show Task View Button on Taskbar in Windows 10
- How to Enable or Disable Collect Activity History in Windows 10
- How to Turn On or Off Collect Activity History in Windows 10
- How to Clear Your Activity History from Cloud in Windows 10
- How to Clear Activities from Timeline in Windows 10
- How to Add Task View Context Menu in Windows 10
- How to Create Task View Shortcut in Windows 10
- How to Turn On or Off Timeline in Microsoft Launcher app on Android Phone
Open and Use Timeline in Windows 10
-
New #1
Is there any way to customize what items show up in Timeline?
-
-
New #3
In 17134.48 I only seem to be able to scroll back the Timeline for three days. However, the Search box at top right can find results going back for 14 days. The history must be there, it's just that I can only scroll back through the first three days of it.
I don't really want to sign up for a Microsoft Account just to get 30 days of Timeline. Is there a way to allow me to scroll back through the 14 days history it obviously does keep?
-
New #4
Hello Bree, :)
The Turn on button in your screenshot is for the Let Windows sync my activities from this PC to the cloud setting that does require a Microsoft account.
I'm not aware of a way yet to scroll back further in Timeline without this setting checked (turned on).
-
-
-
New #7
timeline is worthless in my book since you need to be signed into a microsoft account so tl can save your data to the cloud. there is no reason tl couldn't of been designed to work locally via a local account or the cloud via a microsoft account. this to me is like web integration coming to windows explorer with rs5, just wrong.
-
-
-
New #9
It really needs a feature where you don't have to click the search box. When you type, you search. Seems logical
Ctrl+F is just akward for my hands.

Open and Use Timeline in Windows 10
How to Open and Use Timeline in Windows 10Published by Shawn BrinkCategory: General Tips
25 May 2021


 Quote
Quote


Tutorial Categories

Related Discussions
