configurating windows 10 network share through .bat file

Page 1 of 3 123 LastLast

  1. Posts : 14
    w10
       #1

    configurating windows 10 network share through .bat file


    hi everybody, im sorry by my english...

    i want to configurate my windows 10 network throug the .bat

    i am going to give an simple exemple about what I need below

    exemple:
    show simple files in windows explorer (.bat)
    REG ADD "HKCU\SOFTWARE\Microsoft\Windows\CurrentVersion\Explorer\Advanced" /V FileHideExt /T REG_WORD /D 00000000 /F

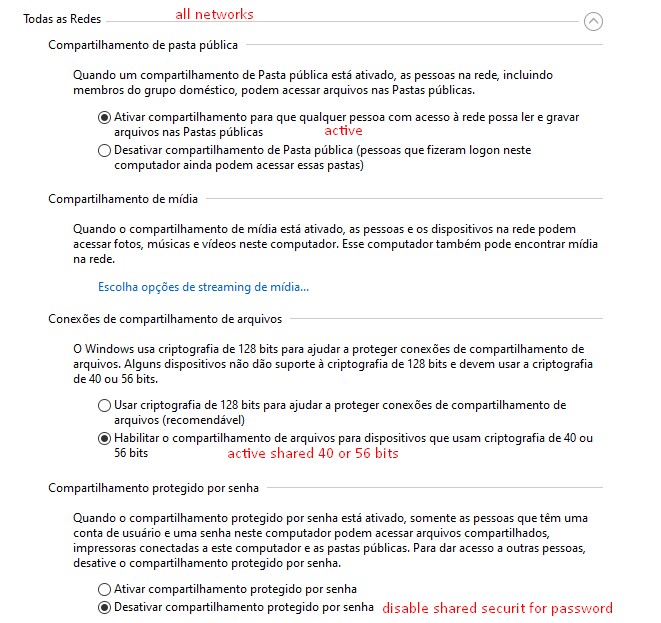
    below i am going to show how do I want the network configurations to be

    configurating windows 10 network share through .bat file-screenshot_3.jpg

    configurating windows 10 network share through .bat file-screenshot_4.jpg

    configurating windows 10 network share through .bat file-screenshot_5.jpg

    thanks by any help
      My Computer


  2. Posts : 4,187
    Windows 11 Pro, 22H2
       #2

    Code:
    REM      ###############################
    REM      # Network & Internet Settings #
    REM      ###############################
    
    REM ****************************************************************************************************************
    REM * Change Network Profile type to "Private" *                                                                   *
    REM ********************************************                                                                   *
    REM * You could do this with two commands. The first command below shows you information about your network.       *
    REM * connection. The second command filters it so that it outputs ONLY the network name. In the third command we  *
    REM * would replace "NetworkName" with the name found from either of the first two commands to perform the actual  *
    REM * change to a Private Network. Finally, the forth command combines the second and third commands into a single *
    REM * command, feeding the output of one command into the other.                                                   *
    REM ****************************************************************************************************************
    
    REM PowerShell "Get-NetConnectionProfile"
    REM PowerShell "Get-NetConnectionProfile | Select-Object -ExpandProperty Name"
    REM PowerShell "Set-NetConnectionProfile -Name "NetworkName" -NetworkCategory Private"
    
    PowerShell "Set-NetConnectionProfile -Name (Get-NetConnectionProfile | Select-Object -ExpandProperty Name) -NetworkCategory Private"
    
    REM   #############################################################################################################
    REM   # The following settings can be found here:                                                                 #
    REM   # Settings > Network & internet > Advanced network settings > Advanced sharing settings > Private networks  #
    REM   # NOTE: These settings will only be reflected in the GUI once the network is marked as a "Private" network. #
    REM   #############################################################################################################
    
    REM **************************************************
    REM * Turn On: Network discovery                     *
    REM * NOTE: This is for the Private network profile. *
    REM **************************************************
    
    PowerShell "Set-NetFirewallRule -DisplayGroup 'Network Discovery' -Enabled True -Profile Private"
    
    REM **************************************************
    REM * Turn On: File and Printer Sharing              *
    REM * NOTE: This is for the Private network profile. *
    REM **************************************************
    
    PowerShell "Set-NetFirewallRule -DisplayGroup 'File And Printer Sharing' -Enabled True -Profile Private"
    
    REM      ###################################
    REM      # End Network & Internet Settings #
    REM      ###################################
      My Computers


  3. Posts : 14
    w10
    Thread Starter
       #3

    hsehestedt said:
    Code:
    REM      ###############################
    REM      # Network & Internet Settings #
    REM      ###############################
    
    REM ****************************************************************************************************************
    REM * Change Network Profile type to "Private" *                                                                   *
    REM ********************************************                                                                   *
    REM * You could do this with two commands. The first command below shows you information about your network.       *
    REM * connection. The second command filters it so that it outputs ONLY the network name. In the third command we  *
    REM * would replace "NetworkName" with the name found from either of the first two commands to perform the actual  *
    REM * change to a Private Network. Finally, the forth command combines the second and third commands into a single *
    REM * command, feeding the output of one command into the other.                                                   *
    REM ****************************************************************************************************************
    
    REM PowerShell "Get-NetConnectionProfile"
    REM PowerShell "Get-NetConnectionProfile | Select-Object -ExpandProperty Name"
    REM PowerShell "Set-NetConnectionProfile -Name "NetworkName" -NetworkCategory Private"
    
    PowerShell "Set-NetConnectionProfile -Name (Get-NetConnectionProfile | Select-Object -ExpandProperty Name) -NetworkCategory Private"
    
    REM   #############################################################################################################
    REM   # The following settings can be found here:                                                                 #
    REM   # Settings > Network & internet > Advanced network settings > Advanced sharing settings > Private networks  #
    REM   # NOTE: These settings will only be reflected in the GUI once the network is marked as a "Private" network. #
    REM   #############################################################################################################
    
    REM **************************************************
    REM * Turn On: Network discovery                     *
    REM * NOTE: This is for the Private network profile. *
    REM **************************************************
    
    PowerShell "Set-NetFirewallRule -DisplayGroup 'Network Discovery' -Enabled True -Profile Private"
    
    REM **************************************************
    REM * Turn On: File and Printer Sharing              *
    REM * NOTE: This is for the Private network profile. *
    REM **************************************************
    
    PowerShell "Set-NetFirewallRule -DisplayGroup 'File And Printer Sharing' -Enabled True -Profile Private"
    
    REM      ###################################
    REM      # End Network & Internet Settings #
    REM      ###################################
    hi friend, thank you for feedback

    im sorry by my english

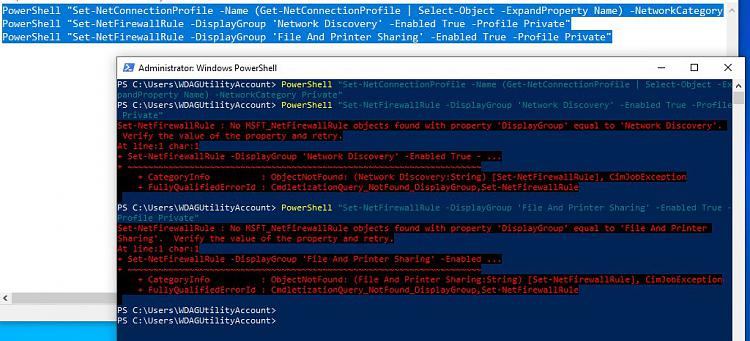
    its attached below the image with the results

    configurating windows 10 network share through .bat file-screenshot_2.jpg

    im going to study this code and try to understand it

    thank you
      My Computer


  4. Posts : 16,950
    Windows 10 Home x64 Version 22H2 Build 19045.4170
       #4

    jhugor,

    The script refers to Powershell but is written to be run in a Command prompt window [I assume an elevated one].
    Open Command Prompt - TenForumsTutorials


    Denis
      My Computer


  5. Posts : 14
    w10
    Thread Starter
       #5

    Try3 said:
    jhugor,

    The script refers to Powershell but is written to be run in a Command prompt window [I assume an elevated one].
    Open Command Prompt - TenForumsTutorials


    Denis
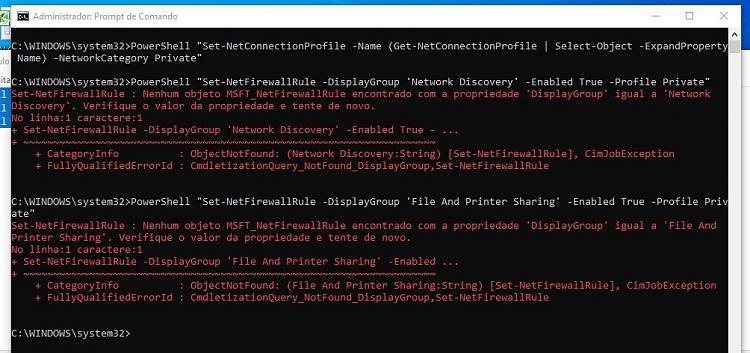
    tks

    configurating windows 10 network share through .bat file-screenshot_3.jpg
      My Computer


  6. Posts : 4,187
    Windows 11 Pro, 22H2
       #6

    I'll look into this in the morning. That section was part of a much bigger script I wrote quite some time ago. I'll check in the morning when I'm in front of my desktop system if something else has to be run to initialize that first.
      My Computers


  7. Posts : 14
    w10
    Thread Starter
       #7

    hsehestedt said:
    I'll look into this in the morning. That section was part of a much bigger script I wrote quite some time ago. I'll check in the morning when I'm in front of my desktop system if something else has to be run to initialize that first.
    thank you very much
      My Computer


  8. Posts : 4,187
    Windows 11 Pro, 22H2
       #8

    Tell me if I am getting this wrong, but it looks to me like you are running the individual commands manually rather than running the commands from the batch file as is.

    The intent is to run the batch file as is as an administrator. You could add a line at the start to make it a little more readable like this:

    @echo off

    Just make that the very first line.

    I just tried it, and at least for me, it is working fine.
      My Computers


  9. Posts : 16,950
    Windows 10 Home x64 Version 22H2 Build 19045.4170
       #9

    jhugor,

    It's difficult to see in your posted screenshots but it looks to me as though the quotation marks have been turned into curvy quotation marks [which the Cmd window & Powershell do not recognise].
    This can often happen if you've pasted the code into a Word processor such as Word before saving it in order to run it.
    Copy H's code from this page straight into a Notepad file instead. That will not corrupt the quotation marks.


    No, sorry. I was looking at the first diagram. I can see them much more clearly in the second picture and they are not corrupted.


    All the best,
    Denis
      My Computer


  10. Posts : 16,950
    Windows 10 Home x64 Version 22H2 Build 19045.4170
       #10

    jhugor,

    Knowing nothing about firewalls or using PowerShell with them, I wonder if it is a language problem.

    I suggest running this command in an Admin Command prompt window

    PowerShell Get-NetFirewallRule >"D:\Desktop\AllRulesForReview.txt"

    and post the results [which will be unnecessarily long purely to avoid using a better command that might cause errors].
    Do replace my D:\Desktop with the path to a folder of your own.
    My quotation marks are only there in case the path you write contains any spaces or special characters such as ampersands [&].


    I'm suggesting this test in case your Firewall rules use Portuguese equivalents of Network Discovery, File and printer sharing, ...


    Denis
      My Computer


  Related Discussions
Our Sites
Site Links
About Us
Windows 10 Forums is an independent web site and has not been authorized, sponsored, or otherwise approved by Microsoft Corporation. "Windows 10" and related materials are trademarks of Microsoft Corp.

© Designer Media Ltd
All times are GMT -5. The time now is 09:49.
Find Us


Windows 10 Forums