Recreate ASUS F9 recovery functional partition

Page 1 of 2 12 LastLast

  1. Posts : 181
    Windows 10 Pro x64
       #1

    Recreate ASUS F9 recovery functional partition


    As many did, I upgraded my ASUS G751JY from Windows 8.x to Windows 10, and this destroyed ASUS F9 built-in recovery feature. When I press F9 now it will give me a BSOD with:

    Your PC needs to be repaired
    A required device isn't connected or can't be accessed.
    Error code: 0xc0000225
    [ A text saying I should use recovery tools on my installation media to fix the issue. ]
    Press Enter to try again
    Press F8 for Start-up Settings
    Press Esc for UEFI Firmware Settings


    This happens every time I want to use F9, then every time I have also to repair Windows boot (have no problem, I know how to do this and regenerate a correct BCD), so my idea now is to recreate a generic Windows 10 install partition working with ASUS F9 feature.

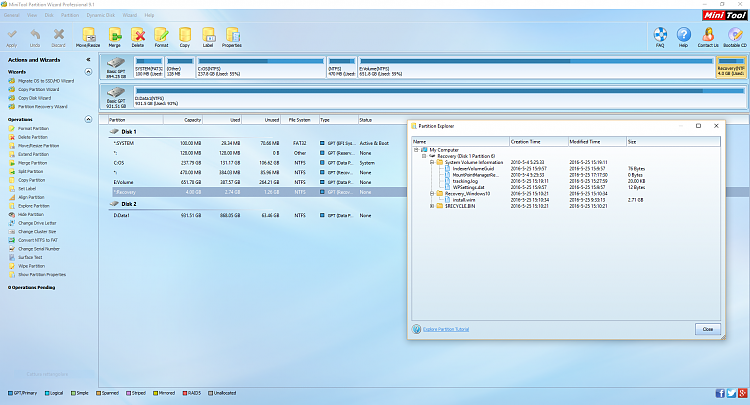
    Here is my current situation:
    Recreate ASUS F9 recovery functional partition-untitled.png

    but Recovery partition was Disabled.
    No problem. I've managed to re-Enable it using the REAgentC command:

    Code:
    C:\Users\Luca\Desktop>reagentc /info
    Informazioni di configurazione per Ambiente ripristino Windows
    e la reimpostazione del sistema:
    
    
        Stato Ambiente ripristino Windows:      Enabled
        Percorso Ambiente ripristino Windows:   \\?\GLOBALROOT\device\harddisk0\partition4\Recovery\WindowsRE
        Identificatore dati di configurazione di avvio (BCD): fc0612d5-20ce-11e6-8adf-9bc77791b978
        Percorso immagine di ripristino:
        Indice immagine di ripristino:          0
        Percorso immagine personalizzata:
        Indice immagine personalizzata:         0
    
    
    REAGENTC.EXE: operazione riuscita.
    ASUS F9 still not working giving me BSOD Erorr 225.

    Following some guides on the net I've been also able to create a generic "install.wim" starting from MediaCreationTool's Windows 10 ISO file and "<mounted Windows 10 iso>:\sources\install.esd", using the DISM command:
    dism /Export-Image /SourceImageFile:"MY_ESD_FILE" /SourceIndex:1 /DestinationImageFile:install.wim /compress:recovery /CheckIntegrity

    How do I proceed now?
    1. Add a new additional 4GB recovery partition with GUID ID: DE94BBA4-06D1-4D40-A16A-BFD50179D6AC
    2. copy "install.wim" into this partition (requires a specific dir structure or the root will be enough?)
    3. use "REAgentC /setosimage ..." and target to the new partition with the wim file


    Is this correct? Will this make ASUS F9 work again?
    Last edited by hexaae; 25 May 2016 at 07:39.
      My Computer


  2. Posts : 4,142
    Windows 3.1 to Windows 11
       #2

    correct - as far as the OS Image Recovery
    Not sure about F9

    as you would have to regenerate the bootkey
      My Computer


  3. Posts : 181
    Windows 10 Pro x64
    Thread Starter
       #3

    So I don't need a specific directory structure for the install.wim file?
    Can I put this in the new additional 4GB recovery partition and just use the usual:
    Reagentc /setosimage /path <driveletter>:\<folder-containing-osimage> /index 1 /target C:\Windows ?
      My Computer


  4. Posts : 4,142
    Windows 3.1 to Windows 11
       #4

    You can use the E: drive
    copy the install.wim into a RecoveryImage folder
    then point to it...

    or you can shrink E: and create a RecoveryImage partition...

    the install wim has to be in a folder - not on the root of the partition...

    ONE MAJOR NOTE...
    If you reset the PC your Data partition E: will be removed... So very important that if you reset - you MUST select keep current partitions...

    that is the problem with having your DATA on the same Drive as the windows OS
      My Computer


  5. Posts : 181
    Windows 10 Pro x64
    Thread Starter
       #5

    Yes, my idea was to keep the current 470MB Recovery partition and add the install.wim I created from Windows 10 ISO ESD file into a new partition after E: (I'll label this R: ). Something like R:\Recovery_Win10\install.wim

    Thank you for the "keep current partitions" hint
      My Computer


  6. Posts : 4,142
    Windows 3.1 to Windows 11
       #6

    You are way better off - not using the Recovery Option at all > with your current disk/partition layout....

    If windows ever went bad - just run the windows 10 setup.exe - from within the current windows 10 OS
    To repair windows and keep your files and programs..

    Known as a Repair Install...
      My Computer


  7. Posts : 181
    Windows 10 Pro x64
    Thread Starter
       #7

    Everything properly set:
    DISKPART> detail partition

    Partizione 6
    Tipo : de94bba4-06d1-4d40-a16a-bfd50179d6ac
    Nascosta : Sì
    Richiesta: Sì
    Attributo : 0X8000000000000001
    Offset in byte: 955899707392

    Volume ### Let. Etichetta Fs Tipo Dim. Stato Info
    --------- --- ----------- ----- ---------- ------- --------- --------
    * Volume 3 Recovery NTFS Partizione 4095 Mb Integro Nascosto


    Recreate ASUS F9 recovery functional partition-image.png

    C:\WINDOWS\system32>reAgentC /info
    Informazioni di configurazione per Ambiente ripristino Windows
    e la reimpostazione del sistema:


    Stato Ambiente ripristino Windows: Enabled
    Percorso Ambiente ripristino Windows: \\?\GLOBALROOT\device\harddisk0\partition4\Recovery\WindowsRE
    Identificatore dati di configurazione di avvio (BCD): 6ca57f00-2280-11e6-be75-d0a88fc569a8
    Percorso immagine di ripristino: \\?\GLOBALROOT\device\harddisk0\partition6\Recovery_Windows10
    Indice immagine di ripristino: 1
    Percorso immagine personalizzata:
    Indice immagine personalizzata: 0


    REAGENTC.EXE: operazione riuscita.

    ...but unfortunately ASUS F9 still doesn't work as expected (here is a working video from YT) and returns the usual BSOD Error 225 mentioned in first msg
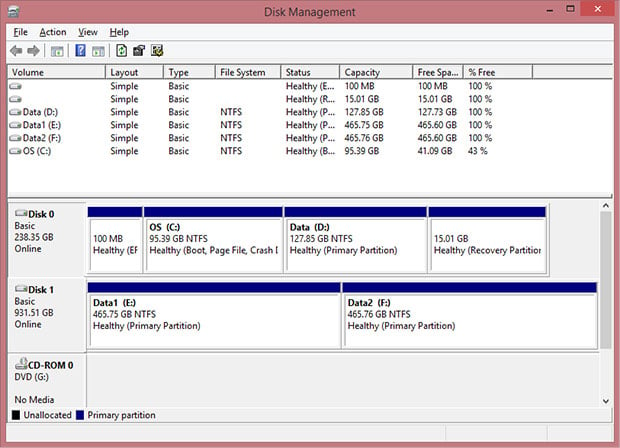
    Mmmh... I start to think F9 simply works by booting from the first Recovery partition it can find, usually put after C: on ASUS G751JY laptops as shown in this example pic coming from an online review:


    Probably it expects to find something more than the install.wim file there as it asks for winload.efi pressing F8 after BSOD is displayed:


    EDIT: maybe I could try copying the entire Windows 10 ISO inside the first recovery partition and see what happens pressing F9...
    Last edited by hexaae; 25 May 2016 at 13:30.
      My Computer


  8. Posts : 18,430
    Windows 11 Pro
       #8

    The factory recovery partition more than likely contained an executable file that F9 ran which would then control the restoration. That's why most people when they talk about leaving the factory recovery in place after an upgrade to Windows 10 are likely to be disappointed to discover they can't really use the recovery partition left behind because, more than likely, manufacturer software is going to be required to actually do a recovery from it.

    I think the only way you will get F9 functionality back would be to restore the original factory recovery partition.
      My Computer


  9. Posts : 181
    Windows 10 Pro x64
    Thread Starter
       #9

    Let's see if I can find another G751JY user with working F9 so we can discover what's inside the 12GB recovery partition from ASUS...
    Honestly I can't remember if I manually deleted the original partition or was wiped out by Windows 8.1 -> 10 upgrade (more likely).
    Last edited by hexaae; 25 May 2016 at 13:28.
      My Computer


  10. Posts : 1,481
    Windows 10 Pro 64bit 20H2 19042.844
       #10

    I Recently got a Asus Desktop with F9 recovery, unforuately was too in a hurry to get it setup with 10, to make backup copy of original config lol, my fault I know, soon doing clean install of 10, so think gonna wipe out the partition then, I got a copy of 8.1 Core on another flash drive, Original system key in uefi saved, plus Windows 10 USB drive, and system repair Disk made as well. So think i'll be ok if something ever goes wrong.
      My Computers


  Related Discussions
Our Sites
Site Links
About Us
Windows 10 Forums is an independent web site and has not been authorized, sponsored, or otherwise approved by Microsoft Corporation. "Windows 10" and related materials are trademarks of Microsoft Corp.

© Designer Media Ltd
All times are GMT -5. The time now is 00:11.
Find Us


Windows 10 Forums