Windows 10 Taking Charge


  1. Posts : 24
    Windows 10 Pro 22H2 19045.2728
       #1

    Windows 10 Taking Charge


    Hi:
    I am trying to install Win 10 on wifey's PC.
    Right now I have a booting program that selects which partition to boot.
    So when I installed on an empty partition and it restarted it now wants to take over my booting program's job and gives me two choices: 1. Win 10, 2. Win 7 .
    I ran into this when finally installing Win 10 on my PC but can't remember what you have to do to make Win 10 quit trying to give you dual boot options.
    I want to give options back to my booting prog.
    Any help is appreciated.

    This is a USB install I purchased in 2019 whatever version that would be.
      My Computer


  2. Posts : 8,111
    windows 10
       #2

    Not clear do you want just 10 or duel boot with 7 ?
      My Computer


  3. Posts : 24
    Windows 10 Pro 22H2 19045.2728
    Thread Starter
       #3

    I'm trying to give back to my booting program the responsibility of booting the partition I choose instead of Win 10 giving me choices of it or Win 7.

    Thanks for the reply.
      My Computer


  4. Posts : 18,432
    Windows 11 Pro
       #4

    If you don't want Windows setup to touch your bootloader, then you need to use the dism /apply-image command to apply a Windows image to the desired partition rather than running Windows setup.
      My Computer


  5. Posts : 24
    Windows 10 Pro 22H2 19045.2728
    Thread Starter
       #5

    Ah! That's what I was afraid of. Oh well, got plenty of images.

    Okay I have another question. I don't care if 10 elbows my bootloader aside when it installs. I just would like for 10 to mind it's own business afterward. I can reinstall bootloader without any problems. Bootit Baremetal.

    Thanks!

    - - - Updated - - -

    NavyLCDR
    Can you show me what that looks like or point me to information I should read to understand how to do it myself? Using BIBM is good but not having to jump through so many hoops would be better. I had to disable Win 10 "Fast Start" in BIBM to make sure it didn't interfere with booting.
    Last edited by Leo625; 07 May 2023 at 16:09.
      My Computer


  6. Posts : 6,345
    Windows 11 Pro - Windows 7 HP - Lubuntu
       #6

    Please post a whole window Disk Manager image of your drives. Don't forget to expand the columns so we can read them. How to Post a Screenshot of Disk Management
    If you have a MiniTool or AOMEI Partition use it instead or Windows disk manager.
      My Computers


  7. Posts : 18,432
    Windows 11 Pro
       #7

    Leo625 said:
    NavyLCDR
    Can you show me what that looks like or point me to information I should read to understand how to do it myself? Using BIBM is good but not having to jump through so many hoops would be better. I had to disable Win 10 "Fast Start" in BIBM to make sure it didn't interfere with booting.
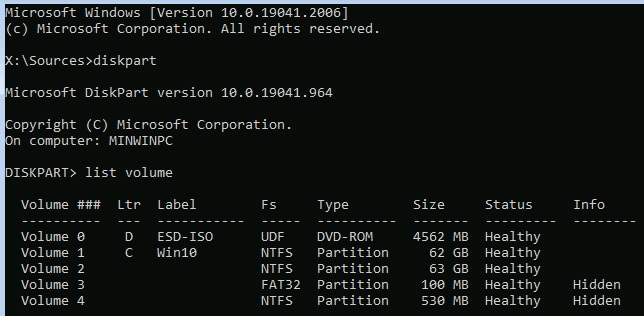
    To start with, you need the standard Windows 10 installation USB flash drive, and on your computer you need a blank partition formatted as NTFS to apply the windows image to. Boot the computer from the Windows 10 USB flash drive and you get the first screen asking for language, time and keyboard. Press Shift + F10 to open a command prompt.
    Code:
    diskpart
    list volume
    Windows 10 Taking Charge-1.jpg

    What this is telling me is that my USB Flash Drive is D drive. My current Windows is C drive. The blank NTFS partition I want to put the new Windows on has no drive letter (it is volume 2). The blank partition you want to install the new Windows to may have a drive letter already assigned. If it does, just use the existing drive letter and skip the next step. Next I am going to assign drive letter T to the blank partition I want to install Windows to:
    Code:
    select volume 2
    assign letter=T
    Windows 10 Taking Charge-2.jpg

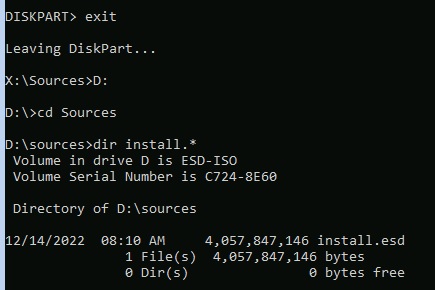
    Now we need to leave diskpart, go into the sources folder of our USB flash drive and see if we have install.esd or install.wim. Change the drive letter used below to whatever the drive letter of your USB flash drive is:
    Code:
    exit
    D:
    cd Sources
    dir install.*
    Windows 10 Taking Charge-3.jpg

    I have install.esd. You might have install.wim. Just make sure to use the proper filename in the command below. Next I am going to see what is available in my install file:

    Code:
    dism /get-wiminfo /wimfile:install.esd
    Windows 10 Taking Charge-4.jpg

    I want Windows 10 Pro, so it is going to be index 6. Windows 10 Home would be index 1. Now I have everything I need: the install.wim or install.esd file, the index number, and a blank NTFS partition with a drive letter to apply the image to. The only thing left to do is apply the image:

    Code:
    dism /apply-image /imagefile:install.esd /index:6 /applydir:T:\
    Windows 10 Taking Charge-5.jpg

    That's it. Remove the flash drive and restart the computer. You now have Windows installed onto the partition that you created for it, but there is currently no way to boot into it. Your next step would then be to go into whatever boot manager you are using and add that partition to it's boot menu. Good Luck!
      My Computer


  8. Posts : 24
    Windows 10 Pro 22H2 19045.2728
    Thread Starter
       #8

    Thank You Both for your help! I'm going to save this to my notes!
      My Computer


  Related Discussions
Our Sites
Site Links
About Us
Windows 10 Forums is an independent web site and has not been authorized, sponsored, or otherwise approved by Microsoft Corporation. "Windows 10" and related materials are trademarks of Microsoft Corp.

© Designer Media Ltd
All times are GMT -5. The time now is 14:54.
Find Us


Windows 10 Forums