no images are available...win 10 install

Page 3 of 5 FirstFirst 12345 LastLast

  1. Posts : 34
    windows 10
    Thread Starter
       #21

    I decided to re-use the original install.wim and use kari's autounattend answer file and install it to a physical machine. It worked flawless from beginning to end. I am trying to understand why it will not take the answer file I create which is really close to Kari's file. There are only a few differences as in names, but that's just about it. I have kept all the partition part exactly how he has it. This is really baffling me it seems that something is getting corrupted when trying to install my customized wim file. I think the unattend is working just fine it seems as though it has something to do with the autounattend and I wouldn't know why. As I stated earlier it is still almost exactly like Kari's original just a few different names that's it. I think what I am going to try next is use one of my customized wim files and use Kari's autounattend file to see how that works. I want to try and see whether or not I get the same results.
      My Computer


  2. Posts : 14,046
    Windows 11 Pro X64 22H2 22621.1848
       #22

    The customized wim will have your unattend.xml in it.
      My Computers


  3. Posts : 34
    windows 10
    Thread Starter
       #23

    I did what I said I was going to do and that was use Kari's original autounattend answer file and use my customized wim file, but unfortunately that didn't work. It came up with the "no images are available" screen so it is either my unattend file or something with my customized wim file. Yes I believe you're correct it should have my unattend file in my customized wim file so that too(my unattend) could be a problem. I think the next process of elimination is I am going to use Kari's autounattend file and unattend file with my customized wim file see if that works. Maybe now I feel like I am getting somewhere at least I hope

    - - - Updated - - -

    I saw something very interesting in my unattend file it might be the reason why I kept getting "no images are available". When I was comparing the two files in the unattend this is supposed to be first "Microsoft-Windows-Shell-Setup". However, my unattend file had "Microsoft-Windows-International-Core" I am starting to think this may have been my problem, but I don't know for sure until I correct it. Once I get to work I am going to try this out and see what happens.
      My Computer


  4. Posts : 14,046
    Windows 11 Pro X64 22H2 22621.1848
       #24

    I also have "Microsoft-Windows-International-Core" first. "Microsoft-Windows-Shell-Setup" is 2nd. That's the way WSIM created it, I didn't do anything to make that happen.

    Where did you see that "Microsoft-Windows-Shell-Setup" should be first?

    Edit: I see that the unattend @Kari created has it that way. Don't understand why it would matter, especially since WSIM generated it reversed for me.
      My Computers


  5. Posts : 34
    windows 10
    Thread Starter
       #25

    I copied both Kari's files autounattend and unattend then just edit the files with my information. I made a new sysprep image than captured the file. Put the new image in the sources folder on my usb flash drive. I bootup the laptop and it started the install without any errors. I was getting excited, but close to the end of the install it came up with "windows could not complete the installation" Restart the installation. What a bummer I was hoping to end it tonight now looks like got see why this error is coming up.
      My Computer


  6. Posts : 14,046
    Windows 11 Pro X64 22H2 22621.1848
       #26

    Maybe PM Kari and see if he can help?
      My Computers


  7. Posts : 34
    windows 10
    Thread Starter
       #27

    sounds good thanks
      My Computer


  8. Posts : 14,046
    Windows 11 Pro X64 22H2 22621.1848
       #28

    Great, now I'm getting the "No image available". Oracle VM, 4GB ram, 50GB vdi, Win10_1903_V1_English_x64_wim.iso multi edition was the starting point.

    I did a complete, from scratch rebuild following @Kari s tutorial to the letter as far as I can tell.
    autounattend and unattend xml files look correct, again as far as I can tell.

    This is getting so frustrating.

    When I tried the previous build on real hardware it couldn't complete the drive setup. I tried it over a previous install and after using diskpart to clean the drive prior to install.

    autounattend.xml
    Code:
    <?xml version="1.0" encoding="utf-8"?>
    <unattend xmlns="urn:schemas-microsoft-com:unattend">
        <settings pass="windowsPE">
            <component name="Microsoft-Windows-International-Core-WinPE" processorArchitecture="amd64" publicKeyToken="31bf3856ad364e35" language="neutral" versionScope="nonSxS" xmlns:wcm="http://schemas.microsoft.com/WMIConfig/2002/State" xmlns:xsi="http://www.w3.org/2001/XMLSchema-instance">
                <SetupUILanguage>
                    <UILanguage>en-US</UILanguage>
                </SetupUILanguage>
                <InputLocale>0409:00000409</InputLocale>
                <SystemLocale>en-US</SystemLocale>
                <UILanguage>en-US</UILanguage>
                <UILanguageFallback>en-US</UILanguageFallback>
                <UserLocale>en-US</UserLocale>
            </component>
            <component name="Microsoft-Windows-Setup" processorArchitecture="amd64" publicKeyToken="31bf3856ad364e35" language="neutral" versionScope="nonSxS" xmlns:wcm="http://schemas.microsoft.com/WMIConfig/2002/State" xmlns:xsi="http://www.w3.org/2001/XMLSchema-instance">
                <DiskConfiguration>
                    <Disk wcm:action="add">
                        <CreatePartitions>
                            <CreatePartition wcm:action="add">
                                <Order>1</Order>
                                <Size>450</Size>
                                <Type>Primary</Type>
                            </CreatePartition>
                            <CreatePartition wcm:action="add">
                                <Extend>true</Extend>
                                <Order>2</Order>
                                <Type>Primary</Type>
                            </CreatePartition>
                        </CreatePartitions>
                        <ModifyPartitions>
                            <ModifyPartition wcm:action="add">
                                <Active>true</Active>
                                <Format>NTFS</Format>
                                <Label>System</Label>
                                <Order>1</Order>
                                <PartitionID>1</PartitionID>
                            </ModifyPartition>
                            <ModifyPartition wcm:action="add">
                                <Format>NTFS</Format>
                                <Label>Windows</Label>
                                <Letter>C</Letter>
                                <Order>2</Order>
                                <PartitionID>2</PartitionID>
                            </ModifyPartition>
                        </ModifyPartitions>
                        <DiskID>0</DiskID>
                        <WillWipeDisk>true</WillWipeDisk>
                    </Disk>
                </DiskConfiguration>
                <ImageInstall>
                    <OSImage>
                        <InstallTo>
                            <DiskID>0</DiskID>
                            <PartitionID>2</PartitionID>
                        </InstallTo>
                    </OSImage>
                </ImageInstall>
                <UserData>
                    <ProductKey>
                        <Key>VK7JG-NPHTM-C97JM-9MPGT-3V66T</Key>
                    </ProductKey>
                    <AcceptEula>true</AcceptEula>
                    <Organization>ACTS</Organization>
                </UserData>
            </component>
        </settings>
        <cpi:offlineImage cpi:source="wim://desktop/lenovo_gcustom_os/oscdimage_source/sources/install.wim#Windows 10 Pro" xmlns:cpi="urn:schemas-microsoft-com:cpi" />
    </unattend>
    unattend.xml
    Code:
    <?xml version="1.0" encoding="utf-8"?>
    <unattend xmlns="urn:schemas-microsoft-com:unattend">
        <settings pass="oobeSystem">
            <component name="Microsoft-Windows-International-Core" processorArchitecture="amd64" publicKeyToken="31bf3856ad364e35" language="neutral" versionScope="nonSxS" xmlns:wcm="http://schemas.microsoft.com/WMIConfig/2002/State" xmlns:xsi="http://www.w3.org/2001/XMLSchema-instance">
                <InputLocale>0409:00000409</InputLocale>
                <SystemLocale>en-US</SystemLocale>
                <UILanguage>en-US</UILanguage>
                <UILanguageFallback>en-US</UILanguageFallback>
                <UserLocale>en-US</UserLocale>
            </component>
            <component name="Microsoft-Windows-Shell-Setup" processorArchitecture="amd64" publicKeyToken="31bf3856ad364e35" language="neutral" versionScope="nonSxS" xmlns:wcm="http://schemas.microsoft.com/WMIConfig/2002/State" xmlns:xsi="http://www.w3.org/2001/XMLSchema-instance">
                <OOBE>
                    <HideEULAPage>true</HideEULAPage>
                    <HideOEMRegistrationScreen>true</HideOEMRegistrationScreen>
                    <HideOnlineAccountScreens>true</HideOnlineAccountScreens>
                    <HideWirelessSetupInOOBE>true</HideWirelessSetupInOOBE>
                    <ProtectYourPC>1</ProtectYourPC>
                    <UnattendEnableRetailDemo>false</UnattendEnableRetailDemo>
                </OOBE>
                <UserAccounts>
                    <LocalAccounts>
                        <LocalAccount wcm:action="add">
                            <Description>Main local login</Description>
                            <DisplayName>Owner</DisplayName>
                            <Group>Administrators</Group>
                            <Name>Owner</Name>
                        </LocalAccount>
                    </LocalAccounts>
                </UserAccounts>
                <RegisteredOwner>ACTS</RegisteredOwner>
                <ShowPowerButtonOnStartScreen>true</ShowPowerButtonOnStartScreen>
                <TimeZone>Eastern Standard Time</TimeZone>
            </component>
        </settings>
        <settings pass="specialize">
            <component name="Microsoft-Windows-Shell-Setup" processorArchitecture="amd64" publicKeyToken="31bf3856ad364e35" language="neutral" versionScope="nonSxS" xmlns:wcm="http://schemas.microsoft.com/WMIConfig/2002/State" xmlns:xsi="http://www.w3.org/2001/XMLSchema-instance">
                <OEMInformation>
                    <Manufacturer>ACTS</Manufacturer>
                </OEMInformation>
                <CopyProfile>true</CopyProfile>
                <OEMName>ACTS</OEMName>
                <RegisteredOrganization>ACTS</RegisteredOrganization>
                <TimeZone>Eastern Standard Time</TimeZone>
                <ShowPowerButtonOnStartScreen>true</ShowPowerButtonOnStartScreen>
            </component>
        </settings>
        <cpi:offlineImage cpi:source="catalog://desktop/lenovo_gcustom_os/oscdimage_source/sources/install_windows 10 home.clg" xmlns:cpi="urn:schemas-microsoft-com:cpi" />
    </unattend>
      My Computers


  9. Posts : 17,661
    Windows 10 Pro
       #29

    I have done some extensive testing during the past few days.

    First the facts:

    When capturing a custom image, image name is required but description is optional. Missing description is not a problem if install media only contains one Windows image (edition / index), and autounattend.xml answer file contains the correct product key for that specific edition. For instance, if a single index image is Win10 PRO, and autounattend.xml contains a valid PRO generic key, edition selection is not shown because Windows setup finds matching edition to install.

    If the edition selection is shown in unattended, automatic installation, it means that either the edition in image does not match the key in autounattend.xml, or that there is other syntax errors in answer file.

    However, I edited the tutorial, its step 7.11, adding the switch for description for the capture command sample:

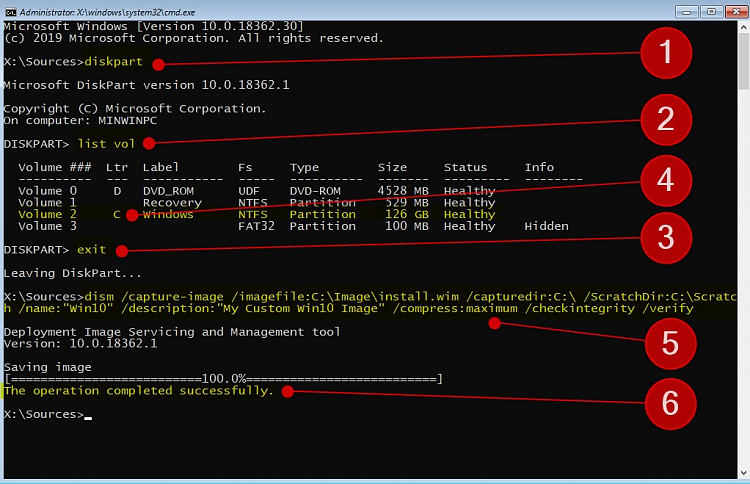
    7.11) When booted from install media, press SHIFT + F10 to open Command Prompt. Type diskpart and press Enter (#1 in screenshot below), type list vol and press Enter (#2), type exit and press Enter (#3)

    Check drive letter for Windows partition (#4), all drives are listed under list vol command. In most cases it will be C: but occasionally, depending on hardware and connected disks, booting to WinPE or install media changes drive letters.

    Enter the following command and press Enter to capture Windows image (#5). Replace drive letter C: if necessary in /imagefile, /capturedir and /ScratchDir switches:

    Code:
    dism /capture-image /imagefile:C:\Image\install.wim /capturedir:C:\ /ScratchDir:C:\Scratch /name:"Win10" /description:"My Custom Win10 Image" /compress:maximum /checkintegrity /verify
    Name is required, it must be in quotes and can be anything you'd prefer. Description is optional but recommended, also in quotes.

    Dism will capture the image. Wait until it's done (#6), restart reference machine and let it boot normally from hard disk. Notice that boot will take quite some time because reference machine goes through automated OOBE.

    no images are available...win 10 install-image.png

    If custom image is already created, and it does not contain an index / edition description, it can be added as shown in this post in tutorial thread.

    Kari
      My Computer


  10. Posts : 14,046
    Windows 11 Pro X64 22H2 22621.1848
       #30

    Hi Kari. This is what dism /Get-WimInfo shows about the Win 10 Pro install.wim I built.

    no images are available...win 10 install-dism-1.jpgno images are available...win 10 install-dism-2.jpg

    My xml files in in my previous post. Any idea why I get a No images are available like I show in post #2.

    I used the 1903 ADK with the Windows System Image Manager (WSIM) 1903 update that makes it work correctly.
      My Computers


  Related Discussions
Our Sites
Site Links
About Us
Windows 10 Forums is an independent web site and has not been authorized, sponsored, or otherwise approved by Microsoft Corporation. "Windows 10" and related materials are trademarks of Microsoft Corp.

© Designer Media Ltd
All times are GMT -5. The time now is 09:09.
Find Us


Windows 10 Forums