How can you Remove Indexing


  1. Posts : 10
    w10x64pro
       #1

    How can you Remove Indexing


    I work a lot with Nlite, Customizing my windows 10 ISO for a Clean and Less Bloated Installation.
    One of the things I have never been able to remove is Indexing, let me explain.
    On a clean install if you go to Computer/c:/drive/properties/general, there is a box at the bottom that says ( allow files on this drive to have contents indexed in addition to the properties ).
    Now when you tick that box and apply it , it can take some time to apply.
    So what I am after is to find a way to enable that setting in the ISO so that after windows is installed, that setting is already done.
    Disabling windows Search in Services doesn't alter it.
    Now lets not get into a discussion as to why one would want to disable Indexing, But it is something I have always done, And it does make your PC Perform Better.
    Any help would be appreciated.
      My Computer


  2. Posts : 456
    Windows 10
       #2

    1. Mount the image somewhere (I mean the wim or esd file)

    2. Access the root of the mount point

    3. Open a command prompt and run this:

    attrib +i /d /s

    4. Unmount the image and save the changes
      My Computer


  3. Posts : 10
    w10x64pro
    Thread Starter
       #3

    ricardobohner said:
    1. Mount the image somewhere (I mean the wim or esd file)

    2. Access the root of the mount point

    3. Open a command prompt and run this:

    attrib +i /d /s

    4. Unmount the image and save the changes
    My Image is an ISO , How do I Apply your Fix
      My Computer


  4. Posts : 1,079
    10 + Linux
       #4

    Don't know for the ISO Tweaker or the ISO tweak you ask. Ccleaner removes bloatware.

    -Control Panel/Indexing Options/Deselect All/Manually in modify

    -C:/Properties/General/Allow files on the drive to have conten indexed in addition to file properties=Deselect + Disk Cleanup.
      My Computer


  5. Posts : 456
    Windows 10
       #5

    Somewhere inside that iso must be a *.wim or *.esd file. For example let's say you mounted your iso file in e: drive.

    e:\sources\install.wim
    e:\sources\install.esd

    You create a temporary folder to mount your wim or esd file:

    c:\test

    You use this command to find out the index number of the Windows 10 version you want to change:

    Dism /get-wiminfo /wimfile:E:\sources\install.esd

    You use this command to mount the image on c:\test:

    Dism /mount-wim /wimfile:E:\sources\install.wim /index:<indexnumber> /mountdir:C:\test

    * change <indexnumber> with the index you memorized previously

    I don't remember how long it takes to mount the image maybe 10 minutes or so. When it is mounted you open a command prompt go into C:\test and do the attrib command

    attrib +i /d /s

    Now you update the image with:

    Dism /unmount-wim /montdir:C:\test /commit

    Now you use the files on e: to make a new iso by using imgburn or another iso creating software you like, but make sure you make it bootable.
      My Computer


  6. Posts : 10
    w10x64pro
    Thread Starter
       #6

    ricardobohner said:
    Somewhere inside that iso must be a *.wim or *.esd file. For example let's say you mounted your iso file in e: drive.

    e:\sources\install.wim
    e:\sources\install.esd

    You create a temporary folder to mount your wim or esd file:

    c:\test

    You use this command to find out the index number of the Windows 10 version you want to change:

    Dism /get-wiminfo /wimfile:E:\sources\install.esd

    You use this command to mount the image on c:\test:

    Dism /mount-wim /wimfile:E:\sources\install.wim /index:<indexnumber> /mountdir:C:\test

    * change <indexnumber> with the index you memorized previously

    I don't remember how long it takes to mount the image maybe 10 minutes or so. When it is mounted you open a command prompt go into C:\test and do the attrib command

    attrib +i /d /s

    Now you update the image with:

    Dism /unmount-wim /montdir:C:\test /commit

    Now you use the files on e: to make a new iso by using imgburn or another iso creating software you like, but make sure you make it bootable.
    Thanks for that, I'm rather busy but I will try it out in a few days and get back to you.
    John
      My Computer


  7. Posts : 14,046
    Windows 11 Pro X64 22H2 22621.1848
       #7

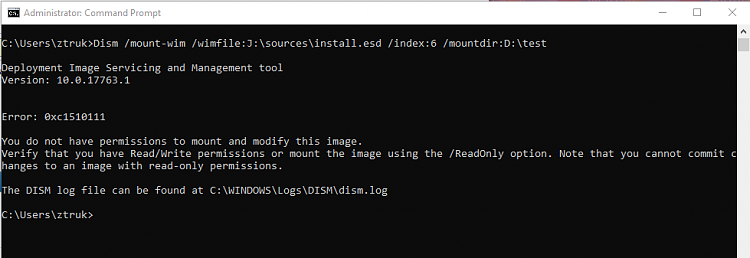
    When I try this (because I'm curious) I get this error:

    Mounted ISO for 17763.389 to J:
    Used Index 6 which is the Pro version.
    D:\Test is a new folder I just created. I can create adn delete files and folders there.
    I'm running DISM form a Elevated COmmadn Prompt/

    How can you Remove Indexing-image.png
      My Computers


  8. Posts : 456
    Windows 10
       #8

    @Ztruker Try to extract the content of the iso before mounting. I remembered that everything inside the iso is readonly so maybe it's this.
      My Computer


  9. Posts : 14,046
    Windows 11 Pro X64 22H2 22621.1848
       #9

    What would the DISM command to do that look like?

    Maybe if I extract the ISO to a folder then run the DISM command pointing to that as the source? I'll try it.
      My Computers


  10. Posts : 14,046
    Windows 11 Pro X64 22H2 22621.1848
       #10

    Okay, I extracted the iso to a folder, D:\Win10source, then the DISM command worked correctly. There sure are a lot of files in a Win 10 ISO. I used 17763.1 Win 10 Pro X64. 94,940 files in total.

    How can you Remove Indexing-image.png
      My Computers


  Related Discussions
Our Sites
Site Links
About Us
Windows 10 Forums is an independent web site and has not been authorized, sponsored, or otherwise approved by Microsoft Corporation. "Windows 10" and related materials are trademarks of Microsoft Corp.

© Designer Media Ltd
All times are GMT -5. The time now is 09:57.
Find Us


Windows 10 Forums