WIn 10 image to use on various PCs

Page 1 of 3 123 LastLast

  1. Posts : 14,046
    Windows 11 Pro X64 22H2 22621.1848
       #1

    WIn 10 image to use on various PCs


    I do the same thing over and over for the PCs I sell at our thrift store.

    I'd like to set one up the way I want, then neutralize it so I can save the image and then simply restore the image to other computers, enter the product key, have it install the necessary drivers and be done.

    I know I've seen this discussed here many different time but I was not interested then.

    I want to keep this as simple as possible.

    Pointers? Links?
      My Computers


  2. Posts : 31,660
    10 Home x64 (22H2) (10 Pro on 2nd pc)
       #2

    Ztruker said:
    ...I'd like to set one up the way I want, then neutralize it so I can save the image and then simply restore the image to other computers...
    Pointers? Links?
    Kari is the expert in this, the notes in part eight of his tutorial say...

    The image is hardware independent, thanks to the Generalize switch we used in Step 6.2 with Sysprep, required by customized default user profile. This means that it can be used on any hardware setup and computer capable of running Windows 10 to perform a clean install by restoring the image which does not contain any user profiles but has all the software already installed and Windows theme customizations done.
    Customize Windows 10 Image in Audit Mode with Sysprep
      My Computers


  3. Posts : 14,046
    Windows 11 Pro X64 22H2 22621.1848
    Thread Starter
       #3

    Thanks Bree, I'll read that over after dinner. Sounds like exactly what I need.

    Will try it tomorrow.
      My Computers


  4. Posts : 18,432
    Windows 11 Pro
       #4

    If all the computers are the same make/model, what I would do is the normal clean install on one. At the OOBE screen, press CTRL+SHIFT+F3 to reboot into audit mode. In audit mode, install all the drivers and updates. Get everything completely ready, except for entering a product key to activate. At that point, create a Macrium Reflect Image of the installation. Then you can enter the product key to activate the first computer and select Shutdown and To OOBE on the sysprep GUI window. The next time the computer restarts, it will be to OOBE and no traces of the temp admin account login will remain. But all the drivers, updates and activation will stay.

    Then on the next computers, restore the Macrium Reflect image. The computer will boot directly into Audit Mode. Enter that computer's product key to activate and select Shutdown to OOBE. Lather, rinse, repeat for all the other computers.
      My Computer


  5. Posts : 14,046
    Windows 11 Pro X64 22H2 22621.1848
    Thread Starter
       #5

    The computers are every make and model you can think of. Some will be the same but most will not though over time many will be.

    This is a thrift store that people donate their old computers too and I wipe them, load the OS and programs, setup the way I want and sell cheap.

    Right now I have 30+ from a local networking business (hardware/software and service) with at least 7 different brands and models.

    A simgle image I can restore then finish the install would save me a lot of time.
      My Computers


  6. Posts : 9,790
    Mac OS Catalina
       #6
      My Computer


  7. Posts : 14,046
    Windows 11 Pro X64 22H2 22621.1848
    Thread Starter
       #7

    I don't use Linux so not an option. Thanks though.
      My Computers


  8. Posts : 14,046
    Windows 11 Pro X64 22H2 22621.1848
    Thread Starter
       #8

    So far a waste of time. Spent 3+ hours and ended up with this:

    3:38 PM : This application requires version 10.0.18362.1 of the Windows ADK.
    Install this version to correct the problem
    3:44 PM :
    3:44 PM : Windows SIM was unable to generate a catalog. For troubleshooting assistance, see the topic: 'Windows System Image Manager Technical Reference' in the Windows ADK User's Guide.
    3:44 PM :
    3:44 PM : System.BadImageFormatException: Could not load file or assembly 'Microsoft.ComponentStudio.ComponentPlatformImplementation, Version=10.0.0.0, Culture=neutral, PublicKeyToken=31bf3856ad364e35' or one of its dependencies. An attempt was made to load a program with an incorrect format.
    File name: 'Microsoft.ComponentStudio.ComponentPlatformImplementation, Version=10.0.0.0, Culture=neutral, PublicKeyToken=31bf3856ad364e35'

    Server stack trace:
    at Microsoft.ComponentStudio.ComponentPlatformInterface.Cpi.CreateOfflineImageInstance(OfflineImageInfo imageInfo)
    at Microsoft.ComponentStudio.ComponentPlatformInterface.OfflineImageCatalog.Serialize(OfflineImageInfo imageInfo)
    at Microsoft.ComponentStudio.ComponentPlatformInterface.OfflineImageInfo.CreateCatalog()
    at Microsoft.ComponentStudio.ComponentPlatformInterface.CatalogCreatorImpl.CreateCatalog(OfflineImageIn fo offlineImageInfo)
    at System.Runtime.Remoting.Messaging.StackBuilderSink._PrivateProcessMessage(IntPtr md, Object[] args, Object server, Object[]& outArgs)
    at System.Runtime.Remoting.Messaging.StackBuilderSink.SyncProcessMessage(IMessage msg)

    Exception rethrown at [0]:
    at System.Runtime.Remoting.Proxies.RealProxy.HandleReturnMessage(IMessage reqMsg, IMessage retMsg)
    at System.Runtime.Remoting.Proxies.RealProxy.PrivateInvoke(MessageData& msgData, Int32 type)
    at Microsoft.ComponentStudio.ComponentPlatformInterface.ICatalogCreator.CreateCatalog(OfflineImageInfo offlineImageInfo)
    at Microsoft.ComponentStudio.CatalogGenerator.CreateCat(ProgressDialog pd, Object o)

    WRN: Assembly binding logging is turned OFF.
    To enable assembly bind failure logging, set the registry value [HKLM\Software\Microsoft\Fusion!EnableLog] (DWORD) to 1.
    Note: There is some performance penalty associated with assembly bind failure logging.
    To turn this feature off, remove the registry value [HKLM\Software\Microsoft\Fusion!EnableLog].
    I did install version 10.0.18362.1 of the Windows ADK.

    The ISO I installed from did not have a WIM so I had to convert ESD to WIM so maybe that is where the problem is.

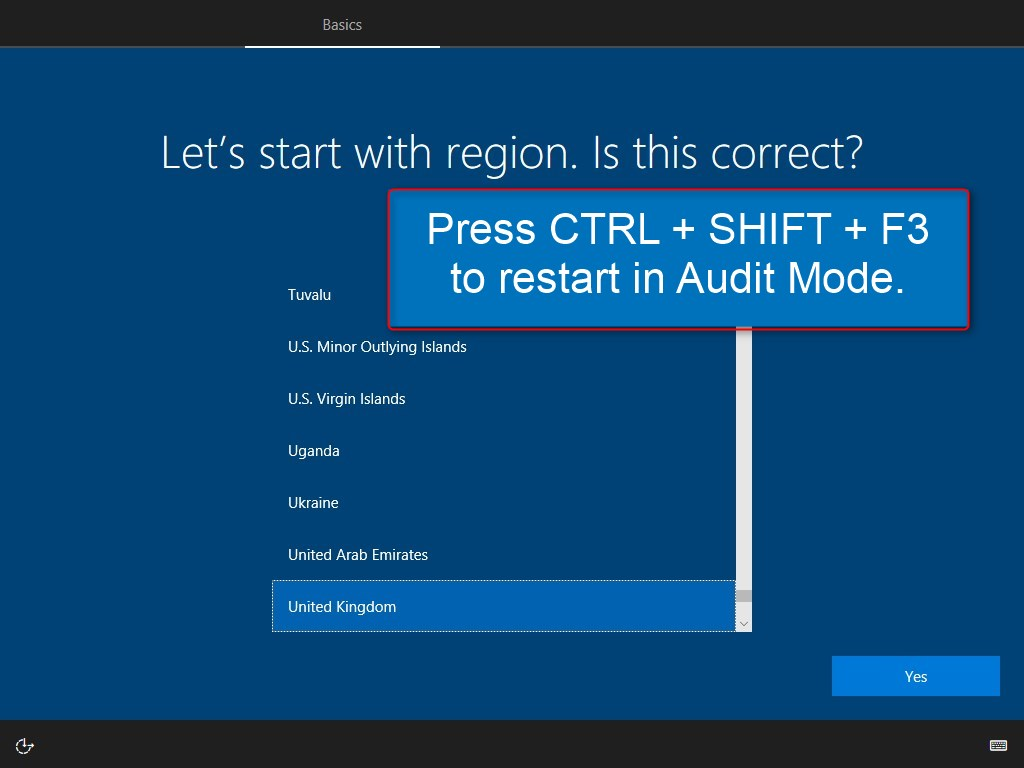
    I was not exactly sure where to press Ctrl+Shift+F3 as Keri's words and what I saw on the screen didn't match. I'm guessing I had to do this at the point install asks you to create a userid so that's what I did.

    Next tried to figure out how to get to a Default account then reread the tutorial and realized Default would be up updated when I finally used the sysprep command. Also did not realize I would be logged in as Administrator until I again went back and reread the tutorial.

    So, one question I have is where do I put stuff. Do I put it in Administrator\Downloads or directly in Default\Downloads?
    I chose the latter but I'm not sure that is correct.

    I powered off the PC I was working with, will it boot up into Audit Mode again so I can continue to work on it or do I have to start over? I'll get the same 1903 18362.239 ISO with a install.wim instead of a install.esd and try using that instead of the one I converted, see if that makes a difference.

    If I get time I may try this on a Oracle VM tonight to see if I can make it work.
      My Computers


  9. Posts : 14,046
    Windows 11 Pro X64 22H2 22621.1848
    Thread Starter
       #9

    Another question. Since you can't personalize anything without activating, I went ahead and activated the Win 10 install. I wanted to see what would or would not be propagated to Default when I syspreped the system after some basic Desktop customization.

    Off to try this in a VM now that I have a ISO that has install.wim.
      My Computers


  10. Posts : 17,661
    Windows 10 Pro
       #10

    Ztruker said:
    So far a waste of time. Spent 3+ hours and ended up with this:

    {Error code removed}

    I did install version 10.0.18362.1 of the Windows ADK.
    Sadly, Windows ADK has been quite buggy lately, especially when trying to create x64 catalog files. I recommend using the ADK Insider Preview instead: https://www.microsoft.com/en-us/soft...iderpreviewADK

    In any case, you can download a catalog file from my OneDrive. You can use it instead of creating a new one. Although it is a Pro edition catalog, it can also be used for Home Edition answer files in WSIM (Windows System Image manager):

    Download


    Ztruker said:
    I was not exactly sure where to press Ctrl+Shift+F3 as Keri's words and what I saw on the screen didn't match. I'm guessing I had to do this at the point install asks you to create a userid so that's what I did.
    It's Kari, not Keri

    You enter Audit Mode from Region selection screen:


    Ztruker said:
    So, one question I have is where do I put stuff. Do I put it in Administrator\Downloads or directly in Default\Downloads? I chose the latter but I'm not sure that is correct.
    Never, ever do anything with Default account! Never save anything to it, never even open it! I repeat: Do not touch the Default account!

    Everything you do in Audit Mode, be it software installation, profile customization or anything else, everything will be copied from built-in admin account you use in Audit Mode to Default user account when you sysprep with an answer file with CopyProfile>true</CopyProfile> setting. It's the built-in admin profile you customize to copy it to Default profile; if you edit / modify Default profile, all changes you've made will be overwritten when you sysprep.


    Ztruker said:
    I powered off the PC I was working with, will it boot up into Audit Mode again so I can continue to work on it or do I have to start over?
    Once you have entered the Audit Mode, Windows will always boot back to it as long as you have not specifically told it to exit Audit Mode and boot to OOBE. This is done by using the /oobe switch with sysprep command; if the switch is not used, Windows will always reboot to Audit Mode.

    By the way, as Windows 10 and ADK are changing version by version, the tutorial @Bree linked to is, although still valid, a little bit outdated. The more actual, comprehensive tutorial to build hardware independent install media can be found here: Create media for automated unattended install of Windows 10

    That tutorial might look long and difficult to understand, but that's only because it gives detailed step-by-step instructions with lots of screenshots to "image customization newbies".

    Last but not least, if you want to, I can make custom answer file(s) to you. You just need to tell me which processor architecture and edition you are installing, and what username and password you want to use for initial local admin account.

    Kari
      My Computer


  Related Discussions
Our Sites
Site Links
About Us
Windows 10 Forums is an independent web site and has not been authorized, sponsored, or otherwise approved by Microsoft Corporation. "Windows 10" and related materials are trademarks of Microsoft Corp.

© Designer Media Ltd
All times are GMT -5. The time now is 02:14.
Find Us


Windows 10 Forums