Can I install "unsigned" Win 8 driver for monitor on Win 10?

Page 1 of 2 12 LastLast

  1. Posts : 239
    10
       #1

    Can I install "unsigned" Win 8 driver for monitor on Win 10?


    I have an Asus ProArt PA248Q monitor that is showing as "Generic PnP Monitor" in the Device Manager.
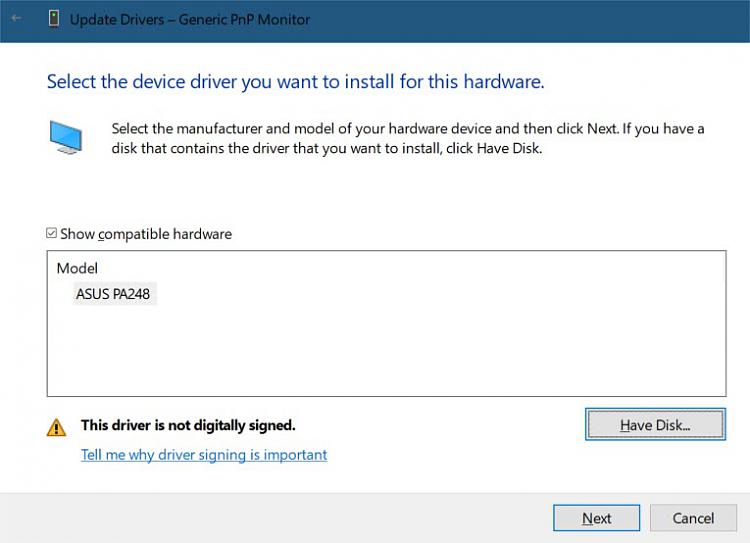
    I'm trying to update it to the manufacturer drivers but the only one they have is the Win 8 64-bit but whenever I try to update the driver, it tells me it is digitally unsigned and therefore will not complete the install.

    Is there anyway around and is it safe to do so?
    Just really wanting the device to show as the Asus monitor, not just a Generic PnP.
      My Computer


  2. Posts : 4,187
    Windows 11 Pro, 22H2
       #2
      My Computers


  3. Posts : 239
    10
    Thread Starter
       #3

    Hmm, I did option 3 and still get the same result

    Can I install "unsigned" Win 8 driver for monitor on Win 10?-2021-01-19_17-10-52.jpgCan I install "unsigned" Win 8 driver for monitor on Win 10?-2021-01-19_17-11-06.jpg
      My Computer


  4. Posts : 8,103
    windows 10
       #4

    Whats in the inf file you can view it in notepad https://docs.microsoft.com/en-us/win...-for-inf-files
      My Computer


  5. Posts : 239
    10
    Thread Starter
       #5

    Samuria said:
    Whats in the inf file you can view it in notepad https://docs.microsoft.com/en-us/win...-for-inf-files
    ; =================================================; ASUS_PA248.INF 01/11/2012 Ver. 1.0; INF File for Windows Vista/XP/Me/9x/2000; Copyright (c) 2012, ASUS Corporation; =================================================;[Version]signature="$CHICAGO$"Class=MonitorClassGuid={4D36E96E-E325-11CE-BFC1-08002BE10318}Provider=%ASUS%CatalogFile=PA248.catDriverVer=01/11/2012,1.0[ClassInstall32]AddReg=ClassAddReg32[ClassAddReg32]HKR,,,,%MonitorClassName%HKR,,Icon,,"-1"HKR,,NoInstallClass,,1[ControlFlags]ExcludeFromSelect.NT=Monitor\ACI24B1[DestinationDirs]DefaultDestDir = 11PA248.CopyFiles = 23[SourceDisksNames]1=%DiskName%,,[SourceDisksFiles]PA248.icm=1[Manufacturer]%ASUS%=ASUS,NTx86,NTAMD64[ASUS]%PA248%=PA248.Install, Monitor\default_Monitor%PA248%=PA248.Install, Monitor\ACI24B1[ASUS.NTx86]%PA248%=PA248.Install, Monitor\default_Monitor%PA248%=PA248.Install, Monitor\ACI24B1[ASUS.NTAMD64]%PA248%=PA248.Install, Monitor\default_Monitor%PA248%=PA248.Install, Monitor\ACI24B1[PA248.Install]DelReg=DEL_CURRENT_REGAddReg=PA248.AddReg, 1920, DPMSCopyFiles=PA248.CopyFiles[DEL_CURRENT_REG]HKR,MODESHKR,,MaxResolutionHKR,,DPMSHKR,,ICMProfile[1920]HKR,,MaxResolution,,"1920,1200"[DPMS]HKR,,DPMS,,1[PA248.AddReg]HKR,"MODES\1920,1200",Mode1,,"30.0-83.0,50.0-76.0,+,-"HKR,,ICMProfile,0,"PA248.icm"[PA248.CopyFiles]PA248.icm[Strings]MonitorClassName="Monitor"ASUS="ASUS"DiskName="ASUS LCD Monitor installation diskette"PA248="ASUS PA248"
      My Computer


  6. Posts : 8,103
    windows 10
       #6

    Try changing Signature = "$WINDOWS NT$"
      My Computer


  7. Posts : 239
    10
    Thread Starter
       #7

    Samuria said:
    Try changing Signature = "$WINDOWS NT$"
    Thanks for the suggestion. Unfortunately, it didn't work. Still same message (I'm still in windows test mode as well).
      My Computer


  8. Posts : 582
    Windows 10 Home
       #8

    Open an admin Command Prompt, type or paste "bcdedit.exe /set nointegritychecks on" and press "Enter". You may have to restart the computer for the change to take effect.

    Ben
      My Computer


  9. Posts : 239
    10
    Thread Starter
       #9

    Ben Myers said:
    Open an admin Command Prompt, type or paste "bcdedit.exe /set nointegritychecks on" and press "Enter". You may have to restart the computer for the change to take effect.Ben
    Would you believe it - this did not work either.
      My Computer


  10. Posts : 1,310
    Windows 10
       #10

    To make this work :

    First you need the following files in same folder on installing :
    Code:
    PA248.INF
    PA248.cat
    PA248.icm
    * If any is missing or named differently , installation will fail
    ** The file PA248.cat is the signature file windows was looking for and apparently missing

    Second
    1 - Open a command prompt as administrator
    2 - Run the following commands
    Code:
    bcdedit /set testsigning on
    bcdedit /set nointegritychecks off

    Third
    Edit the line in original file PA248.INF by NotePad++ From
    Code:
    signature="$CHICAGO$"
    To
    Code:
    signature="$Windows NT$"
    *Using other means than NotePad++ may risk changing needed control characters (Enter / Shift)

    Fourth go through installation through device manager as normal

    Fifth when done run command prompt as administrator and run the following commands
    Code:
    bcdedit /set testsigning off
    bcdedit /set nointegritychecks on
      My Computer


  Related Discussions
Our Sites
Site Links
About Us
Windows 10 Forums is an independent web site and has not been authorized, sponsored, or otherwise approved by Microsoft Corporation. "Windows 10" and related materials are trademarks of Microsoft Corp.

© Designer Media Ltd
All times are GMT -5. The time now is 10:18.
Find Us


Windows 10 Forums