
New
#31
ACHIEVEMENT UNLOCKED: FIRST TIME BUILDING A PC FROM SCATCH! (silver trophy)
ACHIEVEMENT UNLOCKED: TURNED ON PERFECTLY INTO WINDOWS FIRST TRY (gold trophy)
Hey all! It's been a while I know but I've been busy whilst also mustering up the courage and effort of tearing down all the parts and basically building a pc from scratch. I'm excited to announce that everything went perfectly! Let me walk you all through my adventure for anyone that is interested.
So! First of all here are the pc's before I dived in.
BEFORE
donated parts, old case
better case, old parts
Then I basically started taking all the parts out of my white case first, since I wouldn't be using those parts I could start getting some experience touching these delicate pieces and figuring out how it all comes out, it was actually incredibly exhausting so I spent the first night just disassembling the phantom.
The following day I started to disassemble the black case of which the parts I would put in the white case. Here is a picture of my work space.
Putting in the motherboard was a tad scary, the i/o shield was easy enough to figure out after I watched a youtube video. But lining up the motherboard holes with the screw holes was a little tense as they wouldn't line up, but after pushing the motherboard slightly firmly in towards the I/O shield I managed to line it up and get that first screw in. Then all the others lined up and diagonally I put the screws in one by one, then tightening 1 by 1.
The cabling was the most daunting thing for me, because there was so much going on, but it actually wasnt too bad, I seperated all the front usb/on off cables into a bundle, then took out all the power cables. Started with the on/off/led/bios speaker first and after referring to the manual was actually pretty easy, once they where done I moved onto the chassi fans, which where ezpz, then finally the MOBO power, CPU power, storage and finally plugged in the GPU then the power cable for it.
Can I just say.....how much....I hate...with a passion....the most annoying...most frustrating cable.....MOLEX. I curse the individual that invented Molex cables, honestly, my hands....my poor hands, trying to get them in to each other, my god, the worst cable on the planet, I have cuts and bruises all over my hands, please, someone tell me, in the future, in modern pc times, they are no longer being used, please. I think I almost managed to even break one for the FAN controller and the RGB for the heatsink fan, but I think I managed to fix it as both those things are working fine
oh oh oh, one of the mobo screws fell behind the mobo, THE LAST 1, i was so done, it was sort of wedged in, i don't know how but I lost track of it, then when I came to the last screw i couldn't find it, then I was like..."no....don't tell me..." I looked behind the mobo and there it was, stuck, LUCKILY, right on the edge/corner, I was honestly so CBF I didn't want to unscrew them all then have to align it all over again, so i got a ear cleaner thing and managed to push it out, then had a panic attack because I was like "...shit, what if I scratched the PCB, oh god, im doomed, yep, RIP PC, it was fun, it's not going to work, im so done". And the molex wire coming out of the socket added to that feeling so by that point I Just wanted to get it done and see if this thing even turned on.
Long and behold. I plugged it all up and first shot, first try, boom, 360 no scoped the crap out of this pc, booted in mint condition, NOTHING went wrong, I almost cried, I think I did, I was so proud of myself, went from being too scared to even touch a fan cable to building an entire PC from scratch. It's even so incredibly quiet, whilst still maintaining really good temps at low RPM, this cpu is pretty sick.
NOW FOR THE THERMAL PASTE SAGA
So while I was hooking up the heatsink, I applied a little bit of thermal paste onto the cpu...the thing is...it was...little, like actually little. I even took a picture because I was going to show you all to rate my thermal paste because I knew it didn't feel like enough.
I showed it to some friends plus the 1 that donated the pc and they where like....yeea....hmmmm...its not baaad, but, could have been a bit more, so my OCD kicked in and I was like.....ffffffffff, alright, i gotta reapply the thermal paste or I'm not going to be able to sleep at night.
So I used a program called OCCT for the first time to check the temps of my current little blob.
This is what I got, now, I don't know if this is good, or great, but still, in the back of my mind im like.."what if its only covering the centre like those stock intel coolers and everything else isn't even covered properly, I'm missing out on potential C's, maybe it can go even cooler! By this point I was a seasoned pc builder, so I slapped on my gloves and went at it again, ain't no cpu or heatsink gana scare me, ok maybe a little bit because it might break but it's pretty new so i may as well abuse it now before the warranty runs out. So I took it out to see the actual coverage of that little blob I had put, I had to see it with my own eyes, for science, for peace of mind, long and behold....To be continued shortly, ran out of picture limit
- - - Updated - - -
LONG AND BEHOLD...
It actually did a very good job of covering the cpu, i was like "....not bad". I was surprised, a tiny blob like that? That much coverage? Dam....nice, I guess it was enough after all, except for the 2 corners, but still, at least I got to see with my own 2 eyes the effects of thermal paste and how it works, sort off.
So I reapplied some thermal paste, but this time, a crappy little cross. I was going to do a bigger cross as seen on youtube but I thought to myself "if that little blob did that much, then if i did a slightly bigger cross, it should be perfect" worst case a little more then needed but I realised I'd have better peace of mind if I put slightly more then needed as opposed to not enough, because not having enough can be bad, but having a bit too much, won't do a dam thing, at least from my research, who ever came up with "less is more" is wrong, "enough is enough, a little bit more, won't harm anything" is a better saying, imo.
As you can see, not too much, potentially the same amount as last time, if not, just a little bit more and a cross shape for hopefully better coverage.
Here are the temps for the crappy cross.
As you can see, practically the same +- 1/2c, which could be because I ran the test immediately after I put it on where as with the little blob I did it the day after because I was exhausted, who knows, hotter day? not hotter day? Unless I'm looking at it wrong, I've concluded that is just how that CPU runs, at those temperatures, having done 2 tests, I can say this
Thank you for reading my adventure, going to be using the pc for a few days, see how things go, hopefully no hiccups, then after a few days I can go back to my life and enter the matrix.
What does the future hold for me? Hopefully after Covid dies down (if ever), chip stocks catch up, market prices chill out and scalpers f$%k off I will buy a brand new system, with brand new parts....and build it myself :)
Much love, Vellaura <3
@Ghot
@AddRAM
@itsme1
@ignatzatsonic
- - - Updated - - -
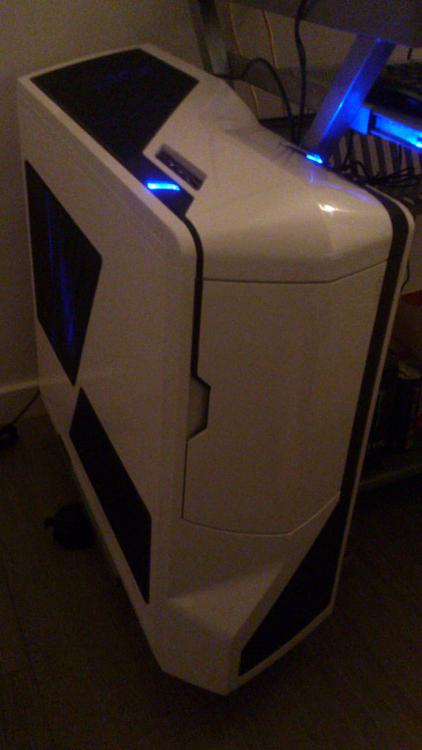
Oh crap, I forgot the final picture! lmao. Cable management was hard, this was the best I could do whilst still trying to fit the wires in. Here she is... My Phantom. Edit: Also, my headphones would make little static sounds when plugged into the old case but in my phantom the static is gone and audio is crystal


Last edited by Vellaura; 04 Apr 2021 at 07:44.

 Quote
Quote


 , still.


