Using Macrium Reflect to transfer data between two machines

Page 1 of 2 12 LastLast

  1. Posts : 19
    Windows 7 Professional
       #1

    Using Macrium Reflect to transfer data between two machines


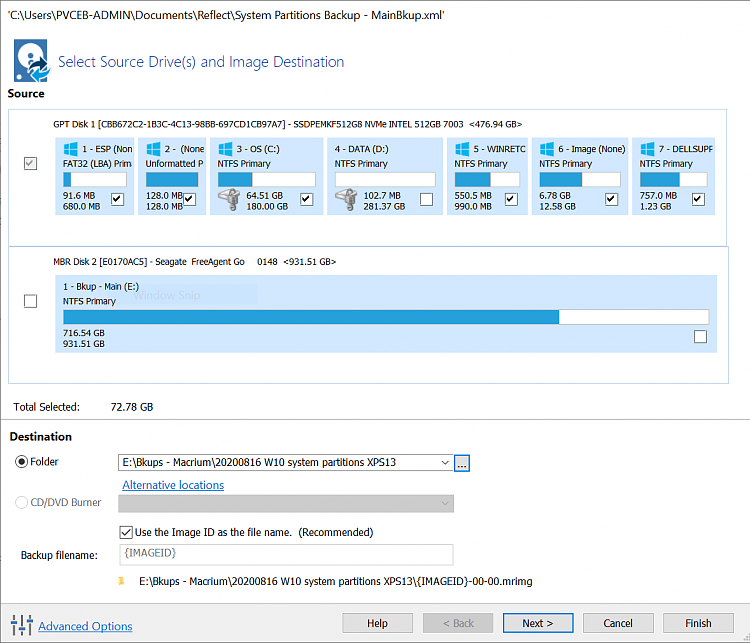
    I need help with using Macrium Reflect (v7.2.5107.0) to transfer data on XPS13 laptop running W7 to the newly formatted and empty partition DATA (D:) on 2nd (and newer) XPS13 laptop running W10. I’ve made backup image of W10 system partitions, using MR to a folder on an external backup hard drive (screenshot attached):
    Using Macrium Reflect to transfer data between two machines-2020-08-16-system-partitions-xps13-bkup-pre.png


    I’ve already backed up the W7 DATA (D:) partition with MR to the same external backup drive.
    When I run MR on W10, I can browse and see this saved backup folder (and image)…please see attached screenshot:

    Using Macrium Reflect to transfer data between two machines-image.png

    How do I proceed to choose the destination location of the “restore” as the DATA (D:)? MR doesn’t allow me to specifically specify the DATA (D:) partition of Destination (local disk) - please see screenshot:

    Using Macrium Reflect to transfer data between two machines-image.png

    There’s a helpful tip on top of the screen shown in the above screenshot [Drag Partitions to the Destination Disk or click ‘Copy selected partitions’]. I’m hesitant to proceed as I suspect that this action may actually overwrite the system partitions (particularly the three at the end of the disk) and not necessary “overwrite” the intended empty DATA (D:) partition.


    My system specs have been updated: PC 1 is the W7 machine and 2nd PC is the W10 machine. I've allotted time to do this transfer this morning so really hope there are longtime MR users are online now to help me with the next crucial steps & be able to use Windows 10 more regularly.
      My Computers


  2. Posts : 43,227
    Win 10 Pro (22H2) (2nd PC is 22H2)
       #2

    Hi, if it's data only, why bother using Macrium R anyway? You could possibly transfer over a network (depends on speed) or via an external drive.
      My Computers


  3. Posts : 2,487
    Windows 10 Home, 64-bit
       #3

    I'd like to see the answer to this myself.

    I faced a similar situation a few years ago. I have no "network" through which to do the transfer and the amount of data was over 600 GB.

    I also was afraid of an overwrite and did not proceed and instead used a more direct method not involving Macrium. It was tedious but not worrisome.

    Dragging the partition to the destination partition may not overwrite the other partitions, but as I recall there's nothing shown on screen to reassure you.
      My Computer


  4. Posts : 43,227
    Win 10 Pro (22H2) (2nd PC is 22H2)
       #4

    Hi, if you have a look at this, then in the example given where the partition of source and destination match, you would untick the matches, then drag the appropriate partition to its destination.

    Restoring an image from within Windows - KnowledgeBase v7 - Macrium Reflect Knowledgebase - KnowledgeBase v7 - Macrium Reflect Knowledgebase

    Then the NEXT screen (3) gives you the option to review the actions to be processed.

    It is at that stage you see exactly what will happen when you click 'Finish'

    (From v7 online manual
    Macrium Reflect v7 User Guide - KnowledgeBase v7 - Macrium Reflect Knowledgebase - KnowledgeBase v7 - Macrium Reflect Knowledgebase
    )

    Full guide:
    http://updates.macrium.com/reflect/v...df?src=sidebar
      My Computers


  5. Posts : 19
    Windows 7 Professional
    Thread Starter
       #5

    dalchina said:
    Hi, if it's data only, why bother using Macrium R anyway? You could possibly transfer over a network (depends on speed) or via an external drive.
    Thank you, @dalchina, for the quick responses! Good question on why use Macrium R….I guess more due to my trusting the backup image be more a more secure (& probably faster) way for doing the transfer than using the Windows basic “copy” command to make full copy of the Data partition of nearly 40G on W7 machine onto an external hard drive and subsequently, to copy to Data partition on W10 machine.


    I also had a bad experience in the past using Windows 7 “copy” command to copy smaller amount of data (but still substantial) to an external hard drive (on the W7 machine); the data were copied okay and the dates of the individual files were preserved. But the dates of the top-tiered folders reflected the date on which the copy was made and not the original dates of the folders at the time of the copy.

    I have many archived folders with many layers of subfolders for which I need all the original folder dates to be preserved. Using Macrium R might not be necessary but in my case, it’s the safer option for me.


    While waiting for help, I clicked on the ‘help’ button on the screen of the last screenshot posted. MR Knowledge-base stated “Drag the source partition onto the destination partition. The partition locates to the first available free area of the new disk.” But the screenshots shown didn’t have any additional partitions located after the one with the free space like in my case.


    Amazing...writing to submit this post helped make the problem more manageable...and to know that others were also "in the same boat" as I am now.....it seems that we both have been reading up on similar documents, dalchina!


    As I already have the MR backup of W10 system partitions, I will proceed per the Macrium R tip: drag the W7 data backup image to the W10 data partition, which is more than 4x the size of the image. If the back-end system partitions do somehow get overwritten, then I should be able to use Macrium R to restore them from the backup image made. Fingers crossed for extra luck….I’ll post updates of the outcome.
      My Computers


  6. Posts : 2,487
    Windows 10 Home, 64-bit
       #6

    Woodpecker:

    Referring to your post 1, the last screen shot shown in that post.

    I assume you want to copy Source partition 4 (with the red bar; about 36 gb) to Destination partitition 4 (about 281 gb).

    Is that right?

    I assume you don't have to "drag and drop", but can instead choose "copy selected partitions" if you have UNTICKED the other partitions on the source disk. If you then click next, I'd further assume a screen appears letting you choose the destination.

    That might be less spooky than drag and drop?

    And apparently---the destination doesn't have to be a partition. It can be unallocated space.
      My Computer


  7. Posts : 19
    Windows 7 Professional
    Thread Starter
       #7

    I logged into to give the update and found post by ignatzatsonic so I will answer / share relating to that post first:

    ignatzatsonic said:
    Woodpecker:

    Referring to your post 1, the last screen shot shown in that post.

    I assume you want to copy Source partition 4 (with the red bar; about 36 gb) to Destination partitition 4 (about 281 gb).

    Is that right?
    YES

    I assume you don't have to "drag and drop", but can instead choose "copy selected partitions" if you have UNTICKED the other partitions on the source disk. If you then click next, I'd further assume a screen appears letting you choose the destination.

    That might be less spooky than drag and drop?
    Sorry, guess I skipped taking a crucial screenshot; after I had browsed to find the W7 Data backup image and clicked "Restore" the next dialog box showed the backup image as the SOURCE and the bottom section for the DESTINATION was actually "blank" (MR didn't automatically choose to local disk). There was only a link in the middle of the area to click in order to specify the location, which I did and that resulted in the screenshot I had posted and to which you have referred. None of the partitions show any 'small boxes' to allow for ticking or unticking.That was the one major item that made me hesitate to proceed without checking on this forum.

    Secondly, in reading the MR Knowledge-base document 'Modifying restored partition properties' that stated, as shared earlier: "the partition locates to the first available free area of the new disk"; for me this also posed a possible danger since there are still free area in the first two partitions of the disk that are not part of the Data partition and since I can't untick these partitions. With the drag and drop, I can at least attempt to direct the image to the specific partition I want to use.
    And apparently---the destination doesn't have to be a partition. It can be unallocated space.
    Good to know, but in my case, all the space in the one drive on W10 machine has all been allocated to various partitions.

    UPDATE ON RESTORING BACKUP IMAGE FROM W7 MACHINE TO DATA PARTITION IN W10 MACHINE Success and much peace of mind!

    When I dragged the W7 backup image and dropped it onto the existing W10 data partition D:, that partition was then shown shrunk to the size of the image, leaving the remaining free space “grey-out” (as if unformatted)….sorry, I was focused on doing the task and not documenting it so didn’t take a screenshot.

    Then I clicked on the link Restored Partition properties, where there are different options to resize the partition – I just clicked on the maximum button - here’s the screenshot after having done that and clicking okay to close the dialog window (showing the backup image fitting into the intended Data (D:) partition, now back to original size.)

    Using Macrium Reflect to transfer data between two machines-2020-09-14-screenshot-restore-link-2.png

    I remembered also to click on the advance options and chose 1) verify before restoring 2) SSD Trim and 3) unchecked the option to restore MBR file, since the backup image was made on W7 and that MBR isn’t the same on this W10 machine. There was a note on the knowledge-base documentation that "GPT/UEFI systems this option has no effect." Here's a screenshot showing parameters set for the "Restore" and confirming successful restore.

    Using Macrium Reflect to transfer data between two machines-2020-09-14-screenshot-restore-confirmed-1.png
    The backup took just 29 minutes with those extra options and here’s the screenshot of all partitions on W10 machine after the successful restore.


    Using Macrium Reflect to transfer data between two machines-2020-09-14-mr-screenshot-w10-all-partitions-after-data-xfer.png

    Thanks again, dalchina and ignatzatsonicfor your questions & support, and much appreciation to everyone who makes TenForums possible and continue to be available!
      My Computers


  8. Posts : 56,849
    Multi-boot Windows 10/11 - RTM, RP, Beta, and Insider
       #8

    The Drag 'n Drop option using Macrium from a set of backed up partitions to empty unallocated space on a destination drive allow Macrium to handle the SID of the partitions and update all drive tables accordingly. It was designed to do just that. Does all the housecleaning as it goes. Leaving the boxes ticked is telling Macrium to look for the matching partition it was copied from as the destination, which does not exist in this scenario.
      My Computers


  9. Posts : 19
    Windows 7 Professional
    Thread Starter
       #9

    additional scrrenshots MR "restore" to different machine


    Update: I had to re-do the "restore" as I've ran into trouble with ownership / permissions to access the data now using Windows 10 that are on the backup image from Windows 7 machine. I've taken the screenshots I've missed doing this the first time around...posting it here now to help others later who may find themselves in similar problematic situation!

    Screenshot after I've clicked on "restore this image"

    Using Macrium Reflect to transfer data between two machines-2020-09-14-screenshot-restore-link-1b.png

    And after I've chosen the destination drive, these are screenshots after dragging the backup image from Source and dropping it over the D:\ partition on Destination:

    Using Macrium Reflect to transfer data between two machines-2020-09-14-screenshot-restore-link-1c.png

    After I've clicked on "Restored Partition properties",

    Using Macrium Reflect to transfer data between two machines-2020-09-14-screenshot-restore-link-1d.png

    Then just clicked "Maximum size":

    Using Macrium Reflect to transfer data between two machines-2020-09-14-screenshot-restore-link-1e.png

    Then clicked on OK, and voila, I'm set to restore into D:\....the 2nd time around was certainly less stressful! Many thanks again for everyone's super helpful questions and support!
      My Computers


  10. Posts : 2,487
    Windows 10 Home, 64-bit
       #10

    I guess I'm missing something.

    Can you describe the nature of the ownership/permission problems you encountered? Couldn't open files? What specifically?

    At first glance, I don't see what you did differently on your recent successful attempt than on the apparently failed attempt several days ago...............it looks like in both cases you dragged the 36 gb partition on the source to the 281 gb partition on the destination and then chose to maximize the size of the restored partition.

    Since I don't see the difference between the 2 attempts, I'm not clear why the successful attempt avoided the ownership/permissions issue encountered in the failed attempt.

    Can you straighten me out?

    Did an MBR source and a GPT destination have anything to do with any of the issues?
      My Computer


  Related Discussions
Our Sites
Site Links
About Us
Windows 10 Forums is an independent web site and has not been authorized, sponsored, or otherwise approved by Microsoft Corporation. "Windows 10" and related materials are trademarks of Microsoft Corp.

© Designer Media Ltd
All times are GMT -5. The time now is 01:24.
Find Us


Windows 10 Forums