How to Change how Apps and Websites Automatically Open for Sets in Windows 10
Warning
Sets is no longer available in Windows 10.
Sets shell provided tab experience is no more in Windows 10
Microsoft had announced a new Windows 10 feature called Sets (Microsoft may end up calling it something else by the time it ships) which would be coming to Windows Insiders as a controlled study. The concept behind Sets is to make sure that everything related to your task: relevant webpages, research documents, necessary files and applications, is connected and available to you in one click. Office (starting with Mail & Calendar and OneNote), Windows, and Edge become more integrated to create a seamless experience, so you can get back to whatís important and be productive, recapturing that moment, saving time Ė Microsoft believes thatís the true value of Sets.
Sets: With all the elements that go into a task, sometimes convincing yourself to get started is the hardest part. Sets help you keep webpages, documents, files, and apps connected, while remaining just one click away. When you close a file that includes a group of tabs, itíll help you bring those tabs back to life the next time you open it. Whether itís something you pick up later in the day or in a couple weeks, Sets is being designed to help you keep the important things together.
Add tabs to apps: To help fuel Sets, most apps will be able to add app and web tabs. When you select a link in something like an e-mail, itíll open in a new tab next to the app you were using. Selecting the plus (+) in an app will take you to a new tab page, which will help you jump to your next location. You might already know where you want to go, or just need a little bit of inspiration. From here, youíll be able to search your PC and the internet, access customized feeds, open frequently used websites and apps, and get suggestions based on your recent activity.
Starting with Windows 10 build 17666, the Sets section of Multitasking Settings now lets you set your windowing preference of should apps and websites open in a new window or a new tab. If you choose Window, new windows wonít open into a new tab unless you explicitly click the + or drag with your mouse. Choosing Tab opens any new windows invoked from your running apps into tabs.
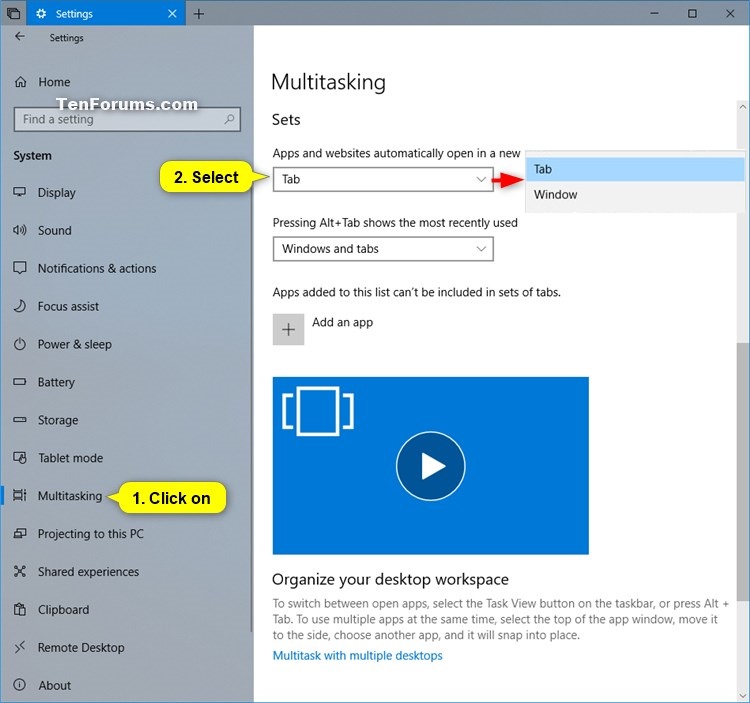
This tutorial will show you how to change Sets to have apps and websites automatically open in a new window or tab for your account in Windows 10.
- Option One: Change how Apps and Websites Automatically Open for Sets in Settings
- Option Two: Change how Apps and Websites Automatically Open for Sets using a REG file
1. Open Settings, and click/tap on the System icon.
2. Click/tap on Multitasking on the left side, select Window or Tab (default) for what you want in the Apps and websites automatically open in a new drop menu under Sets on the right side. (see screenshot below)
3. You can now close Settings if you like.
The downloadable .reg files below will modify the DWORD value in the registry key below.
HKEY_CURRENT_USER\Software\Microsoft\Windows\CurrentVersion\TabShellAppSettings
ForceNewTabGroup DWORD
0 = Tab
1 = Window
1. Do step 2 (tab) or step 3 (window) below for what you want.
This is the default setting.
A) Click/tap on the Download button below to download the file below, and go to step 4 below.
Alt+Apps_and_websites_automatically_open_in_new_tab_for_Sets.reg
Download
A) Click/tap on the Download button below to download the file below, and go to step 4 below.
Alt+Apps_and_websites_automatically_open_in_new_window_for_Sets.reg
Download
4. Save the .reg file to your desktop.
5. Double click/tap on the downloaded .reg file to merge it.
6. When prompted, click/tap on Run, Yes (UAC), Yes, and OK to approve the merge.
7. If you like, you can now delete the downloaded .reg file.
That's it,
Shawn
Related Tutorials
- How to Enable or Disable Sets in Windows 10
- How to Turn On or Off Tabs in apps (Sets) in Windows 10
- How to Turn On or Off Showing Tabs for Sets in Alt+Tab in Windows 10
- How to Add or Remove Apps to Not be Included in Sets of Tabs in Windows 10
- How to Open App in New Tab for Sets in Windows 10
- How to Open Each Folder in the Same or New Window in Windows 10
- How to Open Folder in New Tab in Windows 10 File Explorer
- How to Open Items with Single-Click or Double-Click in Windows 10
- How to Change New Tab Page Settings for Sets in Windows 10
Change how Apps and Websites Automatically Open for Sets in Windows 10

Change how Apps and Websites Automatically Open for Sets in Windows 10
How to Change how Apps and Websites Automatically Open for Sets in Windows 10Published by Shawn BrinkCategory: General Tips
22 Apr 2019
Tutorial Categories


Related Discussions


