

How to Change HungAppTimeout Value in Windows 10
When apps (tasks) do not end (close) automatically when you are restarting, shutting down, or signing out of Windows 10, the system will wait 5 seconds (HungAppTimeout) by default before the End Task dialog appears asking you to cancel or to close the listed apps and restart anyway, shut down anyway, or sign out anyway.
If you do not make a choice in the End Task dialog before the 1 minute timeout expires, Windows 10 will automatically cancel the restart, shutdown, or sign-out by default.
For example, if you have notepad open with unsaved changes when you restart, shut down, or sign out.
HungAppTimeout also specifies how long (5 seconds by default) the system waits for user processes to end after the user clicks/taps on the End task button in Task Manager. If this threshold is exceeded, the End Task dialog box appears, stating that the process did not respond.
This tutorial will show you how to specify the HungAppTimeout value for how long the system waits before the End Task dialog appears for your account or all users in Windows 10.
Contents
- Option One: Change HungAppTimeout Value for Current User Only
- Option Two: Change HungAppTimeout Value for All Users
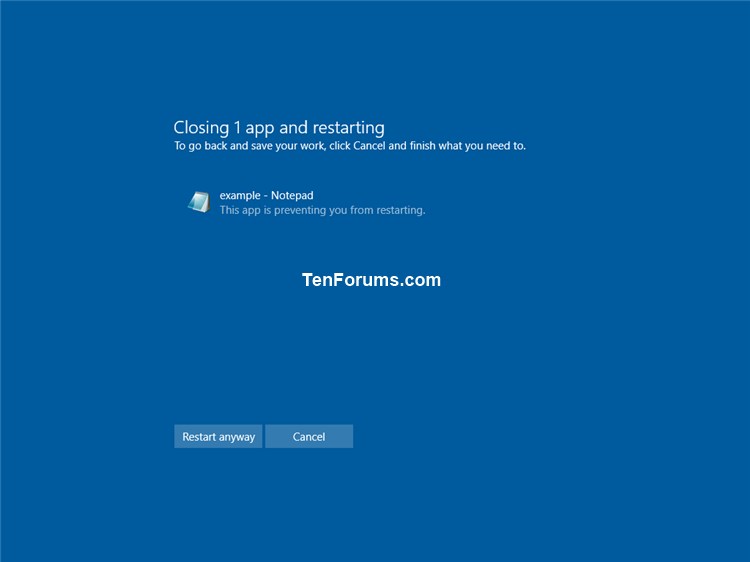
EXAMPLE: End Task dialog when restarting, shutting down, and signing out

1 Press the Win + R keys to open Run, type regedit into Run, and click/tap on OK to open Registry Editor.
2 Navigate to the key below in the left pane of Registry Editor. (see screenshot below)
HKEY_CURRENT_USER\Control Panel\Desktop
3 In the right pane of the Desktop key, double click/tap on the HungAppTimeout string value to modify it. (see screenshot above)
If you do not have a HungAppTimeout string value, then right click or press and hold on an empty space in the right pane of the Desktop key, click/tap on New, click/tap on String Value, type HungAppTimeout for the name, and press Enter.
4 Type in a number for many milliseconds you want to have for the HungAppTimeout value, and click/tap on OK. (see screenshot below)
The default value is 5000 milliseconds (5 seconds). You could also delete the HungAppTimeout string value, to have it use 5000 milliseconds by default.
It is recommended to not set a value below 1000 milliseconds (1 second).
5 Sign out and sign in to apply.
You must be signed in as an administrator to be able to do this option.
This will override Option One above.
1 Press the Win + R keys to open Run, type regedit into Run, and click/tap on OK to open Registry Editor.
2 Navigate to the key below in the left pane of Registry Editor. (see screenshot below)
HKEY_USERS\.DEFAULT\Control Panel\Desktop
3 In the right pane of the Desktop key, double click/tap on the HungAppTimeout string value to modify it. (see screenshot above)
If you do not have a HungAppTimeout string value, then right click or press and hold on an empty space in the right pane of the Desktop key, click/tap on New, click/tap on String Value, type HungAppTimeout for the name, and press Enter.
4 Type in a number for many milliseconds you want to have for the HungAppTimeout value, and click/tap on OK. (see screenshot below)
The default value is 5000 milliseconds (5 seconds).
It is recommended to not set a value below 1000 milliseconds (1 second).
5 Sign out and sign in to apply.
That's it,
Shawn
Related Tutorials
- How to Turn On or Off AutoEndTasks at Restart, Shut down, or Sign out of Windows 10
- How to Restart the Computer in Windows 10
- How to Shut Down the Computer in Windows 10
- How to Sign out of Windows 10
Change HungAppTimeout Value in Windows 10
-
New #1
Note, that if this value is set too low, Windows evaluates it as a crashed app and it will end it before it opens.
It especially applies to slow laptops/tablets, where it can take about 25 secs to open, so "25000" is minimum.
-
-
New #3
Indeed. I had multiple issues on laptops, like system tray icons not displaying at all.
The cause was this value. They were grayed out as the result of this value set too low.
Once I set it to 20000, all system icons worked just fine. Imagine my surprise, but it worked.
Maybe it is not an issue anymore, but I thought it is worth mentioning, 10 works in mysterious ways.
System icons greyed out Solved - Windows 10 Forums
EDIT: Value 5000 is probably fine, the other values count towards it, so 5000 + 20000.
I think, that WaitToKillAppTimeout and WaitToKillServiceTimeout do not exist by default, so it was probably my fault anyway.
-
New #4
Yeah, WaitToKillAppTimeout and WaitToKillServiceTimeout do not exist by default.
They may have contributed to that. It'll be interesting to hear if others have the same issue.
-
New #5
Is there a setting that controls the 1 minute timeout for the end task screen?
I'd like it stay there indefinite rather then cancel the reboot all together.
IMO it's stupid that 1 minute timeout, if you step away from computer, you won't be able tell the if it was restarted or not...
HungAppTimeout affects how fast the end task screen appears, which means if you set it for a high number, you'll have to wait that long before you able force close application or cancel. This is just dumb.
-
New #6
Hello mate,
If you like, you could turn on AutoEndTasks to force it to kill the process and continue the restart, shut down, or sign out without getting the End Task dialog.
Turn On AutoEndTasks at Restart, Shut down, or Sign out of Windows 10
-
New #7
-
New #8
Well, since this only happens when you restart, shut down, or sign out, you could change the HungAppTimeout value low so you don't have to wait to see the End Task dialog (if it appears) when you restart, shut down, or sign out.
It does mean you will need to sit at the computer when you restart, shut down, or sign out for a bit to verify it performs the action, or to select what you want to do in the End Task dialog.
-
-
New #9
The one under HKEY_USERS\.DEFAULT has no effect though. The one under HKCU works.

Change HungAppTimeout Value in Windows 10
How to Change HungAppTimeout Value in Windows 10Published by Shawn BrinkCategory: Performance & Maintenance
25 May 2020


 Quote
QuoteTutorial Categories

Related Discussions
