

How to Hibernate the Computer in Windows 10
Hibernate is a power-saving state designed primarily for laptops, and might not be available for all PCs. Hibernate uses less power than sleep and when you start up the PC again, youre back to where you left off (though not as fast as sleep). Use hibernation when you know that you won't use your laptop or tablet for an extended period and won't have an opportunity to charge the battery during that time.
This tutorial will show you different ways on how to hibernate your local Windows 10 PC.
To be able to hibernate your PC, you will need to enable hibernate.
If you want hibernate to show in your Power menu, you will need to enable hibernate and add hibernate to the Power menu.
If devices connected to your PC (like monitors, printers, or scanners) aren't working properly after waking up from hibernate, you might need to disconnect and reconnect your device or restart your PC. You should also make sure that you have the most current drivers for all of your devices.
Contents
- Option One: To Hibernate Computer from Start Menu
- Option Two: To Hibernate Computer from Win+X Quick Link Menu
- Option Three: To Hibernate Computer from Alt+F4 Shut Down Windows Dialog
- Option Four: To Hibernate Computer from Ctrl+Alt+Del Screen
- Option Five: To Hibernate Computer from Sign-in Screen
- Option Six: To Hibernate Computer in Power Options
- Option Seven: To Hibernate Computer from Power Buttons and Lid
- Option Eight: To Hibernate Computer from Command Prompt
1 Open the Start menu , click/tap on thePower button, and click/tap on Hibernate. (see screenshots below)
1 Open the Win+X Quick Link Menu, click/tap on Shut down or sign out, and click/tap on Hibernate. (see screenshot below)
OR
2 Press the Win + X keys, press U, and press H.
1 Click/tap on your desktop to make it the current focused (active) window, and press the Alt + F4 keys.
2 Select Hibernate in the drop down menu, and click/tap on OK or press Enter. (see screenshots below)
1 Press the Ctrl + Alt + Del keys, click/tap on the
1 While on the sign-in screen, click/tap on the
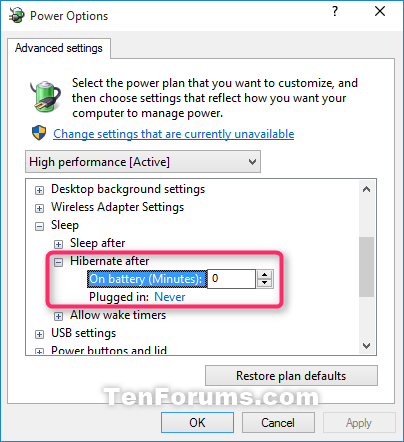
This option is to specify how long in minutes your computer will wait with no user activity before automatically hibernating.
1 Open your Power Options.
2 Expand open Sleep and Hibernate after, specify either never hibernate or how many minutes to hibernate after, and click/tap on OK. (see screenshot below)
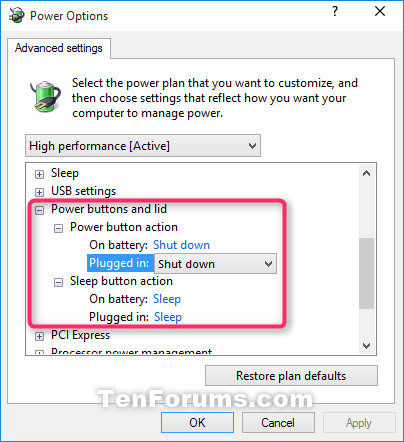
This option is to specify what your computer does when you close the lid and/or press the power buttons
1 Open your Power Options.
2 Expand open Power buttons and lid, specify what action (ex: Hibernate) you want for Lid close action (ex: for laptops), Power button action, and Sleep button action, and click/tap on OK. (see screenshot below)
1 Open a command prompt, type the command below you want to use, and press Enter.
(Hibernate the local computer.)
shutdown /h
OR
(Force running apps to close, and hibernate the local computer.)
shutdown /h /f
That's it,
Shawn
Related Tutorials
- How to Enable or Disable Hibernate in Windows 10
- How to Add or Remove Hibernate from Power menu in Windows 10
- How to Lock the Computer in Windows 10
- How to Restart the Computer in Windows 10
- How to Sign out of Windows 10
- How to Shut Down the Computer in Windows 10
- How to Put Your Computer to Sleep in Windows 10
- How to Turn On or Off Fast Startup in Windows 10
- How to Turn On or Off Require Sign-in on Wakeup in Windows 10
- How to Check if Last Boot was from Fast Startup, Full Shutdown, or Hibernate
- How to Sign in to Windows 10
- How to See Sleep States Available on your Windows 10 PC
- How to Enable or Disable Windows To Go Workspace using Hibernate on Windows 10 PC
- How to Change System Unattended Sleep Timeout in Windows 10
- How to Enable or Disable Shut Down, Restart, Sleep, and Hibernate in Power Menu in Windows 10
- How to Add or Remove 'Hibernate after' from Power Options in Windows
- How to Change Default Action of Shut Down Windows Dialog in Windows 10
Hibernate Computer in Windows 10
-
New #1
Windows 10 Pro. I been having the computer hibernate after it goes to sleep and it will not wake up. I have to reboot to get it back. I have nothing anywhere that says "hibernate". I did the reg reset that was listed and so far that may have stopped it, although I have had it stop before and then come back. Very anoying. One time I did a restore back thinking that maybe an update caused it. I am running the same OS on a laptop and so far that has not had a problem.
-
New #2
Hello Maestro, and welcome to Ten Forums. :)
I'm glad to see you got your new account all setup. Nothing triggered for your old account though.
Double check the blue note box at the top of the tutorial to make sure that you have hibernate enabled and turned on to show in the Power menu.
As a test, you might see if turning off fast startup may help with the not waking up issue.
https://www.tenforums.com/tutorials/4...dows-10-a.html
-
New #3
-
New #4
Double check this below to make sure that you have hibernate enabled and turned on in the Power menu. :)
 NoteTo be able to hibernate your PC, you will need to enable hibernate.
If you want hibernate to show in your Power menu, you will need to enable hibernate and add hibernate to the Power menu.
-
New #5
-
New #6
Did you enable hibernate?
https://www.tenforums.com/tutorials/2...dows-10-a.html
Did you turn on to show hibernate?
https://www.tenforums.com/tutorials/7...dows-10-a.html
The power menu are the different menus you see in the screenshots in the tutorial in the first post here.

Hibernate Computer in Windows 10
How to Hibernate the Computer in Windows 10Published by Shawn BrinkCategory: Performance & Maintenance
31 Oct 2021


 Quote
QuoteTutorial Categories

Related Discussions
