

How to Change Diagnostic Data Settings in Windows 10
As you use Windows, we collect diagnostic information, and to make sure we're listening to you, our customer, we've also built ways for you to send us feedback anytime, and at specific times, like when Windows 10 asks you a question about how something is working for you.
There are two levels of diagnostic data: Basic (required) and Full (optional). Microsoft uses diagnostic data to keep Windows secure and up to date, troubleshoot problems, and make product improvements as described in more detail below. Regardless of your selection, your device will be just as secure and will operate normally. This data is transmitted to Microsoft and stored with one or more unique identifiers that can help us recognize an individual user on an individual device and understand the device's service issues and use patterns.
- Basic (required) diagnostic data is information about your device, its settings and capabilities, and whether it is performing properly. This is the minimum level of diagnostic data needed to help keep your device reliable, secure, and operating normally.
- Full (optional) diagnostic data includes all data collected with Basic, along with information about the websites you browse, how you use apps and features, plus additional information about device health, device activity (sometimes referred to as usage), and enhanced error reporting. At Full, Microsoft also collects the memory state of your device when a system or app crash occurs (which may unintentionally include parts of a file you were using when a problem occurred). While your device will be just as secure and operate normally if you choose the Basic level of diagnostics, the additional information we collect at Full makes it easier for us to identify and fix issues and make product improvements that benefit all Windows customers.
See also:
- Windows 10, version 1709 and newer diagnostic data for the Full level | Microsoft Docs
- Diagnostics, feedback, and privacy in Windows 10 - Microsoft Support
Starting with Windows 10 build 15019, you can now only select to belong to the Basic or Full group in Settings. A new option to "Let Microsoft provide more tailored experiences with relevant tips and recommendations by using your diagnostic data" has been added.
Starting with Windows 10 build 17083, a standard user can now make changes to the Diagnostic Data levels. When an administrator sets the Diagnostic Data level, a user can choose to update the Diagnostic Data setting . This control also provides notifications when these settings have been changed by another user or an administrator.
Starting with Windows 10 build 17093, you can now delete the Windows Diagnostic Data that Microsoft has collected from your device.
Starting with Windows version 2004 OR Windows 10 build 19577, as part of the Microsoft initiative to increase transparency and control over data, Microsoft is making some changes to the Settings app and Group Policy settings that will start showing up in Windows Insider builds this month (March 2020). Basic diagnostic data is now known as Required diagnostic data and Full diagnostic data is now Optional diagnostic data. If youre a commercial customer and choose to send Optional diagnostic data, Microsoft will also be providing more granular Group Policy settings to configure the data thats collected within your organization. Microsoft will publish more specifics around the new policies when we get closer to the retail release, and in the meantime, check out the Microsoft Privacy Report for more information around our data collection practices.
This tutorial will show you how to choose how much diagnostic data your want to send to Microsoft about your Windows 10 device.
You must be signed in as an administrator to change diagnostic data settings.
Setting diagnostic data to Basic or Required will disable and gray out the Improve inking and typing settings.
Contents
- Option One: To Change Diagnostic Data Collection Settings during Windows Setup
- Option Two: To Change Diagnostic Data Collection Settings in Settings
- Option Three: To Change Diagnostic Data Collection Settings using a REG file
- Option Four: To Force Diagnostic Data Collection Setting in Group Policy
- Option Five: To Force Diagnostic Data Collection Setting using a REG file
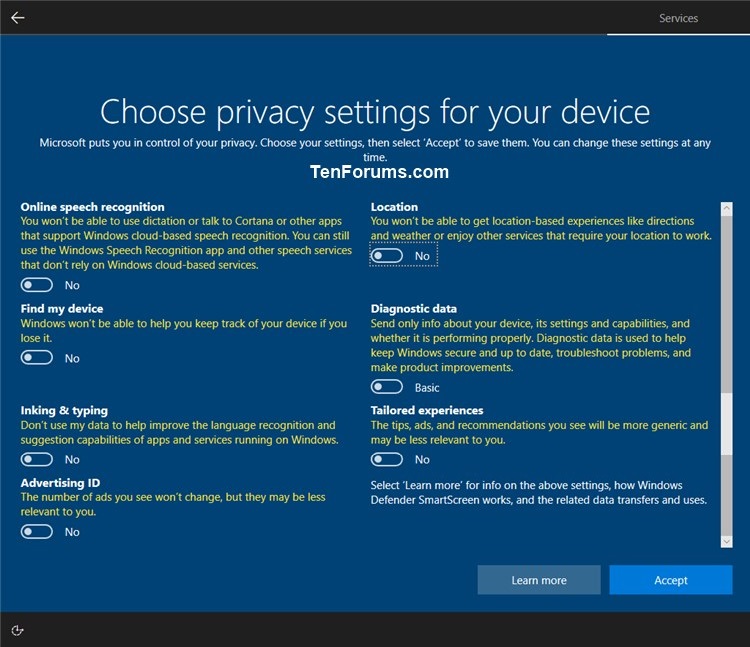
1 When you get to Choose privacy settings for your device during Windows Setup while doing a clean install of Windows 10, you can select Basic or Full for the Diagnostics data privacy setting. (see screenshots below)

Option Four and Option Five will override this option.
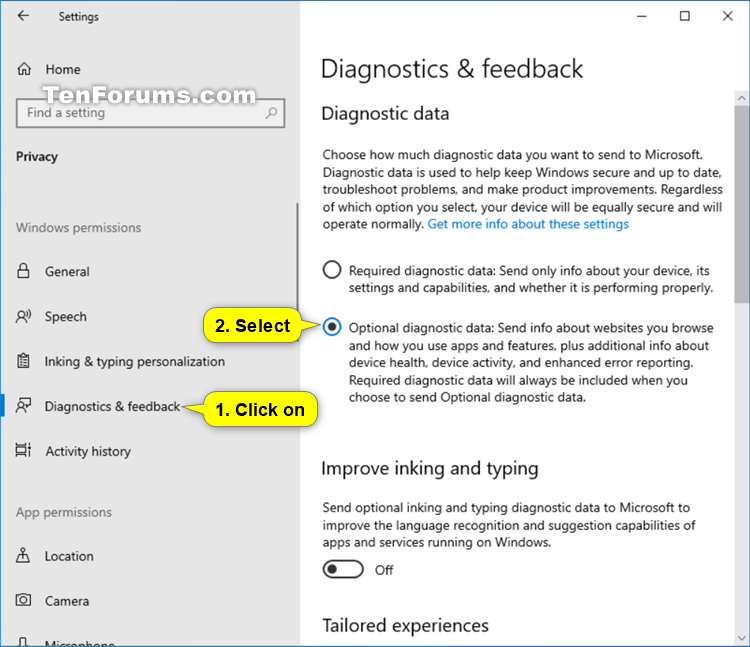
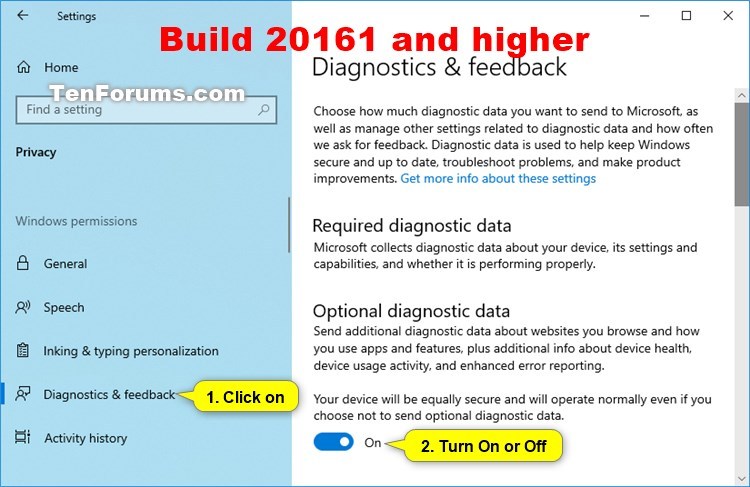
1 Open Settings, and click/tap on the Privacy icon.
2 Click/tap on Diagnostics & feedback on the left side, then select Required (aka: Basic) or Optional (default - aka: Full) for the Diagnostic data you want to send on the right side. (see screenshots below)
3 When finished, you can close Settings if you like.

Option Four and Option Five will override this option.
This option sets the same setting in Option Two, but via Registry Editor instead.
The downloadable .reg files below will modify the DWORD values in the registry keys below.
HKEY_CURRENT_USER\SOFTWARE\Microsoft\Windows\CurrentVersion\Diagnostics\DiagTrack
ShowedToastAtLevel DWORD
1 = Off - Required (basic)
3 = On - Optional (full)
HKEY_LOCAL_MACHINE\SOFTWARE\Microsoft\Windows\CurrentVersion\Policies\DataCollection
AllowTelemetry DWORD
MaxTelemetryAllowed DWORD
1 = Required (basic)
3 = Optional (full)
1 Do step 2 (Optional) or step 3 (Required) below for what you would like to do.
Setting to "Security" applies to enterprise, EDU, IoT and server devices only. Setting this on other devices is equivalent to choosing "Basic".
A) Click/tap on the Download button below to download the file below, and go to step 4 below.
Send_optional_diagnostic_data.reg
Download
A) Click/tap on the Download button below to download the file below, and go to step 4 below.
Send_required_diagnostic_data.reg
Download
4 Save the .reg file to your desktop.
5 Double click/tap on the downloaded .reg file to merge it.
6 When prompted, click/tap on Run, Yes (UAC), Yes, and OK to approve the merge.
7 You can now delete the downloaded .reg file if you like.
The Local Group Policy Editor is only available in the Windows 10 Pro, Enterprise, and Education editions.
All editions can use Option Five to set this same policy.
1 Open the Local Group Policy Editor.
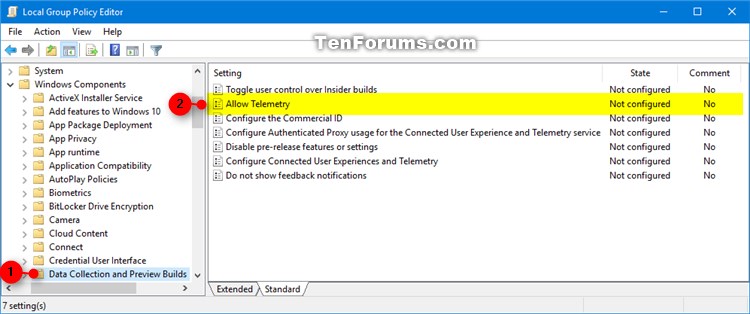
2 In the left pane of Local Group Policy Editor, navigate to the location below. (see screenshot below)
Computer Configuration\Administrative Templates\Windows Components\Data Collection and Preview Builds
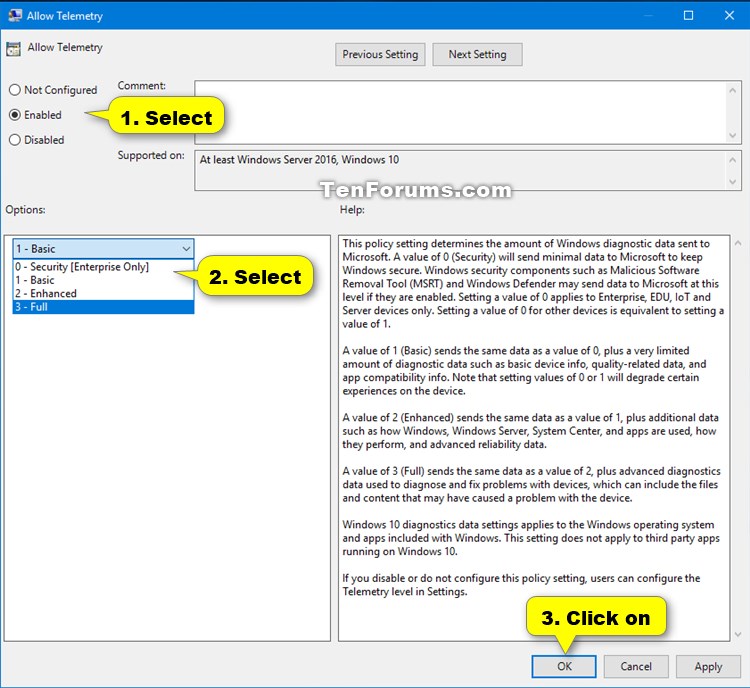
3 In the right pane of Data Collection and Preview Builds in Local Group Policy Editor, double click/tap on the Allow Telemetry policy to edit it. (see screenshot above)
Starting with Windows 10 build 19577, the Allow Telemetry (before build 19577) or Allow Diagnostic Data (build 19577+) policy has been renamed to Allow Diagnostic Data.
4 Do step 5 (default) or step 6 (force) below for what you would like to do.
This step will allow you to use Option Two and Option Three above.
A) Select (dot) Not Configured or Disabled, click/tap on OK, and go to step 7 below. (see screenshot below)
Not Configured is the default setting.
This step will override and prevent you from using Option Two and Option Three above.
A) Select (dot) Enabled, select the Security (Enterprise Only), Basic, Enhanced, or Full value under Options you want, click/tap on OK, and go to step 7 below. (see screenshot2 below)
Starting with Windows 10 build 19577, you would select either Diagnostic data off (disabled), Send required diagnostic data (basic), or Send optional diagnostic data (full) instead.
7 When finished, you can close the Local Group Policy Editor if you like.
This option sets the same setting in Option Four, but via Registry Editor instead.
The downloadable .reg files below will modify the DWORD value in the registry key below.
HKEY_LOCAL_MACHINE\SOFTWARE\Policies\Microsoft\Windows\DataCollection
AllowTelemetry DWORD
(delete) = Default. Allows you to use Option Two and Option Three above.
0 = Disable
1 = Required (basic)
3 = Optional (full)
1 Do step 2 (disable), step 3 (Required), step 4 (Optional), or step 5 (default) below for what you would like to do.
Using this policy value turns off sending diagnostic data from the device. This value is only supported on Enterprise editions.
This step will override and prevent you from using Option Two and Option Three above.A) Click/tap on the Download button below to download the file below, and go to step 6 below.
Disable_diagnostic_data.reg
Download
This step will override and prevent you from using Option Two and Option Three above.
A) Click/tap on the Download button below to download the file below, and go to step 6 below.
Force_Send_required_diagnostic_data.reg
Download
This step will override and prevent you from using Option Two and Option Three above.
A) Click/tap on the Download button below to download the file below, and go to step 7 below.
Force_Send_optional_diagnostic_data.reg
Download
This setting allows you to use Option Two and Option Three above.
A) Click/tap on the Download button below to download the file below, and go to step 7 below.
Default_Not_Configured_diagnostic_and_usage_data.reg
Download
6 Save the .reg file to your desktop.
7 Double click/tap on the downloaded .reg file to merge it.
8 When prompted, click/tap on Run, Yes (UAC), Yes, and OK to approve the merge.
9 You can now delete the downloaded .reg file if you like.
That's it,
Shawn
Related Tutorials
- How to Change Windows Error Problem Reporting Settings in Windows 10
- How to Turn On or Off Tailored experiences with diagnostic data in Windows 10
- How to Enable or Disable Diagnostic Data Viewer in Windows 10
- How to Delete Diagnostic Data in Windows 10
- How to Enable or Disable Delete Diagnostic Data in Windows 10
- How to Send Feedback to Microsoft in Windows 10
- How to Change Windows 10 Feedback Frequency
- How to Start or Stop Receiving Insider Builds in Windows 10
- How to Clear Your Personal Data and Info from Cortana
- How to Use Microsoft Privacy Dashboard to Manage Your Privacy on the Cloud in Windows 10
- How to Turn On or Off Online Speech Recognition in Windows 10
- How to Turn On or Off Improve Inking & Typing Recognition in Windows 10
- How to Turn On or Off Send Diagnostic Data about Narrator in Windows 10
Change Diagnostic Data Settings in Windows 10
-
New #1
Thank you so much Brink for the reg change :). Without being at full on feedback, you (we) are unable to send screen shots. To me this is a big issue. Of course that is if the feedback is being monitored, which I believe (hope) it is.
-
-
New #3
How to disable, 0?
-
New #4
Hello ameeralhindi, :)
Setting a value of 0 for "Security" applies to enterprise, EDU, IoT and server devices only. Setting a value of 0 for other devices is equivalent to choosing a value of 1.
-
New #5
Oh thanks man i just wonder if it's possible to completely disable it now.
-
New #6
I don't think you can fully disable it in Windows 10 Home or Pro editions. Setting it to basic is about it.
You could try disabling the two services below and restart the computer to stop this, but it could cause unknown issues.
https://www.tenforums.com/tutorials/...dows-10-a.html
Diagnostics Tracking Service
Connected User Experiences and Telemetry
-
New #7
I already disabled them, Thanks sir. :)
-
New #8
My setting isn't grayed out, but whenever I switch the setting from Full to Basic, leave the screen, and go back, the setting reverts itself back to Full.
-
-

Change Diagnostic Data Settings in Windows 10
How to Change Diagnostic Data Settings in Windows 10Published by Shawn BrinkCategory: General Tips
06 Oct 2020


 Quote
Quote
Tutorial Categories

Related Discussions
