

How to Enable or Disable Power Throttling in Windows 10
Most people running Windows like having multiple apps running at the same time and often, whats running in the background can drain your battery.
You may remember some of the power experiments Microsoft did back in January 2017 with Windows 10 build 15002. Power Throttling was one of those experiments, and showed to have up to 11% savings in CPU power consumption for some of the most strenuous use cases.
In Windows 10 build 16176, Microsoft leveraged modern silicon capabilities to run background work in a power-efficient manner, thereby enhancing battery life significantly while still giving users access to powerful multitasking capabilities of Windows. With Power Throttling, when background work is running, Windows places the CPU in its most energy efficient operating modes work gets done, but the minimal possible battery is spent on that work.
How does it work? To give great performance to the apps youre using, while at the same time power throttling background work, Microsoft built a sophisticated detection system into Windows. The OS identifies work that is important to you (apps in the foreground, apps playing music, as well as other categories of important work we infer from the demands of running apps and the apps the user interacts with). While this detection works well for most apps, if you happen to notice an app that is negatively impacted by Power Throttling, Microsoft really wants to know!! You can do 3 things:
1. Provide feedback. Run the Feedback Hub and file feedback under the Power and Battery > Throttled Applications category.
2. Control Power Throttling system-wide, using the Power Slider. Windows works hardest to keep the processor in its efficient ranges when youve selected Battery saver, Better battery or Better Performance, and turns off completely when youve selected Best Performance.
3. Opt individual apps out from Power Throttling by unchecking Let Windows decide when this app can run in the background in Battery usage by app, and unchecking Reduce work app does when in background.
Starting with Windows 10 version 1709, you can enable or disable Power Throttling. If you enable Power Throttling, users will be able to apply their own Power Throttling settings as noted above.
Starting with Windows 10 build 21364, the Task Manager has a new experimental feature called Eco mode which provides users with an option to throttle process resources.
This tutorial will show you how to enable or disable Power Throttling for all users in Windows 10.
You must be signed in as an administrator to enable or disable Power Throttling.
Power Throttling is currently available only for processors with Intels Speed Shift technology, available in Intels 6th-gen (and beyond) Core processors Microsoft is working on expanding support to other processors as well over the next few months.
Contents
- Option One: Enable or Disable Power Throttling using Local Group Policy Editor
- Option Two: Enable or Disable Power Throttling using a REG file
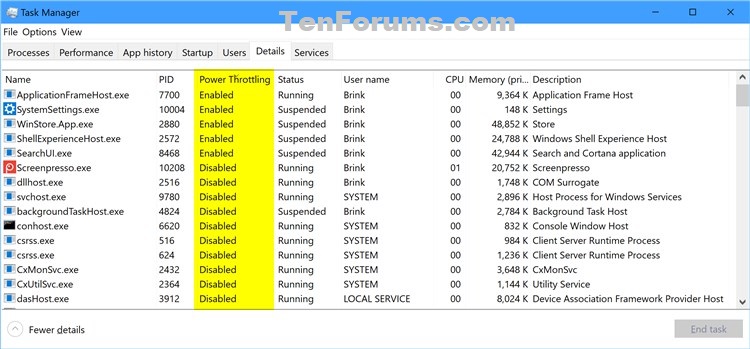
EXAMPLE: Power Throttling in Task Manager
Local Group Policy Editor is only available in the Windows 10 Pro, Enterprise, and Education editions.
All editions can use Option TWO below.
1 Open the Local Group Policy Editor.
2 In the left pane of Local Group Policy Editor, navigate to the location below. (see screenshot below)
Computer Configuration\Administrative Templates\System\Power Management\Power Throttling Settings
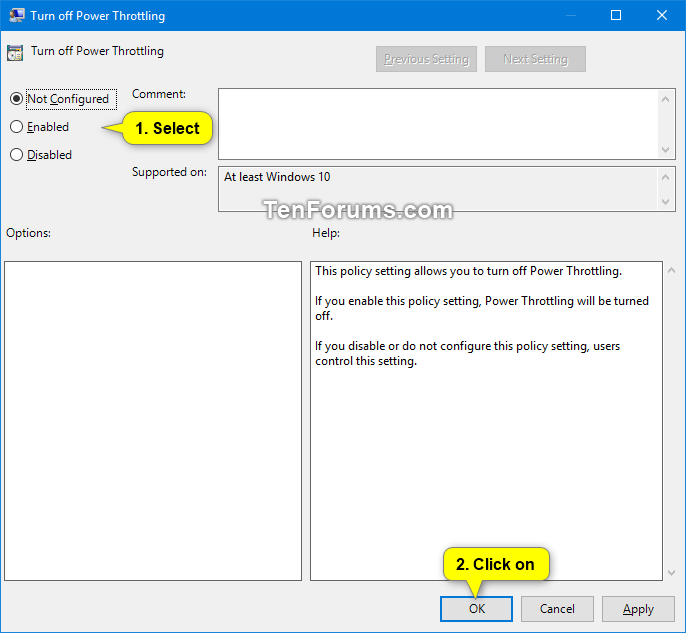
3 In the right pane of Power Throttling Settings in Local Group Policy Editor, double click/tap on the Turn off Power Throttling policy to edit it. (see screenshot above)
4 Do step 5 (enable) or step 6 (disable) below for what you would like to do.
A) Select (dot) Not Configured or Disabled, click/tap on OK, and go to step 7 below. (see screenshot below)
Not Configured is the default setting.
7 Close the Local Group Policy Editor.
8 Restart the computer to apply.
The downloadable .reg files below will modify the DWORD value in the registry key below.
HKEY_LOCAL_MACHINE\SYSTEM\CurrentControlSet\Control\Power\PowerThrottling
PowerThrottlingOff DWORD
0 = Enable
1 = Disable
1 Do step 2 (enable) or step 3 (disable) below for what you would like to do.
This is the default setting.
A) Click/tap on the Download button below to download the file below, and go to step 4 below.
Enable_Power_Throttling.reg
Download
A) Click/tap on the Download button below to download the file below, and go to step 4 below.
Disable_Power_Throttling.reg
Download
4 Save the .reg file to your desktop.
5 Double click/tap on the downloaded .reg file to merge it.
6 When prompted, click/tap on Run, Yes (UAC), Yes, and OK to approve the merge.
7 Restart the computer to apply.
8 You can now delete the downloaded .reg file if you like.
That's it,
Shawn
Related Tutorials
- How to Change Power Mode Level in Windows 10
- How to See if Apps are Power Throttling in Windows 10
- How to Manage Battery Usage by App in Windows 10
- How to Enable or Disable Eco Mode for App or Process in Windows 10
How to Enable or Disable Power Throttling in Windows 10
-
New #1
I have strange (but common I read) power throttling issue on only the "system interrupts". In windows task manager
you must add the "power throttle" column in Details Tab.
Now all processes have power throttle disabled. But only one is "randomly" enabled, that is "system interrupts"
Regardless of the selected powerplan (all default).
Why? This might have something to do with DPC latency I see on my/many) systems. Can I disable it somehow?
PowerThrottlingOff 1 doesn't help here.
Thanks

How to Enable or Disable Power Throttling in Windows 10
Published by Shawn BrinkCategory: Performance & Maintenance21 Apr 2021


 Quote
QuoteTutorial Categories

Related Discussions
