

How to Change Visual Effects Settings in Windows 10
Visual effects are the visual bells and whistles for the appearance of Windows for your account. These visual bells and whistles can affect the performance of Windows on the PC though.
If Windows is running slowly, you can speed it up by disabling some of its visual effects. It comes down to appearance versus performance. Would you rather have Windows run faster or look prettier? If your PC is fast enough, you don't have to make this tradeoff, but if your PC is just barely powerful enough for Windows 10, it can be useful to scale back on the visual bells and whistles.
There are 17 visual effects in Windows 10. You can choose which visual effects to turn off, one by one, or you can let Windows choose for you.
This tutorial will show you how to change the visual effects settings you want to use for the appearance and performance of Windows 10 on the PC for your account.
If you apply any changes in the Ease of Access Center, your visual effects settings will automatically get reset back to default. This is by design in Windows.
If you turn off the Animate controls and elements inside windows visual effects setting, you will no longer see the spinning dots animation on restart and shutdown.Tip
The visual effect settings below are the most common ones to turn off (uncheck) to help improve performance if needed.
- Animate controls and elements inside windows
- Animate windows when minimizing and maximizing
- Animations in the taskbar
- Fade or slide menus into view
- Fade or slide ToolTips into view
- Fade out menu items after clicking
- Show shadows under windows
- Slide open combo boxes
Contents
- Option One: To Change your Visual Effects Settings in Advanced System Settings
- Option Two: To Change your Visual Effects Settings in Registry Editor
1 Do step 2 or step 3 below for how you would like to open System Properties.
2 Press the Win + R keys to open Run, type SystemPropertiesPerformance.exe into Run, click/tap on OK to open Performance Options, and go to step 7 below.
This is the only step in this option that standard users will be able to use.
3 Open the Control Panel (icons view), click/tap on the System icon, and go to step 4 below.
You must be signed in as an administrator to be able to use this step.
Starting with Windows 10 build 20161, you will need to open Settings instead, click/tap on the System icon, and click/tap on About on the left side.
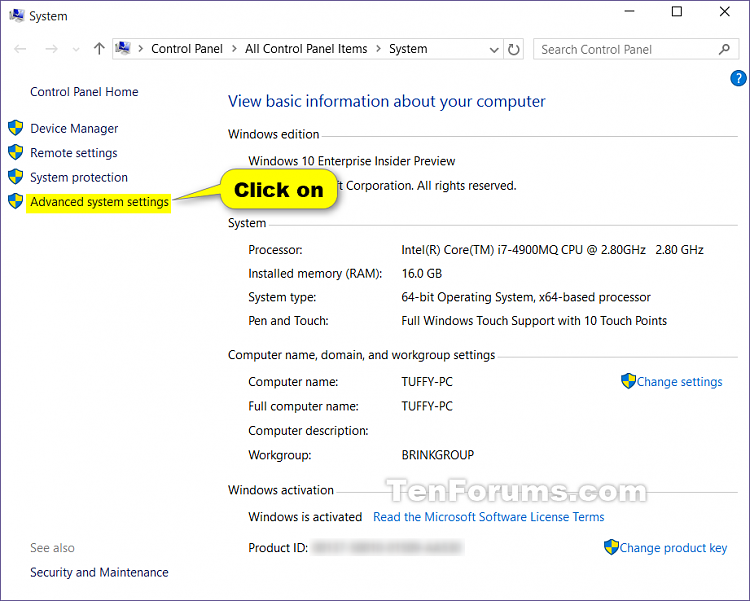
4 In the left pane, click/tap on the Advanced system settings link. (see screenshots below)
5 If prompted by UAC, click/tap on Yes, and close the System window if you like.
6 In the Advanced tab, click/tap on the Settings button under Performance. (see screenshot below)
7 Select the visual effects settings you want, and click/tap on Apply. Keep adjusting and applying the settings until you have them set how you like. (see screenshots below)
- Let Windows choose what's best for my computer - Windows will automatically turn on and off the visual effects that it determines will run fine based on your system specs.
- Adjust for best appearance - This will turn on all visual effects.
- Adjust for best performance - This will turn off all visual effects.
- Custom - This will allow you to turn on and off the visual effects you would like to. This will also be selected by default if you manually turn on and off any visual effects.
8 When finished, click/tap on OK. (see screenshots above)
9 If you did step 3 above, then click/tap OK to close System Properties. (see screenshot below step 6)
Information
This option is only for how to change the visual effects below in Registry Editor.
- Fade or slide menus into view
- Fade or slide ToolTips into view
- Fade out menu items after clicking
- Show shadows under mouse pointer
- Show shadows under windows
- Slide open combo boxes
- Smooth-scroll list boxes
You can click/tap on a link below for how to change these visual effects below in Registry Editor instead.
- Animate controls and elements inside windows
- Animate windows when minimizing and maximizing
- Animations in the taskbar
- Enable Peek
- Save taskbar thumbnail previews
- Show thumbnails instead of icons
- Show translucent selection rectangle
- Show window contents while dragging
- Smooth edges of screen fonts
- Use drop shadows for icon labels on the desktop
1 Type regdit in the search box (Windows+S) on Start or taskbar, and press Enter to open Registry Editor.
2 If prompted by UAC, click/tap on Yes.
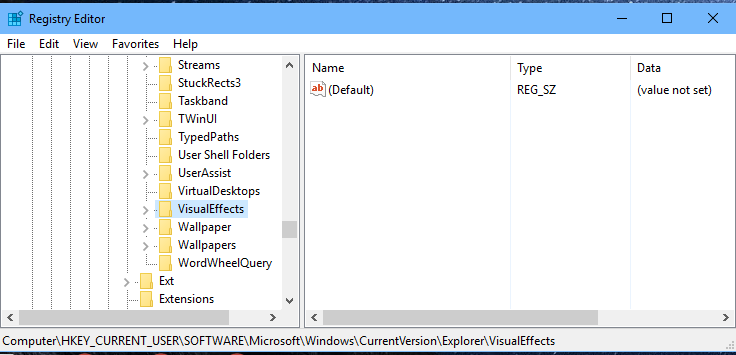
3 In Registry Editor, navigate to the location below. (see screenshot below)
HKEY_CURRENT_USER\Software\Microsoft\Windows\CurrentVersion\Explorer\VisualEffects
4 In the right pane of VisualEffects, double click/tap on the VisualFXSetting DWORD to modify it. (see screenshot above)
5 Type in the value number below for the settings you want to use below, and click/tap on OK. (see screenshot below)
- Let Windows choose what's best for my computer - Windows will automatically turn on and off the visual effects that it determines will run fine based on your system specs.
- Adjust for best appearance - This will turn on all visual effects.
- Adjust for best performance - This will turn off all visual effects.
- Custom - This will allow you to turn on and off the visual effects you would like to. This will also be selected by default if you manually turn on and off any visual effects.
A) Type 0 (zero) for Let Windows choose what's best for my computer settings.
B) Type 1 for Adjust for best appearance settings.
C) Type 2 for Adjust for best Performance settings.
D) Type 3 for Custom settings.
6 In Registry Editor, navigate to the location below. (see screenshot below)
HKEY_CURRENT_USER\Control Panel\Desktop
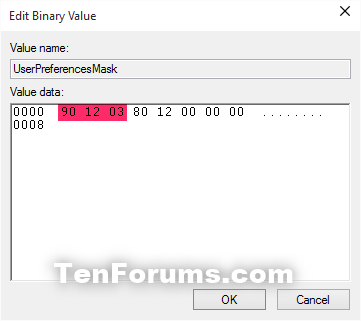
7 In the right pane of Desktop, double click/tap on the UserPreferencesMask DWORD to modify it. (see screenshot above)
8 Do step 9, step 10, step 11, or step 12 below for what you selected in step 5 above.
A) Change the values to be the same as the ones in red below, click/tap on OK, and go to step 13 below. (see screenshot below)
9E 1E 07 80 12 00 00 00
A) Change the values to be the same as the ones in red below, click/tap on OK, and go to step 13 below. (see screenshot below)
9E 3E 07 80 12 00 00 00
A) Change the values to be the same as the ones in red below, click/tap on OK, and go to step 13 below. (see screenshot below)
9E 12 03 80 10 00 00 00
A) Using the binary sets below, change the letters in them to turn on (1) or off (0) for each corresponding visual effect.
The visual effects below will require more work to change them in the Registry Editor.
We will have to use the 3 sets of binary values below for the letter(s) of the Visual Effects below that you want to turn on or off, then convert each binary set to hex for the first 3 hex entries in the registry. This will be explained in detail on how to do this in the steps below.[/I]
Binary sets (3)
1001ABC0 00D1EF10 00000G11
0=off and 1=on
Visual Effects and their assigned letters
(A) Smooth-scroll list boxes
(B) Slide open combo boxes
(C) Fade or slide menus into view
(D) Show shadows under mouse pointer
(E) Fade or slide ToolTips into view
(F) Fade out menu items after clicking
(G) Show shadows under windows
For example, to turn them all off, I would change all letters in the binary sets to 0 (number zero) like below.
10010000 00010010 00000011
For example, to turn only the C visual effect on, I would change the letters in the binary sets like below.
10010010 00010010 00000011
B) Use a binary to hex converter (click on link) to convert each separate binary set of the 3 total to hex. Press Enter after entering the binary value for each one to convert it. (see screenshots below)
For example, from the example above to turn them all off, I would convert the 3 separate binary sets one by one to hex like below.
Binary
10010000 00010010 00000011
converted to
Hex
90 12 3
For example, from the example above to turn only the C visual effect on, I would convert the 3 separate binary sets one by one to hex like below.
Binary
10010010 00010010 00000011
converted to
Hex
92 12 3
C) Change the first 3 values (ex: 90 12 03) underlined in red below with the hex values you got above, click/tap on OK, and go to step 13 below. (see screenshot below)
13 Close Registry Editor.
14 Sign out and Sign in, or restart the computer to apply.
That's it,
Shawn Brink
Related Tutorials
- How to Turn On or Off ClearType in Windows 10
- How to Turn On or Off Translucent Selection Rectangle on Desktop in Windows
Change Visual Effects Settings in Windows 10
-
-
New #2
how can i turn off "Play animations in Windows" and "Turn off all unnecessary animations (when possible)" in regedit?
-
New #3
Hello evildog1, :)
You can manually turn off all animated settings using OPTION FOUR to basically turn off the same settings that "Turn off all unnecessary animations (when possible)" does.
You could use OPTION ONE below to disable window animations for all users.
Window Animations - Allow or Prevent - Windows 7 Help Forums
-
New #4
-
New #5
I found out that it can only be applied on user settings and not on local machine. We have a slow laptops at school that have bad performance. Problem is the company no longer support Windows 7 so we have to install Windows 10 on all laptops. The company does not accept suggestions so i have to make batch file to change registry. Is there a way to apply visual effects for all users?
-
New #6
I'm not sure for all users, but if it's not too many users, you could run a .bat or .reg file to apply the changes per account.
-
-
New #8
Houston, we have a problem. Recent versions of Windows 10 show nothing for the VisualEffects sub-key, i.e., there is no VisualFXSetting DWORD to modify. Create one or has the setting moved?
-
-
New #9
Hello Bulldog, :)
That's correct. You can just create the VisualFXSetting DWORD if it's not there. When it's not there, it usually means you haven't made any changes to your visual effects settings yet.Last edited by Brink; 27 Dec 2016 at 23:47. Reason: typo

Change Visual Effects Settings in Windows 10
How to Change Visual Effects Settings in Windows 10Published by Shawn BrinkCategory: Performance & Maintenance
22 Aug 2022


 Quote
QuoteTutorial Categories

Related Discussions
