

How to Create a Theme Settings Shortcut in Windows 10
Information
In Windows, you can use themes to help make your desktop feel a little more personal. Themes change the desktop background, colors, sounds, screen saver, and pointers on your PC all at once, and you can switch between themes as often as you like.
- Desktop background - Your desktop background (also called wallpaper) can be a picture from your personal collection or included with Windows, a solid color, or a slide show playing selected pictures randomly on all displays.
- Colors - The color of your Start menu, Start button, taskbar, accent, window borders, buttons, text, Settings, and Action Center. A color can be chosen automatically based on the colors in the desktop background picture.
- Sounds - A collection of related sounds that you hear when events happen on your PC. An event can be an action that you perform, such as empting the Recycle Bin, or an action that Windows performs, such as notifying you when you receive new e‑mail.
- Screen saver - A moving picture or pattern that appears on your PC screen when you havent used the mouse or keyboard for a certain period of time. The screen saver is turned off in the themes that come with Windows, but you can turn it on and add one to a theme.
- Pointers - A scheme of .ani (animated cursor) and .cur (cursor) files used to display for different types of pointers.
This tutorial will show you how to download or create a Theme Settings shortcut that opens to the Personalization Control Panel to change themes for your account in Windows 10.
Note
Starting in Windows 10 Insider Preview build 10547, opening Personalization from the Control Panel and this shortcut will now include the Desktop Background, Color, Sounds, and Screen Saver settings again.
CONTENTS:
- Option One: To Download a Theme Settings Shortcut
- Option Two: To Manually Create a Theme Settings Shortcut
EXAMPLE: Theme Settings in Control Panel and Settings
1. Click/tap on the Download button below to download the .zip file you want below.
2. Save the .zip file to your desktop.
3. Unblock the .zip file.
4. Open the .zip file, and extract (drag and drop) the shortcut to your desktop.
5. If you like, you can Pin to Taskbar, Pin to Start, add to All apps, add to Quick Launch, assign a keyboard shortcut to, or move this shortcut to where you like for easy use.
6. When finished, you can delete the downloaded .zip file if you like.
1. Right click or press and hold on an empty area on your desktop, and click/tap on New and Shortcut.
2. Copy and paste the location below you want to use into the location area, and click/tap on Next. (see screenshot below)
(Control Panel)
explorer.exe shell:::{ED834ED6-4B5A-4bfe-8F11-A626DCB6A921}
OR
(Settings)
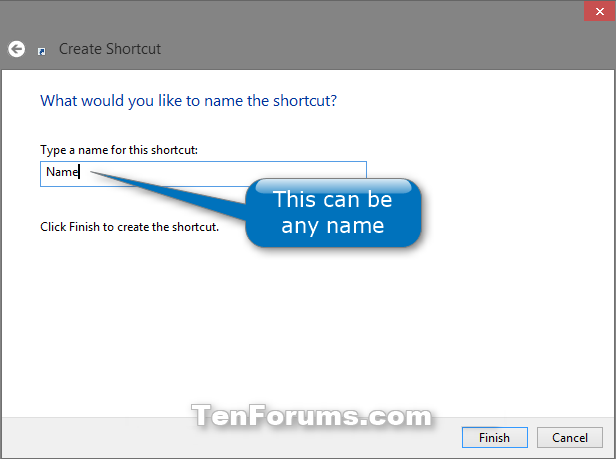
3. Type Theme Settings for the name, and click/tap on the Finish button. (see screenshot below)
NOTE: You could name this shortcut anything you would like though.
4. Right click or press and hold on the new Theme Settings shortcut, and click/tap on Properties.
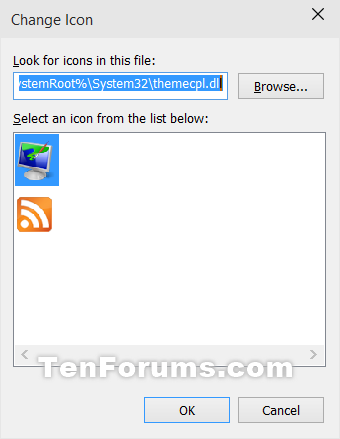
5. Click/tap on the Shortcut tab, and click/tap on the Change Icon button. (see screenshot below)
6. In the line under "Look for icons in this file", copy and paste the location below, and press Enter. (see screenshot below)
7. Select the icon highlighted in blue above, and click/tap on OK. (see screenshot above)
NOTE: You could use any icon that you would like instead though.
8. Click/tap on OK. (see screenshot below step 5)
9. If you like, you can Pin to Taskbar, Pin to Start, add to All apps, add to Quick Launch, assign a keyboard shortcut to, or move this shortcut to where you like for easy use.
That's it,
Shawn
Related Tutorials
- How to Create a 'Color and Appearance' Shortcut in Windows 10
- How to Change your Theme in Windows 10
- How to Add or Remove Personalize (classic) context menu in Windows 10
Create Theme Settings shortcut in Windows 10
-
New #1
I want to add and delete pictures in any Theme as was possible in Windows 7 and 8, Wonder why MS has done away with this in Windows 10. Personalization of themes and backgrounds, sound, and screen saver were really easy to access in previous versions.
Why does MS have to move around convenient features and settings every time a new version comes out...does anyone there understand the relearning process for individuals and corporations ??
-
New #2
Hello ogrick,
You might see if this may be helpful to you for this. :)
https://www.tenforums.com/tutorials/6...dows-10-a.html
Create Theme Settings shortcut in Windows 10
How to Create a Theme Settings Shortcut in Windows 10Published by Shawn BrinkCategory: Customization
10 Sep 2017


 Quote
QuoteTutorial Categories

Related Discussions
