

How to Change Display Order of Boot Loader Entries on Boot Options Menu at Startup in Windows
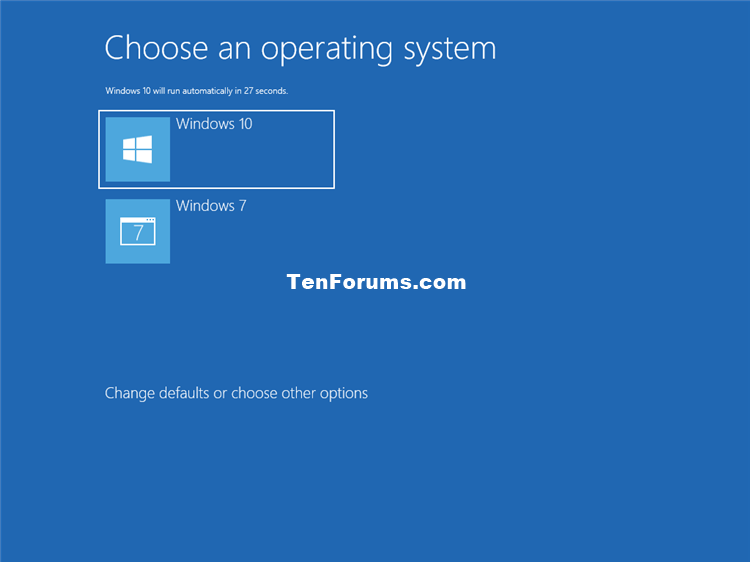
If you have more than one operating system installed on your PC, you will see a Choose an operation system (Windows Boot Manager) screen at startup with the name (description) of each installed OS (boot loader entry) listed on the boot options menu.
By default, the last OS installed will have its boot loader entry listed first in order on the boot options menu, but you can set the boot loader entries to be in any order you want displayed on the boot options menu at startup.
See also: Editing the boot menu | Microsoft Hardware Dev Center
This tutorial will show you how to change the boot entry display order of installed operating systems in the boot options menu at startup in Windows 7, Windows 8, Windows 10, and Windows 11.
You must be signed in as an administrator to change the display order of boot loader entries on the boot options menu.
Contents
- Option One: See Current Display Order of Boot Loader Entries and their Identifier
- Option Two: Set Display Order of All Boot Loader Entries
- Option Three: Change Display Order of Specific Boot Loader Entry to be Listed First
- Option Four: Change Display Order of Specific Boot Loader Entry to be Listed Last
EXAMPLE: Boot options menu at startup for Windows 10
1 Open an elevated command prompt or a command prompt at boot.
2 Typebcdeditin the command prompt, and press Enter. (see screenshot below)
3 In the Windows Boot Manager section at the top, the displayorder item will show you a list of boot loader entries referenced by their identifier (ex: "{current}" and "{323e174d-c50d-11e9-a727-93f7b7756ebc}") arranged in the current display order on the boot options menu.
You can look under each Windows Boot Loader section to see the referenced Identifier value (ex: "{current}" and "{323e174d-c50d-11e9-a727-93f7b7756ebc}") and the Description (ex: "Windows 10" and "Windows 7") displayed on the boot options menu.
1 Open an elevated command prompt or a command prompt at boot.
2 Type the command below into the command prompt, and press Enter. (see screenshot below)
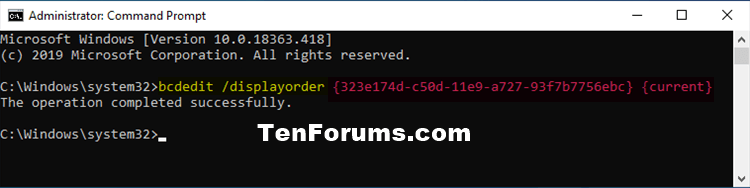
bcdedit /displayorder {identifier} {identifier} ...
Substitute {identifier} in the command above with the identifier values (ex: "{current}" and "{323e174d-c50d-11e9-a727-93f7b7756ebc}") from Option One for each boot loader entry (ex: "Windows 10" and "Windows 7") arranged in the order you want them displayed on the boot options menu.
For example:bcdedit /displayorder {323e174d-c50d-11e9-a727-93f7b7756ebc} {current}
3 When finished, close the command prompt, or restart the computer if a command prompt at boot.
1 Open an elevated command prompt or a command prompt at boot.
2 Type the command below into the command prompt, and press Enter. (see screenshot below)
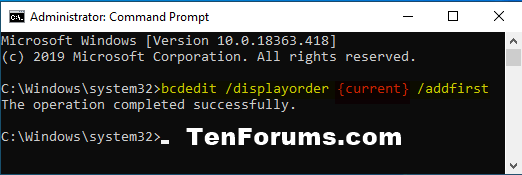
bcdedit /displayorder {identifier} /addfirst
Substitute {identifier} in the command above with the identifier value (ex: "{current}") from Option One of the boot loader entry (ex: "Windows 10") you want displayed first on the boot options menu.
For example:bcdedit /displayorder {current} /addfirst
3 When finished, close the command prompt, or restart the computer if a command prompt at boot.
1 Open an elevated command prompt or a command prompt at boot.
2 Type the command below into the command prompt, and press Enter. (see screenshot below)
bcdedit /displayorder {identifier} /addlast
Substitute {identifier} in the command above with the identifier value (ex: "{323e174d-c50d-11e9-a727-93f7b7756ebc}") from Option One of the boot loader entry (ex: "Windows 7") you want displayed last on the boot options menu.
For example:bcdedit /displayorder {323e174d-c50d-11e9-a727-93f7b7756ebc} /addlast
3 When finished, close the command prompt, or restart the computer if a command prompt at boot.
That's it,
Shawn Brink
Related Tutorials
- How to Dual Boot Windows 10 with Windows 7 or Windows 8
- How to Remove and Uninstall Windows 7, Windows 8, or Windows 10 from Dual Boot PC
- How to Enable or Disable Legacy F8 Advanced Boot Options in Windows 10
- How to Change Operating System Name in Boot Options at Startup in Windows 10
- How to Change Time to Display List of Operating Systems in Boot Options at Startup in Windows 10
- How to Choose a Default Operating System to Load at Startup in Windows 10
- How to Add Safe Mode to Boot Options in Windows 10
- How to Delete Boot Loader Entry on Boot Menu at Startup in Windows
Change Boot Entry Display Order in Boot Menu at Startup in Windows

Change Boot Entry Display Order in Boot Menu at Startup in Windows
How to Change Display Order of Boot Loader Entries on Boot Options Menu at Startup in WindowsPublished by Shawn BrinkCategory: Installation & Upgrade
03 Dec 2023


Tutorial Categories

Related Discussions
