

How to Add or Remove Trusted Devices Associated with your Microsoft Account
When you try to view or edit sensitive info related to your Microsoft accountlike your credit card detailsMicrosoft might ask you for a security code first, to make sure that only you can get in to your account. But you can designate a PC as a trusted device. On trusted devices, you don't need to enter a security code each time you try to access sensitive info.
This tutorial will show you how to add or remove PCs that you sign in to with your Microsoft account as trusted devices.
You do not want to add a public PC (ex: library PC) as a trusted device associated with your Microsoft account. You would only want to add a personal PC that you trust to be safe instead.
If you add a Microsoft account as a new user on a PC, then that user will need to verify their identity if they want to add the PC as a trusted device associated with their Microsoft account.
If you remove all trusted devices associated with your Microsoft account, then you will need to verify your identity on each PC that you want to add again as a trusted device associated with your Microsoft account.
Contents
- Option One: How to Add a PC as a Trusted Device Associated with your Microsoft Account in Settings
- Option Two: How to Add a PC as a Trusted Device Associated with your Microsoft Account Online
- Option Three: How to Remove All Trusted Devices Associated with your Microsoft Account
This option is for when you sign in to a Windows 10 PC with your Microsoft account, and would like to add the PC as a trusted device.
1 Sign in with your Microsoft account to a Windows 10 PC that you want to add as a trusted device.
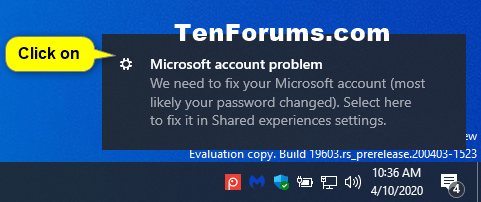
2 Click/tap on the Microsoft account problem notification if displayed, and go to step 4 below. Otherwise, continue on to step 3 below. (see screenshot below)
3 Open Settings, and click/tap on the System icon.
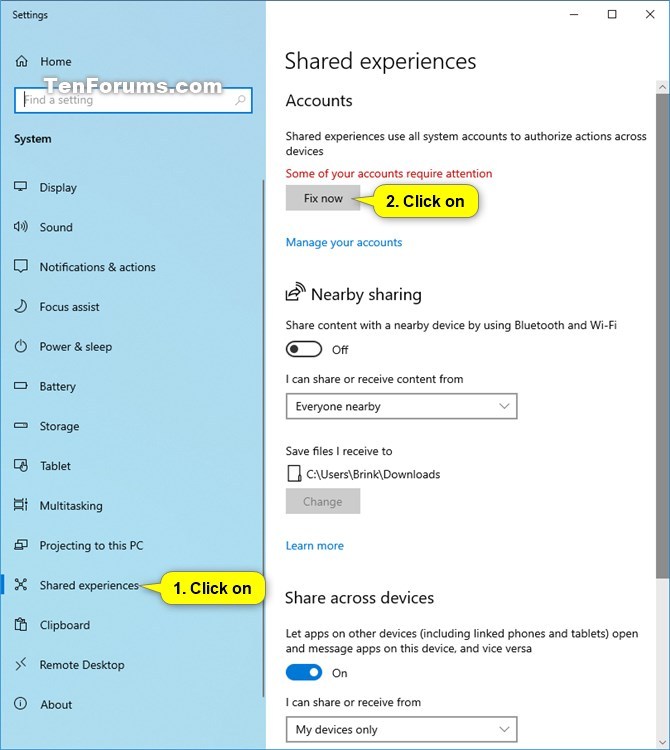
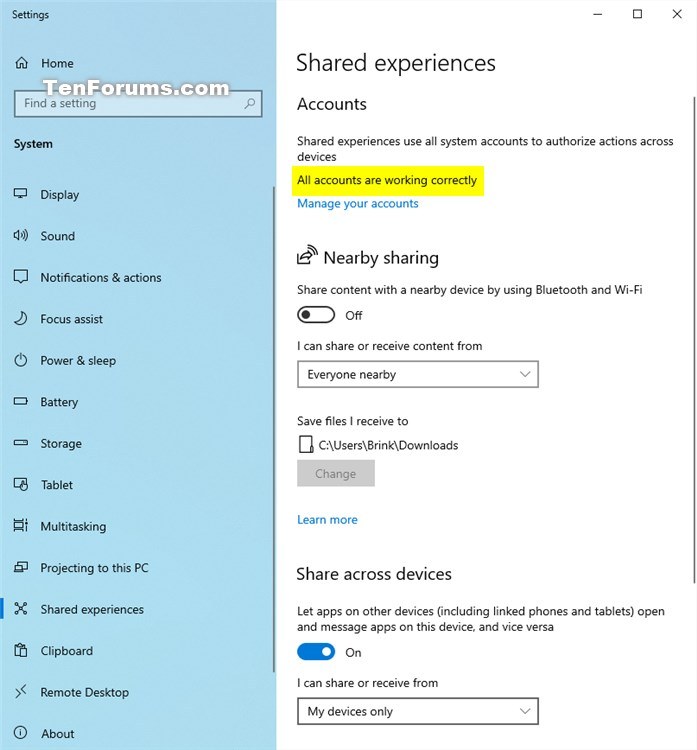
4 Click/tap on Shared experiences on the left side, and click/tap on the Fix now button at the top under Accounts. (see screenshot below)
If you do not see a Fix now button, then the PC has already been added as a trusted device associated with your Microsoft account.
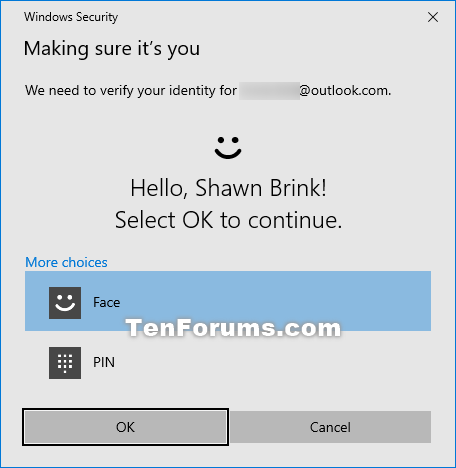
5 Select how you want to verify your identity, and provide any required information for it. (see screenshots below)
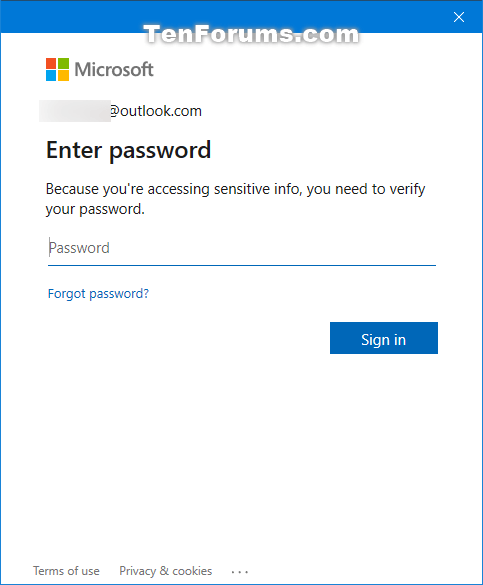
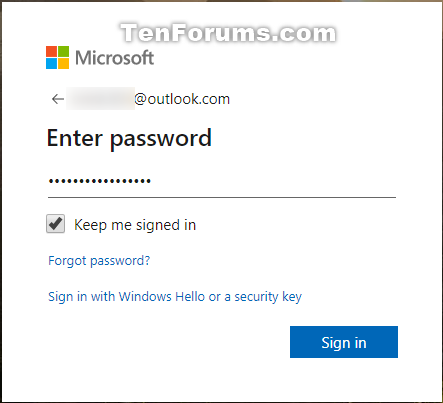
6 Enter the password for your Microsoft account to verify, and click/tap on Sign in. (see screenshot below)
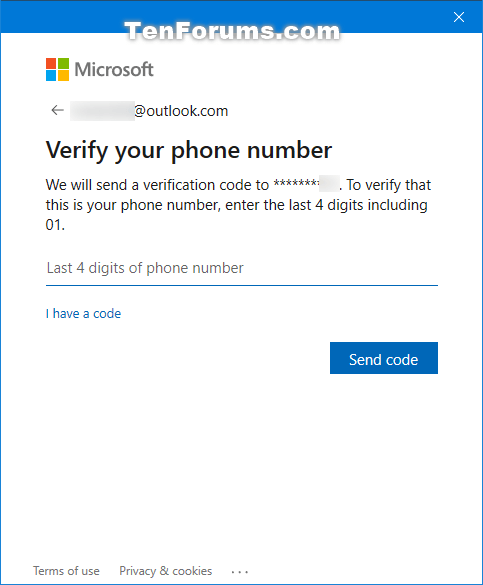
7 If you have two-step verification turned on for your Microsoft account, you will need to click/tap on how (ex: text) you would like to get a security code, enter the required information, and click/tap on Send code. (see screenshot below) (see screenshots below)
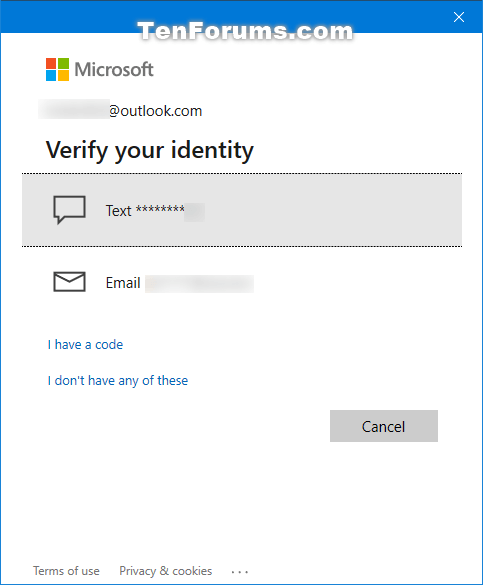
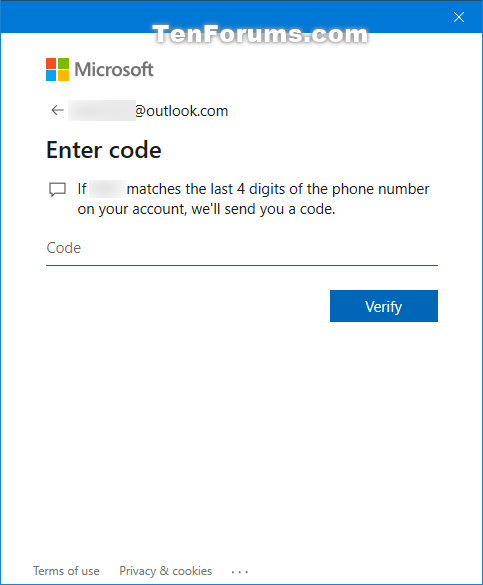
A) Enter the code you received from Microsoft, and click/tap on Verify. (see screenshot below)
8 You will now see All accounts are working correctly in Settings indication this PC has now been added a trusted device associated with your Microsoft account. (see screenshot below)
9 You can now close Settings if you like.
This option is for when you do not sign in to a Windows 8.1 or Windows 10 PC with your Microsoft account, but do sign in to Microsoft services online with your Microsoft account on a PC that you would like to add as a trusted device.
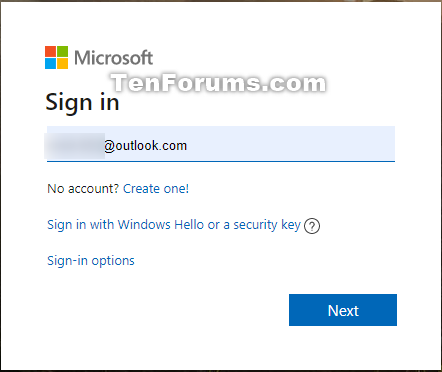
1 Sign in to a Microsoft service website such as Microsoft account, OneDrive, Outlook with your Microsoft account. (see screenshots below)
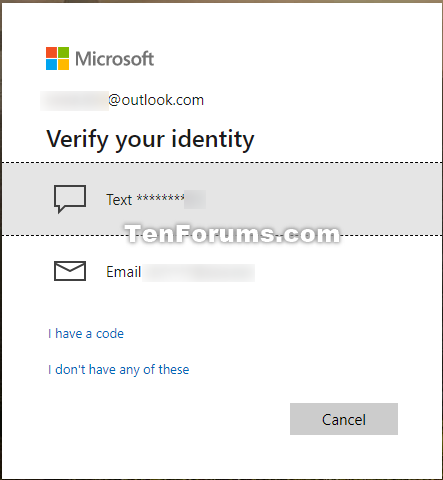
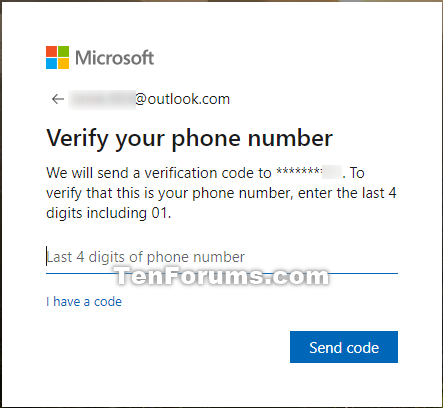
2 Select how you would like to get your security code for verification, enter the required information, and click/tap on Send code. (see screenshots below)
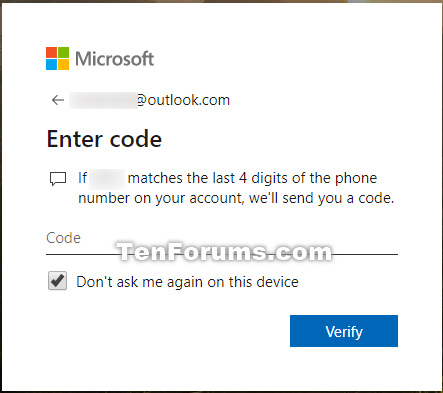
3 Enter the code you received, check the Don't ask me again on this device box, and click/tap on Verify. (see screenshot below)
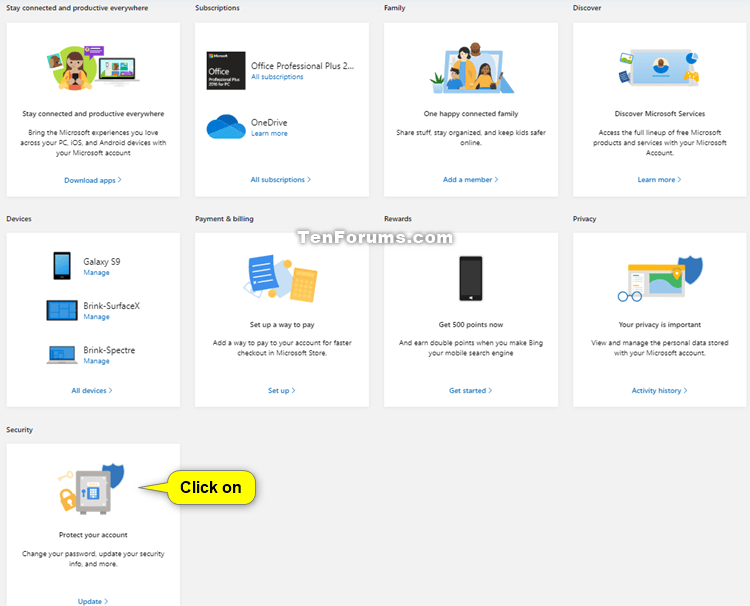
1 Go to your Microsoft account online at Microsoft, and sign in with your Microsoft account if not already.
2 Click/tap on Security "Protect your account". (see screenshot below)
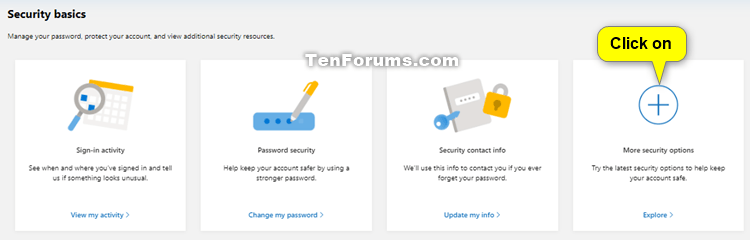
3 Click/tap on More security options. (see screenshot below)
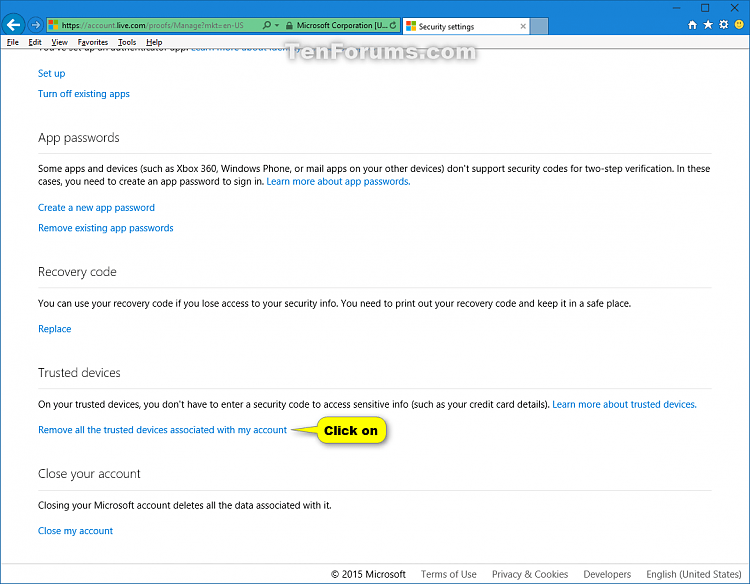
4 Scroll down towards the bottom of the page to the Trusted devices section, and click/tap on the Remove all the trusted devices associated with my account link. (see screenshot below)
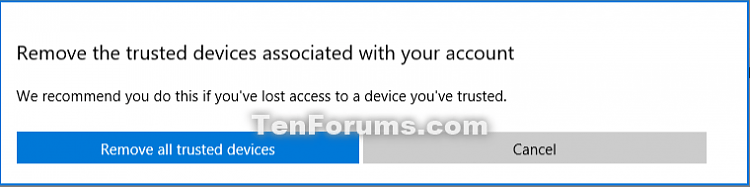
5 Click/tap on Remove all trusted devices to confirm. (see screenshot below)
That's it,
Shawn
Related Tutorials
- How to Allow or Block Microsoft Accounts in Windows 10
- How to Turn On or Off Two-step Verification for your Microsoft Account
- How to Fix 'Click here to enter your most recent credential' in Windows 8 and Windows 10
- How to Remove Devices from your Microsoft Account
Add or Remove Trusted Devices for Microsoft Account
-
New #1
Devices not showing up in Microsoft account
Hello
One of my customers has three laptops. Two ASUS and a Sony VAIO. The first two show up as devices in Microsoft Account on both laptops. The third (ASUS), a recent acquisition, only shows itself and not the other two. It also does not show up on the other two devices. I have been through all the settings and still dont understand what is happening. I set all three up in the same way (I thought). They are ALL in the same Microsoft account. What am I missing!
Thanks for any insight
Chris
-
-
New #3
Thanks for your reply Brink. I mean that on my customer's laptops devices(s) are not showing up online in the Microsoft account. The original two laptops show up when going into the account online from the respective devices, but the third doesn't, and from the third, I only see itself and not the other two. Personally I have two desktops and an ASUS transformer book and they all show-up when going into the account from all three devices.
I hope this makes sense!
-
New #4
That is odd if the same Microsoft account is on all three devices.
It does sound like a different Microsoft account on the third device from how you described how the devices show on the Microsoft account online devices page. Could there have been a slight typo in the account name when setting it up?
I have seen that it may sometimes take a while for a new device to properly sync with your devices on the Microsoft account page.
-
New #5
Well, this is most embarrassing! It turns out that, whilst the first two laptops were set up as English-UK and the auto offered Microsoft account is outlook.com, the third is French and offered outlook.fr. I thought that I had checked this several times (as you pointed out, it is an obvious place to start), but I must have been fixated on the outlook part and not the country code! (and I was doing this remotely as we are in lock - down but no excuse!) Also, OneDrive appeared to be syncing to all three machines so that was a red herring as the third laptop was linked to .com for OneDrive.
Thanks for pointing me in the right direction and sorry for wasting your time.
Stay safe
Chris
-
Add or Remove Trusted Devices for Microsoft Account
How to Add or Remove Trusted Devices Associated with your Microsoft AccountPublished by Shawn Brink
10 Apr 2020


 Quote
Quote
Tutorial Categories

Related Discussions
