How to Rename a Network Adapter in Windows
A network adapter is a computer hardware component that connects a computer to a computer network known as a network connection.
This tutorial will show you different ways to rename a network adapter (NIC) or network connections in Windows 7, Windows 8, and Windows 10.
You must be signed in as an administrator to rename network adapters.
Contents
- Option One: Rename Network Adapter in Network Connections
- Option Two: Rename Network Adapter in Command Prompt
- Option Three: Rename Network Adapter in PowerShell
- Option Four: Rename Network Adapter in Registry Editor
1 Do step 2 (Settings) or step 3 (Control Panel) below for how you would like to open Network Connections.
2 Open Settings, and click/tap on the Network & Internet icon.
This step is only available in Windows 10.
A) Click/tap on Status on the left side, click/tap on Change adapter options on the right side, and go to step 4. (see screenshot below)
3 Open the Control Panel (icons view), and click/tap on the Network and Sharing Center icon.
A) Click/tap on the Change adapter settings link on the left side, and go to step 4. (see screenshot below)
4 Perform either action below. (see screenshot below)
A) Select the network connection (ex: "Wi-Fi") you want to rename, and click/tap on Rename this connection in the toolbar.
OR
B) Right click or press and hold on the network connection (ex: "Wi-Fi") you want to rename, and click/tap on Rename.
5 Type a new name (ex: "My Wi-Fi") you want for the network connection, and press Enter. (see screenshot below)
6 When finished, you can close Network Connections and Network and Sharing Center if you like.
1 Open an elevated command prompt.
2 Copy and paste thenetsh interface show interfacecommand into the elevated command prompt, and press Enter. Make note of the Interface Name (ex: "Wi-Fi") for the network adapter you want to rename. (see screenshot below)
3 Type the command below into the elevated command prompt, and press Enter.
netsh interface set interface name="Current Name" newname="New Name"
Substitute Current Name in the command above with the actual Interface Name (ex: "Wi-Fi") from step 2 you want to rename.
Substitute New Name in the command above with the actual new name (ex: "My Wi-Fi") you want for the network adapter.
For example:netsh interface set interface name="Wi-Fi" newname="My Wi-Fi"
4 When finished, you can close the elevated command prompt if you like.
This option is only available in Windows 8.1 and Windows 10.
1 Open an elevated PowerShell.
2 Copy and paste theGet-NetAdapter | format-listcommand into the elevated Powershell, and press Enter. Make note of the network adapter Name (ex: "Wi-Fi") you want to rename. (see screenshot below)
To see more usage options for the Get-NetAdapter command, see: Get-NetAdapter | Microsoft Docs
3 Type the command below into the elevated PowerShell, and press Enter.
To see more usage options for the Rename-NetAdapter command, see: Rename-NetAdapter | Microsoft Docs
Rename-NetAdapter -Name "Current Name" -NewName "New Name"
Substitute Current Name in the command above with the actual Interface Name (ex: "Wi-Fi") from step 2 you want to rename.
Substitute New Name in the command above with the actual new name (ex: "My Wi-Fi") you want for the network adapter.
For example:Rename-NetAdapter -Name "Wi-Fi" -NewName "My Wi-Fi"
4 When finished, you can close the elevated PowerShell if you like.
1 Press the Win + R keys to open Run, type regedit into Run, and click/tap on OK to open Registry Editor.
2 Navigate to the key below in the left pane of Registry Editor. (see screenshot below)
HKEY_LOCAL_MACHINE\SYSTEM\CurrentControlSet\Control\Network
3 While the Network key selected, press the Ctrl+F keys or click/tap on Edit (menu bar) and click/tap on Find. (see screenshot below)
4 Enter the name (ex: "Wi-Fi") of the network adapter you want to rename, and click/tap on Find Next. (see screenshot below)
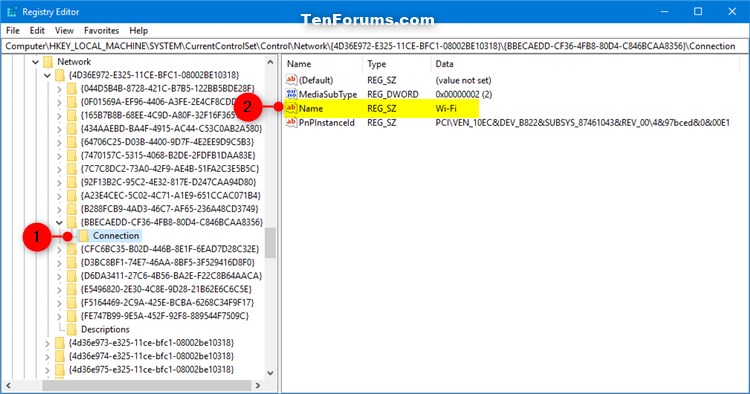
5 In the right pane of the Connection key, double click/tap on the Name string value (REG_SZ) for the network adapter (ex: "Wi-Fi") to modify it. (see screenshot below)
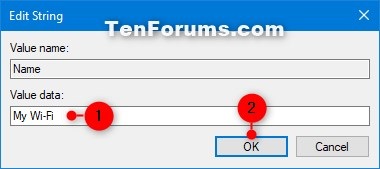
6 Type a new name (ex: "My Wi-Fi") you want for the network adapter, and click/tap on OK. (see screenshot below)
7 When finished, you can close Registry Editor if you like.
That's it,
Shawn
Related Tutorials
- How to Change a Network Profile Name in Windows 10
- How to Enable or Disable Network Adapters in Windows
- How to Change Network Adapter Connection Priorities in Windows 10
- How to Cleanup and Reset Network Adapters in Windows 10
- How to See Network Adapter Speed in Windows 10
- How to Create Network Connections Shortcut in Windows 10
Rename Network Adapter in Windows

Rename Network Adapter in Windows
How to Rename a Network Adapter in WindowsPublished by Shawn BrinkCategory: Network & Sharing
09 Mar 2020
Tutorial Categories


Related Discussions


