

How to reset Hosts file back to default in Windows
The Hosts file is used by the operating system to map human-friendly hostnames to numerical Internet Protocol (IP) addresses which identify and locate a host in an IP network. The hosts file is one of several system resources that address network nodes in a computer network and is a common part of an operating system's IP implementation.
The Hosts file contains lines of text consisting of an IP address in the first text field followed by one or more host names. Each field is separated by white space (Tabs are often preferred for historical reasons, but spaces are also used). Comment lines may be included, and they are indicated by a hash character (#) in the first position of such lines. Entirely blank lines in the file are ignored.
If the Hosts file is changed from default, resetting it can help resolve some connectivity issues.
See also: How to reset the Hosts file back to the default | Windows Support
This tutorial will show you how to reset the Hosts file back to default in Windows 7, Windows 8, and Windows 10.
You must be signed in as an administrator to reset the Hosts file.
Here's How:
1 Open Notepad ("C:\Windows\notepad.exe").
2 Copy the following text below, and paste the text into Notepad. (see screenshot below)
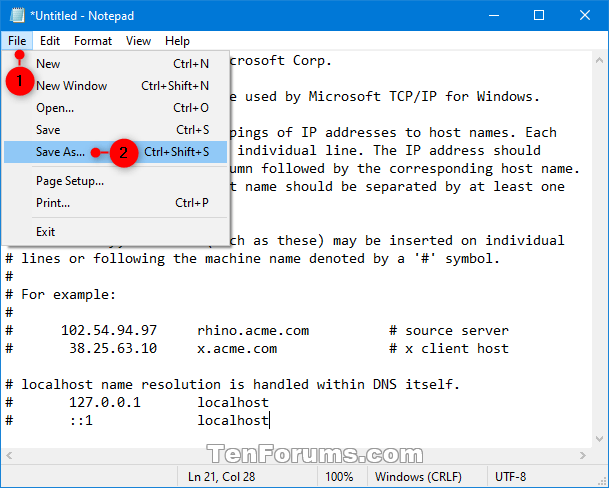
Code:# Copyright (c) 1993-2009 Microsoft Corp. # # This is a sample HOSTS file used by Microsoft TCP/IP for Windows. # # This file contains the mappings of IP addresses to host names. Each # entry should be kept on an individual line. The IP address should # be placed in the first column followed by the corresponding host name. # The IP address and the host name should be separated by at least one # space. # # Additionally, comments (such as these) may be inserted on individual # lines or following the machine name denoted by a '#' symbol. # # For example: # # 102.54.94.97 rhino.acme.com # source server # 38.25.63.10 x.acme.com # x client host # localhost name resolution is handle within DNS itself. # 127.0.0.1 localhost # ::1 localhost
3 Click/tap on File Alt + F in the menu bar of Notepad, and click/tap on Save As Ctrl + Shift + S. (see screenshot below)
4 Select your Desktop as the location to save the file to, type "hosts" (with quotes) for the file name, and click/tap on Save. (see screenshot below)
5 Close Notepad.
6 Press the Win + E keys to open File Explorer (Windows 8 or 10) or Windows Explorer (Windows 7).
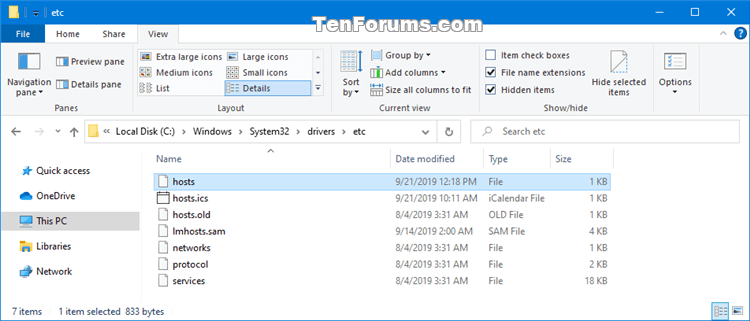
7 Open the C:\Windows\System32\drivers\etc folder in File Explorer (Windows 8 or 10) or Windows Explorer (Windows 7).
8 Right click or press and hold on the hosts file in the C:\Windows\System32\drivers\etc folder, and click/tap on Rename. (see screenshot below)
9 Rename hosts to hosts.old in the C:\Windows\System32\drivers\etc folder, and press Enter. (see screenshot below)
This will be a backup of the current hosts file. You can rename this file from hosts.old to hosts to restore this backup.
10 If prompted by UAC, click/tap on Yes to approve.
11 Drag and drop (move) the hosts file on your desktop from step 4 into the C:\Windows\System32\drivers\etc folder. (see screenshot below)
12 If prompted, click/tap on Continue to approve. (see screenshot below)
13 You can now close File Explorer (Windows 8 or 10) or Windows Explorer (Windows 7). (see screenshot below)
That's it,
Shawn
Related Tutorials
- How to Block Websites using Hosts File in Windows
- How to Change IPv4 and IPv6 DNS Server Address in Windows
- How to Flush DNS Resolver Cache in Windows 10
- How to Cleanup and Reset Network Adapters in Windows 10
Reset Hosts file back to default in Windows
-
New #1
At steps 7 & 8 above I'm not sure which folder I'm after.

The first one doesn't have a "host' entry, The second is not accessible to me (due probably to lack of know-how) and the third is the repository.
Sorry jacee ... I'm still not sure how to proceed.
thx all for the contribultions.
-
-
New #3
Went away, came back ... and found the right file! :)
Thanks to all contributors... I"m now watching the program sought.Last edited by nithig; 06 Dec 2019 at 08:37.

Reset Hosts file back to default in Windows
How to reset Hosts file back to default in WindowsPublished by Shawn BrinkCategory: Network & Sharing
22 Sep 2019


 Quote
QuoteTutorial Categories

Related Discussions
