

How to Turn On or Off Tailored experiences with diagnostic data in Windows 10
Starting with Windows 10 build 15019, a new privacy setting to "let Microsoft provide more tailored experiences with relevant tips and recommendations by using your diagnostic data" has been added.
This tutorial will show you how to turn on or off tailored experiences with diagnostic data for specific or all users in Windows 10.
Contents
- Option One: Turn On or Off Tailored experiences with diagnostic data for Current User during Windows Setup
- Option Two: Turn On or Off Tailored experiences with diagnostic data for Current User in Settings
- Option Three: Turn On or Off Tailored experiences with diagnostic data for Current User using a REG file
- Option Four: Enable or Disable Tailored Experiences Feature for Specific or All Users in Local Group Policy Editor
- Option Five: Enable or Disable Tailored Experiences Feature for Current User using a REG file
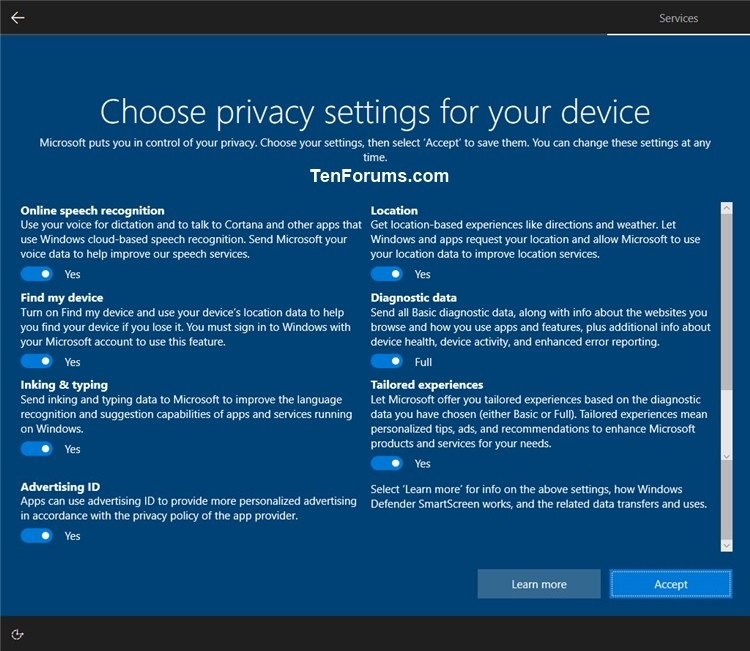
1 When you get to Choose privacy settings for your device during Windows Setup while doing a clean install of Windows 10, you can turn on (default) or off the Tailored experiences privacy setting for what you want. (see screenshots below)
1 Open Settings, and click/tap on the Privacy icon.
2 Click/tap on Diagnostics & feedback on the left side, and turn on (default) of off Tailored experiences on the right side for what you want. (see screenshot below)
3 When finished, you can close Settings if you like.
The downloadable .reg files below will modify the DWORD value in the registry key below.
HKEY_CURRENT_USER\Software\Microsoft\Windows\CurrentVersion\Privacy
TailoredExperiencesWithDiagnosticDataEnabled DWORD
0 = Off
1 = On
1 Do step 2 (on) or step 3 (off) below for what you would like to do.
This is the default setting.
A) Click/tap on the Download button below to download the file below, and go to step 4 below.
Turn_ON_Tailored_experiences_with_diagnostic_data.reg
Download
A) Click/tap on the Download button below to download the file below, and go to step 4 below.
Turn_OFF_Tailored_experiences_with_diagnostic_data.reg
Download
4 Save the .reg file to your desktop.
5 Double click/tap on the downloaded .reg file to merge it.
6 When prompted, click/tap on Run, Yes (UAC), Yes, and OK to approve the merge.
7 You can now delete the downloaded .reg file if you like.
You must be signed in as an administrator to use this option.
The Local Group Policy Editor is only available in the Pro, Enterprise, and Education editions.
If disabled, this option will override Option One, Option Two, and Option Three.
All editions can use Option Five below.
1 Open the all users, specific users or groups, or all users except administrators Local Group Policy Editor for how you want this policy applied.
2 In the left pane of the Local Group Policy Editor, click/tap on to expand User Configuration, Administrative Templates, Windows Components, and Cloud Content. (see screenshot below)
3 In the right pane of Cloud Content, double click/tap on the Do not use diagnostic data for tailored experiences policy to edit it. (see screenshot above)
4 Do step 5 (enable) or step 6 (disable) below for what you would like to do.
A) Select (dot) either Not Configured or Disabled, click/tap on OK, and go to step 7 below. (see screenshot below)
Not Configured is the default setting.
7 When finished, you can close the Local Group Policy Editor if you like.
You must be signed in as an administrator to use this option.
If disabled, this option will override Option One, Option Two, and Option Three.
The downloadable .reg files below will add and modify the DWORD value in the registry key below.
HKEY_CURRENT_USER\Software\Policies\Microsoft\Windows\CloudContent
DisableTailoredExperiencesWithDiagnosticData DWORD
(delete) = Enable
1 = Disable
1 Do step 2 (enable) or step 3 (disable) below for what you would like to do.
This is the default setting.
A) Click/tap on the Download button below to download the file below, and go to step 4 below.
Enable_tailored_experiences_with_diagnostic_data_for_current_user.reg
Download
A) Click/tap on the Download button below to download the file below, and go to step 4 below.
Disable_tailored_experiences_with_diagnostic_data_for_current_user.reg
Download
4 Save the .reg file to your desktop.
5 Double click/tap on the downloaded .reg file to merge it.
6 When prompted, click/tap on Run, Yes (UAC), Yes, and OK to approve the merge.
7 You can now delete the downloaded .reg file if you like.
That's it,
Shawn Brink
Related Tutorials
- How to Change Diagnostic and Usage Data Settings in Windows 10
- How to Enable or Disable Diagnostic Data Viewer in Windows 10
- How to Delete Diagnostic Data in Windows 10
- How to Enable or Disable Delete Diagnostic Data in Windows 10
- How to Turn On or Off Show Me Tips about Windows 10
- How to Enable or Disable Let Apps use Advertising ID for Relevant Ads in Windows 10
- How to Use Microsoft Privacy Dashboard to Manage Your Privacy on the Cloud in Windows 10
- How to Turn On or Off Improve Inking & Typing Recognition in Windows 10
Turn On or Off Tailored experiences with diagnostic data in Windows 10
-
New #1
Hi, Brink
The same registry key of Option Three in Local Machine is as following.
[HKEY_LOCAL_MACHINE\SOFTWARE\Microsoft\Windows\CurrentVersion\Privacy]
"TailoredExperiencesWithDiagnosticDataEnabled"=dword:00000000
0: Off
1: On
Turn On or Off Tailored experiences with diagnostic data by using Group Policy in Windows 10 x64 20H2 is as following.
1. Registry key:
[HKEY_CURRENT_USER\SOFTWARE\Policies\Microsoft\Windows\CloudContent]
"DisableTailoredExperiencesWithDiagnosticData"=dword:00000001
No Key named as CloudContent or 0: On
1: Off
2.The location of Tailored experiences with diagnostic data by using Group Policy is as following.
User Configuration -> Administrative Templates -> Windows Components -> Cloud Content -> Do not use diagnostic data for tailored experiences
Best regards,
Steven.
-

Turn On or Off Tailored experiences with diagnostic data in Windows 10
How to Turn On or Off Tailored experiences with diagnostic data in Windows 10Published by Shawn BrinkCategory: General Tips
06 Jul 2022


 Quote
Quote
Tutorial Categories

Related Discussions
