

How to Add, Remove, and Name a Group of App Tiles on Start in Windows 10
Once you pin to Start items, you can move their tiles to where you like in and out of groups on Start, and name groups to what you like.
This tutorial will show you how to group tiles of items you pinned to Start, and name groups on Start in Windows 10.
Contents
- Option One: Move Apps In or Out of Groups on Start
- Option Two: Move Groups on Start
- Option Three: Create a New Group on Start
- Option Four: Name or Rename Groups on Start
- Option Five: Unpin Group from Start
1 If you like, temporarily open your Start menu to full screen to make this easier to do.
2 Click/press and hold on a tile on Start that you want to move, drag the tile to within the same or other group, and drop it where you like. (see screenshots below)
When you move a tile around within a group, the other tiles in the group will automatically move over to make room for the moved tile.
If you move all tiles out of a group, that group will be removed. The tiles will still remain in the group you moved them to.
This will move the group and all tiles in the group to where you like on Start.
1 If you like, temporarily open your Start menu to full screen to make this easier to do.. (see screenshot below)
2 Click/tap on the space right above a group where the group name is or would be, and click/press and hold on the 3 dots at the end. (see screenshot below)
3 Drag the group to where you like until a group divider bar appears. (see screenshots below)
4 Release the group to drop and move it there. (see screenshot below)
1 If you like, temporarily open your Start menu to full screen to make this easier to do.. (see screenshot below)
2 Click/press and hold on a tile on Start that you want to move in a new group, drag the tile to where you like until a group divider bar appears. (see screenshot below)
3 Release the tile to create a new group. You can now move other tiles in or out of this group, and name the group (ex: Office 2013) what you like.
1 If you like, temporarily open your Start menu to full screen to make this easier to do..
2 Click/tap on the space above a group that you want to name, rename, or remove the name. (see screenshot below)
3 In the white box, type in the name you want for the group, and press Enter or click/tap empty area on Start. You can clear the white box to make it empty to remove the group name. (see screenshots below)
This option is only available starting with Windows 10 build 18298.
1 Open your Start menu.
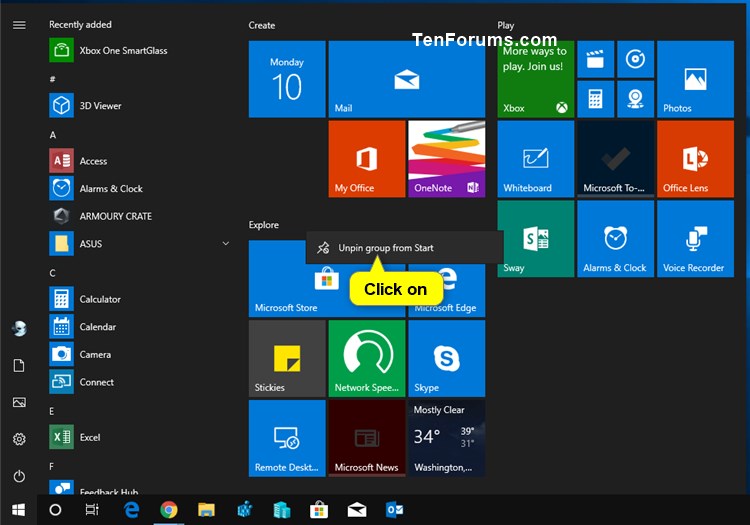
2 Right click or press and hold on the title of the group of tiles you want to unpin from Start. (see screenshot below)
3 Click/tap on Unpin group from Start. (see screenshot below)
That's it,
Shawn
Related Tutorials
- How to 'Pin to Start' and 'Unpin from Start" items in Windows 10
- How to Resize Tiles on Start Menu in Windows 10
- How to Turn On or Off to Use Full-screen Start in Windows 10
- How to Resize your Start Menu in Windows 10
- How to Turn On or Off 'Show more tiles' on Start in Windows 10
- How to Turn On or Off Clear Tile Notifications during Log on in Windows 10
- How to Reset Start Menu Layout to Default in Windows 10
- How to Backup and Restore Start Menu Layout in Windows 10
- How to Create and Use Live Folders on Start in Windows 10
Add, Remove, and Name a Group of App Tiles on Start in Windows 10
-
New #1
It's a bit of an acquired skill to move things around at first. If you move them a little too far, they potentially create a new group. I found it was easiest to move a tile so it partially covered one in the group where I wanted it, then it snaps into place.
-
-
New #3
I'm just pleased I'm not trying to do this on a touch screen. Controlling the mouse is bad enough .
.
-
New #4
Hi Shawn,
is it possible to remove these group names?
Thanks
-
New #5
Hello nissimezra, :)
You can use OPTION FOUR to rename the group, but clear it to leave it blank to not have a name for the group anymore.
-
New #6
-
New #7
Great news. :)
If you like, the free program Classic Shell should give you a Start Menu like in Windows 7.
-
-
-
New #9
Is there any way that this can be automated of pinning a newly installed application to a specific namegroup?
Thanks,
John.

Add, Remove, and Name a Group of App Tiles on Start in Windows 10
How to Add, Remove, and Name a Group of App Tiles on Start in Windows 10Published by Shawn BrinkCategory: Customization
25 Feb 2020


 Quote
QuoteTutorial Categories

Related Discussions
