

Running Windows on a virtual machine can naturally never be as fast as same version of Windows on same computer running on physical hardware. However, by tweaking virtual machine settings, you can greatly impact the speed and functionality of a virtual machine.
In this tutorial, you'll find some simple tips to make your virtual machines to run better.
Part One: VHD storage location Part Two: Virtual RAM (vRAM) Part Three: Virtual Processors (vCPU) Part Four: Using Checkpoints Part Five: Export & Import Virtual Machines Part Six: Ideal VM settings Part Seven: Additional tips & information
1.1 It is recommended to store virtual hard disks on an SSD, if possible.
1.2 Storing virtual hard disks on an HDD affects the time required to install Windows on VM, boot time, and restart time. It also affects the time required to install software, and large Windows updates like full feature upgrades.
Using my laptop (HP ProBook 470 G5) as an example, when the VHD is on SSD, installing Windows 10 takes about 7 minutes from start to desktop, whereas VHD on HDD requires over 20 minutes. Booting a VM from SSD takes about 40 seconds, restart about a minute. Booting VM from HDD, it takes almost two minutes to boot, over three minutes to restart.
However, don't worry if you do not have an SSD. In normal use, virtual machines with VHD on an HDD work nicely, when it has been tweaked with optimal settings.
1.3 Using Differencing Disks (tutorial) is recommended if your SSD is relatively small. Differencing disks means that a VM is stored on two different virtual hard disks, a so called Parent Disk containing the base Windows installation, and a Child Disk which contains all user profiles and data, settings, customizations and software.
VM boots from Parent Disk where the base Windows is installed, which then passes the control to the Child Disk.
1.4 Storing the Parent Disk on an SSD, and Child Disk on HDD is a good compromise. You save storage space on SSD, yet get faster VM than if only HDD was used to store virtual hard disk(s). In addition you can save a lot of storage space used by your virtual machines in general; one Parent Disk can be used for unlimited number of Child Disks.
An example. Let's say you have the Windows 10 version 1903 installed on a Parent Disk. You'd like to use four virtual machines for all available Insider Ring builds, one for Release Preview, one for Slow, one for Fast and one for Skip Ahead.
Version 1903 on Parent Disk takes about 11 GB. Creating four new virtual machines with Child Disks using this Parent Disk, this 11 GB is saved on each VM. You can then opt one VM in for Release Preview, one for Slow, one for Fast, and one for Skip Ahead.
If all four virtual machines were using a normal VHD, they would all have over 11 GB virtual hard disks, a total of about 45 GB before any software would be installed. But, using a Child Disk, each VM requires only less than 2 GB VHD, because the base Windows installation on Parent Disk is used instead of complete Windows on Child Disks.
In this example, you saved about 33 GB of storage space (4*11GB = 44 GB - Parent's 11GB = 33 GB).
If you have an SSD for parent disks, and a fast USB3 external HDD, you can store your child disks on that external HDD. Hyper-V has no issues in running virtual machines from an external disk.
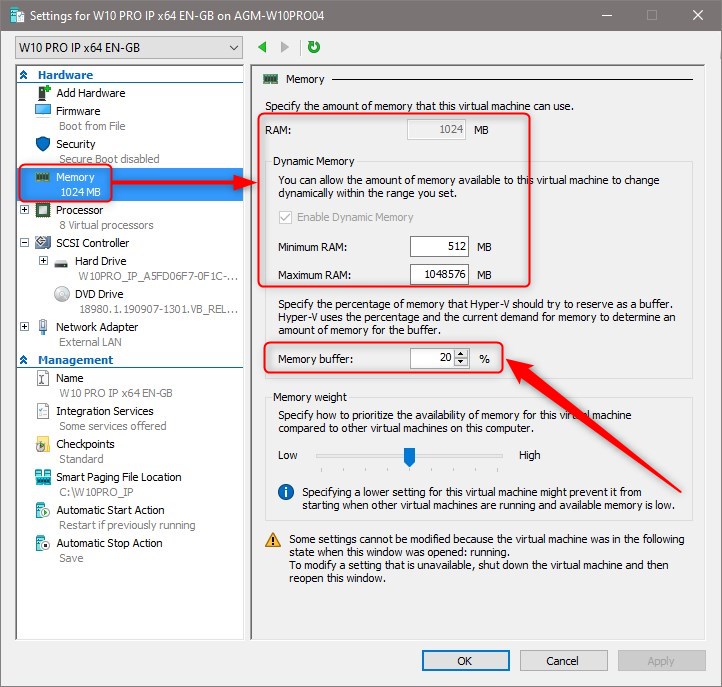
2.1 By default, Hyper-V virtual machines are set to use 1 GB starting vRAM and dynamic memory. Dynamic memory means that a VM only uses as much vRAM as is currently required. A VM with default settings starts with 1 GB vRAM, then assigns it more vRAM when needed, and reduces the amount of vRAM when additional memory is no longer required.
Dynamic memory can fluctuate between set minimum (default is 512 MB) and maximum (default 1048576 MB / 1 TB) values. Both min and max vRAM can be set as user prefers.
2.2 Hyper-V monitors the memory demand for each VM that is using dynamic memory. The demand depends on what's happening on VM; if you run Word and Excel at the same time, the demand increases and Hyper-V assigns more vRAM to VM. This is theoretically very good, but it would require all software and VM actions to report the demand in real time.
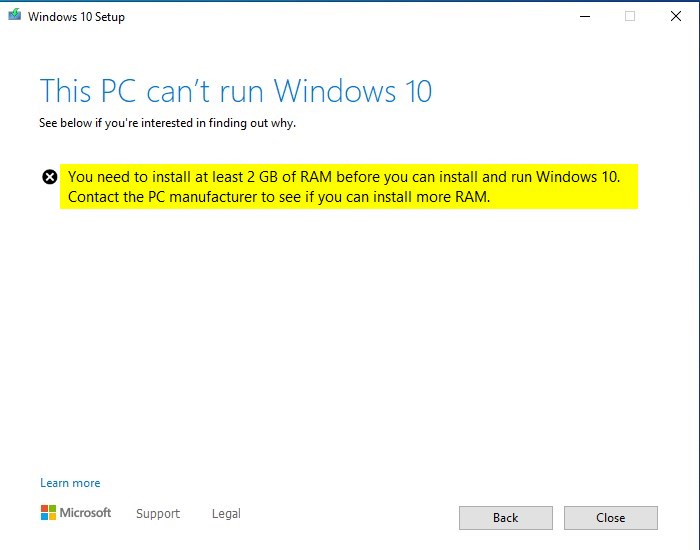
Unfortunately, this is not the case. For instance, running a Windows feature upgrade should tell Hyper-V that for it to work, VM needs more RAM, in case VM has less than 2 GB available at the moment the upgrade is started. But, Windows Update does not report correct demand, therefore user might see this:
(Click screenshots to enlarge.)
In case of Windows feature upgrade, it's not as much it not demanding enough dynamic vRAM for the VM, than the fact that the demand is sent too late. The actual demand works a bit delayed, VM has not had time to adjust for greater memory demand when it' needed.
A simple workaround is to shut down the VM, disable dynamic memory, and assign enough static vRAM to get VM upgraded.
A bit more complicated workaround is to launch a bunch of software to increase the demand, and when the demand has increased VM vRAM (shown in Hyper-V Manager under column Assigend Memory) over required amount, close all open software and run upgrade again.
2.3 You can also increase the available dynamic vRAM by changing the Memory Buffer size in VM settings. By default, a dynamic vRAM buffer is 20%. It means that VM is always assigned 20% more vRAM than it currently demands; if memory demand is 1 GB, VM is assigned 1.2 GB:
2.4 A practical way to follow memory demand in real time is to use Windows Admin Center (WAC, see tutorial).
Managing virtual machines in WAC shows you real time memory demand and assigned vRAM for each VM. In screenshot, a Windows 10 Insider VM with default settings has been booted to desktop and left idle. Its current memory demand is 707 MB, so it has been assigned that plus the default 20% buffer, 852 MB:
2.5 Memory weight, on same settings page than memory buffer (see step 2.3), means which VM has priority to access host RAM and its own vRAM. I recommend leaving it as by default, each VM memory weight being in the middle at 50%.
2.6 Dynamic memory with low minimum vRAM value makes it possible to run more virtual machines simultaneously. However, as it can make virtual machines quite slow, I prefer static vRAM on my virtual machines, never using dynamic memory.
I assign 3 or 4 GB static vRAM for each Windows 10 VM, 2 or 3 GB for Windows 8.1 VM, 2 GB for Windows 7 and 1 GB for any Linux VM. Windows 10 x64 runs really nicely with 3 GB, Windows 7 & 8.1 with 2 GB.
To calculate how many virtual machines I can run at the same time, I use a simple formula. I have noticed, that Windows 10 on this laptop runs really nicely when it has 5 GB RAM available. I'll add a 2 GB "buffer", which leaves me 9 GB to use on virtual machines of the 16 GB total RAM.
For me, it means that I can run three virtual machines with 3 GB vRAM at the same time, or two using 4 GB. I quite often have one VM running Windows 7 (2 GB), one 8.1 (3 GB), and one Windows 10 (4 GB). All virtual machines running smoothly, host having enough RAM for its needs.
2.7 It is of course up to you if you decide to use dynamic memory. My recommendation is at least to disable it when installing Windows, or when doing a feature upgrade.
For information about Hyperthreading and logical processors, see these articles:
- About Hyper-V Virtual Processor Limitations
- Hyper-threading - Wikipedia
3.1 Maximum number of virtual processors you can assign to a single VM is the number of logical processors on your host. Open Task Manager, select Performance tab, and select CPU to see how many logical processors you have available:
That is the maximum number of virtual processors you can assign to a VM.
3.2 If trying to assign more vCPUs to a VM, Hyper-V shows a warning:
Virtual machine will not start if it detects too many virtual processors.
3.3 Everything in Windows is run and executed in threads. Each thread can handle one instruction at any given time, the system then decides which thread is executed next, You can read more about this here: Virtualization : Processor, Core, Logical Processor, Virtual Processor : What does this mean? | buildwindows
A VM can only use an assigned vCPU, basically a logical processor or thread on host, when that thread is idle, not used by host. What this means is that a VM can be totally unable to work if it and other virtual machines running at the same time are demanding to use all available threads; as there are no idle threads on host, a VM suspends its vCPU until matching thread on host becomes available.
3.4 A good "rule of thumb" is to use 2 to 1 ratio, assign each VM 1 vCPU for each 2 host logical processors. In my example case, having 8 logical processors, I usually assign 4 vCPU per VM. This applies to all Linux and post-Vista virtual machines; those still wanting to run Windows XP or Vista virtual machines, remember that they do not accept more than 2 vCPUs.
For some heavy duty Windows virtual machines used to image customization and other deployment tasks, I assign the maximum, 8 vCPU.
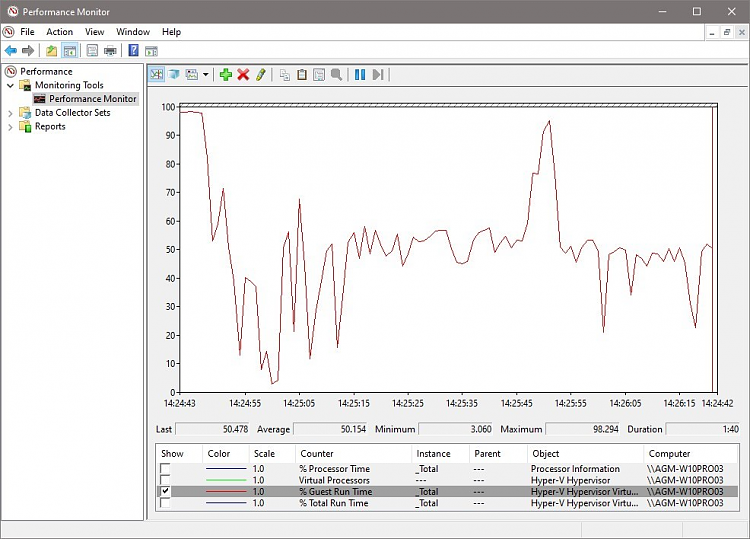
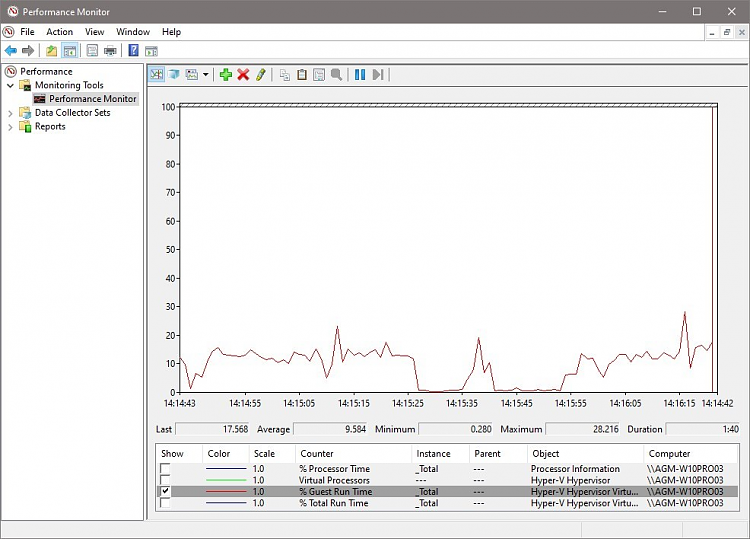
3.5 Monitoring the virtual processors, you can see a clear difference when amount of vCPUs is increased.
First, a VM with 4 GB and 2 vCPU, running a feature upgrade:
Next, the same VM but now with 8 vCPU, running the same upgrade task:
3.6 The recommended maximum number of vCPUs at use at the same time is 8 times the number of host logical cores. In my case now, having 8 logical processors, it would mean that my running virtual machines should not exceed 8*8=64 vCPUs at any given time.
However, this is just a theoretical limit, more a recommendation than rule. As long as you have enough RAM and processing power on your host, you can run almost unlimited number of virtual machines at the same time.
4.1 A checkpoint in Hyper-V stores the current state of a VM. When checkpoint is applied, Windows on VM is restored as it was at the moment of creating the checkpoint. This is very practical when testing software or Windows features; changes can be discarded simply by applying an earlier checkpoint. Full Ten Forums Hyper-V Checkpoint tutorial: Create and Use Hyper-V Checkpoints in Windows 10
4.2 Hyper-V uses two different types of checkpoints, Standard and Production. A Production Checkpoint is basically the same as a Windows 10 restore point; when created, it captures the current state of Windows 10, but not that of open applications and processes.
My recommendation is to always use Production Checkpoints. In case you want a checkpoint to capture also the current state of all running applications and processes, use Standard Checkpoint.
An example: if you are in the middle of copying a large file from network to VM, and you create a Standard Checkpoint when file copy progress is at 44%, when you later apply that checkpoint, the file copy continues from that 44%. The same with an open not saved Word document; when checkpoint is applied, the document will be open on VM desktop.
4.2 By default, Hyper-V uses / creates automatic checkpoints. I strongly recommend to disable this feature before running a new VM first time.
In all time I have used Hyper-V, I have only found one scenario where automatic checkpoints can be useful. I do a lot of Windows image customization and deployment tests; creating a new, clean and empty VM with automatic checkpoint lets me to restore the virgin state of that VM when deployment does not work, and I must repair the image. Other than that, I think automatic checkpoints in Hyper-V is its most unnecessary feature.
4.3 My recommendation for checkpoint settings. You should check this everytime before starting a new VM first time:
5.1 Especially if you have activated your Windows virtual machines, it is important to preserve them and their activation status by exporting them.
5.2 To export a a VM to an external disk, see this tutorial: Export Hyper-V Virtual Machine in Windows 10
After exporting VM, it can be deleted from Hyper-V Manager if not currently needed.
5.3 When the VM is again needed, import it back to Hyper-V: Import Hyper-V Virtual Machine in Windows 10
A hard disk on a physical machine, or VHD on a virtual machine on an activated Windows 10 system can be replaced without losing the machine's activation status (digital license).
What I always do when I have activated a Windows 10 virtual machine is to remove its VHD, and export it without any disk. I now have an activated Windows 10 VM with no disk. When I want, I can just import the VM, attach a new VHD to it, and install the same edition of Windows 10 it had when activated. New installation will be automatically activated, based on the existing digital license.
I even have have a few exported virtual machines on a safe storage which have digital licenses for Home, Pro, Education and Enterprise editions; when imported back to Hyper-V, I can install any of the four editions, all of them automatically activated, or install all four editions on VM in multi boot, all activated.
6.1 The ideal settings for a VM is a subjective thing, based on multiple factors. The recommendations in next step are based on following factors:
- Windows 10 x64 host
- 16 GB RAM
- 8 logical processors
- An SSD and an HDD
- Guest (VM) OS Windows 10 x64
6.2 For those specs, my recommended settings for a Windows 10 VM which I have found to be quite good are as follows:
- 4 GB vRAM
- 4 vCPU
- Disable Secure Boot
- Production Checkpoints
- Disable Automatic Checkpoints
- Install on Differenicing disks, Parent Disk on SSD
6.3 It is extremely important to let host have enough resources to run smoothly. Never run virtual machines with less than 2 GB available for host. That is the absolute minimum, I recommend always having at least 4 GB for host.
What this means is that if you only have 4 GB of RAM, never assign more than 2 GB for a VM, and from 8 GB RAM, never more than 4 GB.
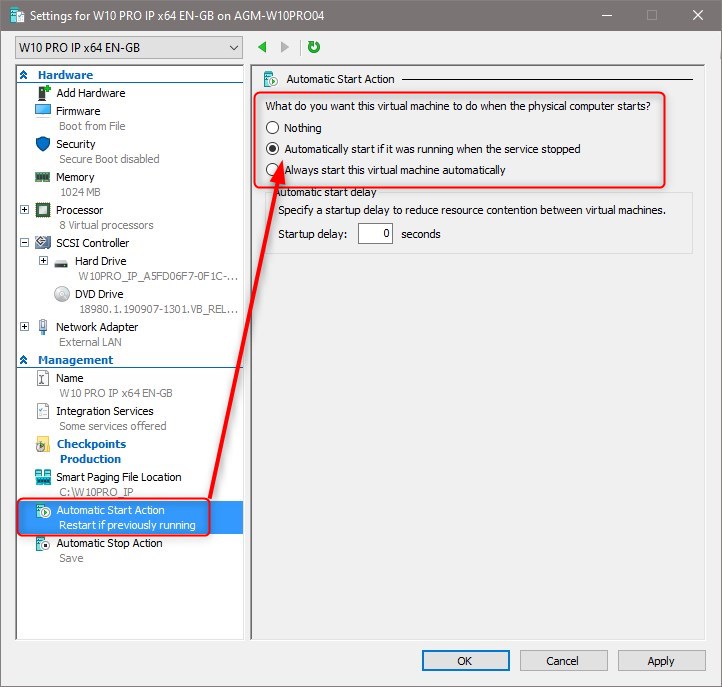
7.1 A very nice feature in Hyper-V is the possibility to select virtual machine's Stop Action and Start Action.
7.2 If you have a virtual machine which is normally always on and running, you can select to save its state when host is turned off, shut down or restarted:
This is the default action. You can also select to automatically turn VM off, or shut it down, when host is turned off / shut down / restarted.
7.3 Depending on your selected Stop Action, the VM will be automatically started at next boot (default action) if you so wish:
Accepting defaults in both Stop and Start Action, the VM which was running when you shut down the host, will be automatically restored to its last state when host is rebooted.
7.4 To boot a VM faster, save its current state by clicking the Save button:
This saves the current state of VM. When started next time, instead of clean boot, the VM is restored fast to its saved state.
That's it, geeks. Happy virtualization!
Kari
Hyper-V - Optimizing Virtual Machines
-
New #1
This is great Keri. I already made a few changes to my VMs. I need to explore some of the other suggestions.
-
Hyper-V - Optimizing Virtual Machines
How to Optimize Hyper-V Virtual Machines for better PerformancePublished by Kari "Kalsarikänni" FinnCategory: Virtualization
30 Apr 2020


 Quote
QuoteTutorial Categories

Related Discussions
