Encoding a movie


  1. Posts : 621
    Windows 10 Pro 19042 x64
       #1

    Encoding a movie


    Hello,
    Have downloaded a musical movie, length 2:54 hours. The picture is a little dark and audio volume low.
    I am trying to re-encode the movie (with video and audio filters), once in "AVIDEMUX", had to stop it after six hours when only 35 % were done. Now I'm trying to do the same with "VideoPad Video editor", there are still 7.5 hours to go and only 21% were done. The program and encoder use almost 88% cpu.
    I was thinking to do altogather with "DVD styler" to make a dvd and at the same time make the enhancement, but there is only an option to amplify the volume, no video filters.
    Is there some way to do this job faster, or some other program which works quicker ?
    Answers will be much appreciated
    Thanks
    Motim
      My Computer


  2. Posts : 31,630
    10 Home x64 (22H2) (10 Pro on 2nd pc)
       #2

    Hi, I found 'DVD Styler' as a replacement for Microsoft's DVD Maker. That was removed when my W7 Media edition was upgrade to Windows 10 (because it was part of the deprecated 'Media Centre').

    At the heart of DVD Styler's video processing is the Open Source command line utility ffmpeg, DVDStyler is the GUI front end but the hard work of video processing is done by ffmpeg. You can (and I do) run ffmpeg from a command line yourself, that way you have far more processing options that DVDStyler makes available. While you could use the sub-set of ffmpeg that comes with DVDStyler, it's better to download the complete version. That way you also get ffplay, a video player that takes all the same command line options as ffmpeg and lets you preview the effects. The command line syntax can take a bit of getting used to (unless you are familiar with Linux).

    Changing the volume is relatively easy using the audio filter volume.
    https://trac.ffmpeg.org/wiki/How%20t...0with%20FFmpeg

    Changing the brightness/contrast is a bit more complicated, or rather it's tricky to find the right settings for your needs - that's where ffplay is useful. The video filter eq is what you need to use.
    https://ffmpeg.org/ffmpeg-filters.html#eq

    As a starting point, try...
    ffplay -i input.mp4 -vf "eq=brightness=0.2:contrast=2" -af volume=2
    ...and adjust the parameters until it looks/sounds as you want.

    Then you're ready to do the conversion. The defaults for ffmpeg produce a reasonable compromise between speed of conversion, quality of output and file size. If you want to get higher quality for a smaller file size (at the cost of processing speed) then see the documentation for Constant Rate Factor (CRF).

    1. Choose a CRF value
    ...A lower value is a higher quality and a subjectively sane range is 18-28. Consider 18 to be visually lossless or nearly so: it should look the same or nearly the same as the input but it isn't technically lossless.
    https://trac.ffmpeg.org/wiki/Encode/H.264

    My priority is file size, so I generally use a CRF of 28. You can also select a preset for how fast or slow to process, the slower the better for quality and compression. There are also tunings to suit various video formats (cartoons vs. films, for example). So, once you have chosen appropriate video/audio filter parameters, my command line to do the conversion would be:

    ffmpeg -i in.mp4 -vf "eq=brightness=0.2:contrast=2" -af volume=2 -crf 28 -preset veryslow -tune film out.mp4

    Depending on your processor speed, the above is likely to run at about half real-time speeds. An hour of video is likely to take at least a couple of hours to process (I leave mine running over night).

    Ffmpeg is widely used in the commercial video industry, if you get stuck just Google 'ffmpeg' and what you are trying to achieve - chances are a professional has already asked for (and been given) the answer.
      My Computers


  3. Posts : 621
    Windows 10 Pro 19042 x64
    Thread Starter
       #3

    Encoding a movie


    Hello Bree,
    Thanks a lot for the detailed answer.
    I'm not so familiar using command lines, but I'l give it a try - time to learn.
    When I posted the thread about encoding the movie (with "videopad video editor"), it was at about 11 AM (local time), the encoding was supposed to end this moments (9 PM), but an hour ago the program's pop-up window said my movie was succesfully finished, then I klicked on the OK button, and the program crashed. Opened the place where the 'finished' movie file was, there was a large 1.7 GB file - un playable(and unfinished). A whole day work went to the drain.
    Now about DVDStyler, when I first made the dvd of this movie, could amplify the volume, but could not find any filters to manage the picture. So I will use your answer as a guide, and give it a try.
    Again, many Thanks.
    Motim
      My Computer


  4. Posts : 31,630
    10 Home x64 (22H2) (10 Pro on 2nd pc)
       #4

    Motim said:
    Now about DVDStyler, when I first made the dvd of this movie, could amplify the volume, but could not find any filters to manage the picture. So I will use your answer as a guide, and give it a try.
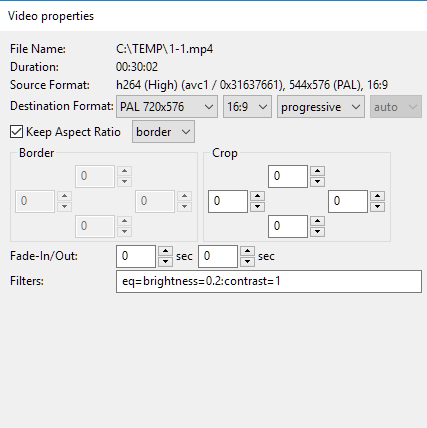
    Now that you know that DVDStyler calls ffmpeg to process the video you can use the full range of video filters that ffmpeg offers. You can write the parameters into the 'Filters:' box on the 'Video properties' page....

    Encoding a movie-styler1.png

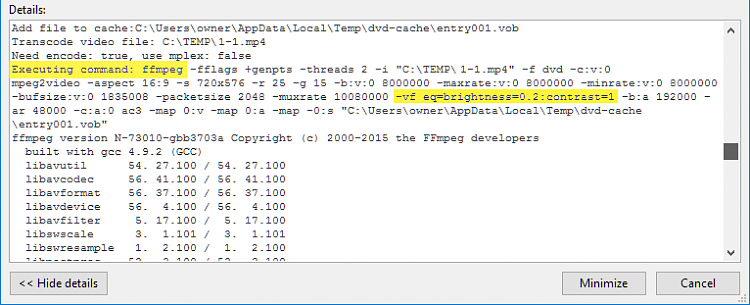
    ...and DVDStyler will incorporate them into the command line it uses to call ffmpeg.

    Encoding a movie-styler2.png

    Your problem is choosing the correct values to use. For that you'll need to try a few test runs with various brightness and contrast values until you get it right. That's best done at the command line using ffmpeg directly (you really don't want to make a complete DVD each time, just to see if the brightness looks OK).

    You'll need to open a command prompt and add the path to the ffmpeg executables. These are in the ...\DVDStyler\bin folder where you installed DVDStyler. Type:

    path=%path%;<put the full path to your ...DVDStyler\bin here>

    You can now run ffmpeg from whatever directory you are in. Type the ffmpeg command, let it run a few minutes then type Q (or Ctrl-C) to end the encoding. The resulting part-done output file will be playable. Repeat, changing the parameters until you are happy with the look, then use those parameters in DVDStyler.
    Last edited by Bree; 26 Oct 2016 at 18:30.
      My Computers


  5. Posts : 621
    Windows 10 Pro 19042 x64
    Thread Starter
       #5

    Encoding a movie


    Hello Bree,
    Thanks again for your explanations.
    Today, for the second time, after 7 hours of "videopad editor" working, and 2 hours still to finish - it crashed again, don't know why, system is ok. No other program was working at the same time.
    Now I'm going to give this ffmpeg a try. To be honest, I used once or twice the command prompt only to check the system - also following some guidance.
    Acording to your sample you sent me, where do I 'put' my movie in the command prompt line - so to make a piece of it, to see results.
    So sorry to bother you, but I am glad to get this help.
    Thanks
    Sincerely
    Motim
    So Sorry to bother, but in the command prompt nothing happened, attached a screenshot - or am I doing something wrong/Thanks again
    MotimEncoding a movie-command-prompt.jpg
    Last edited by Motim; 27 Oct 2016 at 09:06. Reason: Inserting Command prompt screenshot
      My Computer


  6. Posts : 621
    Windows 10 Pro 19042 x64
    Thread Starter
       #6

    Hello Bree
    Please see attached screenshot, I am poor with command prompt.
    Thanks
    Motim
      My Computer


  7. Posts : 31,630
    10 Home x64 (22H2) (10 Pro on 2nd pc)
       #7

    I see you've found your ffmpeg.exe. The 'path' command in your screenshot is incorrect. You should have typed:
    path=%path%;D:\My Win 10 machine\.....\dvdstyler\bin
    (obviously, I've abbreviated that a bit, you should type everything that I've left out and replaced with the '....'). You do NOT type ffmpeg.exe on the end, just the full address of the folder it's in. What you are doing with this command is adding the directory that holds ffmpeg to the list of folders that Windows looks in when you type a command. Next try typing ffmpeg on its own, it should run and tell you its version number, and a lot more besides.

    If you can now run ffmpeg, the next step is to change directory to the one where your video file is kept. Use the cd command for this, something like (use your correct folder name, this is just an example):
    cd C:\admin\Videos\My Films\

    Now you can run your full ffmpeg command. Note that if the names of your video files have spaces in them you need to put them in quotes:

    ffmpeg -i "My film.mp4" -vf eq=brightness=0.2:contrast=2 "My test output.mp4"

    Let it run until you have encoded several minutes of video (ffmpeg tells you how far it has got), then end the encoding by pressing the 'Q' key (or Ctrl-C). Play the video, adjust the brightness/contrast/volume numbers if necessary and try again (and again) until you achieve the effect you desire. Then you can type the eq=brightness=0.2:contrast=2 parameters (using your numbers and without the -vf bit) into DVDStyler's 'filter' box.
      My Computers


  8. Posts : 621
    Windows 10 Pro 19042 x64
    Thread Starter
       #8

    Hello Bree,
    Well, had some problems typing correctly in the command prompt box, got many error messages, but finally got this ffmpeg runing.
    Made some tests, still have to find the right numbers for brightness and contrast. (Copy and paste does not work in the command promt)
    Another small question please, what is the command for audio/volume, or volume I can manage in the dvdstyler.
    Your detailed instructions are great. I marked these pages in my bookmarks.
    Hope to get satisfactory results without too many tests.
    Many many thanks.
    Sincerely
    Motim
      My Computer


  9. Posts : 31,630
    10 Home x64 (22H2) (10 Pro on 2nd pc)
       #9

    Glad you're getting the hang of it!

    The full command line to adjust brightness/contrast and volume all at the same time would be (using -af for 'audio filter'):

    ffmpeg -i input.mp4 -vf "eq=brightness=0.2:contrast=2" -af volume=2 output.mp4

    (using your own numbers, of course)

    But if the end product you are aiming for is the DVD, then its easier to use the controls in DVDStyler's 'Audio Properties', they do after all just put the same thing into the command line it uses to call ffmpeg.

    volume=2 would raise the volume to 200% of original, volume=0.5 would reduce it to 50%. You can if you prefer specify the volume increase as decibels instead: -af volume=6dB

    Good luck.
      My Computers


  Related Discussions
Our Sites
Site Links
About Us
Windows 10 Forums is an independent web site and has not been authorized, sponsored, or otherwise approved by Microsoft Corporation. "Windows 10" and related materials are trademarks of Microsoft Corp.

© Designer Media Ltd
All times are GMT -5. The time now is 15:04.
Find Us


Windows 10 Forums