Windows 10 will not install on a system with a Pentium G3258 CPU

Page 1 of 2 12 LastLast

  1. Posts : 24
    Windows 10 Pro x64
       #1

    SOLVED Windows 10 will not install on systems with a Pentium G3258 CPU


    Hi all,

    As I posted in the SevenForums two months ago, Microsoft released an update (specifically KB3064209) in June (2015) for Windows 7 that effectively caused a system with an Intel Pentium G3258 processor to not boot after the update was applied.

    Interestingly, it DID boot successfully but the screen remained black. The screen works perfectly fine up until just an instant after the 'Starting Windows' logo displayed, then the black screen. Only removing the update fixed this issue.

    This was not motherboard manufacturer/video card/video driver/etc. specific. It happened on many different configurations with the only common factors being the G3258 CPU, Windows 7, and the KB3064209 Update.

    Fast forward to the the wonderful, new, shiny Windows 10 officially released a couple of days ago.

    Windows 10 Will Not Install On a System With a Pentium G3258 CPU! (In almost every case)

    Neither trying the install through 'updates' nor trying the install with an ISO image will work.

    The installation fails with this error:
    "We couldn't install Windows 10
    0xC1900101 - 0x20017
    The installation failed in the SAFE_OS phase with an error during boot operations"

    As I predicted in other forums, this issue has come back to haunt us with a vengeance after most of us agreed that simply not installing the Update 3064209 was a 'fix' to it causing the headache in Windows 7.

    In Windows 10, this is not an 'update' that you can elect to not install, it is internal to the Windows 10 code.

    Microsoft blames Intel, Intel blames Microsoft, and just a very, very few motherboard companies (1 that I know of; Asus) have issued a BIOS update which supposedly fixes this.

    Some reports say that Intel has agreed to "look into the problem but it may take a few weeks."

    A huge amount of discussion in other forums offers two possible workarounds:

    1) Removing ALL overclocking of the CPU (a few people have said this allows a successful Windows 10 install)

    OR

    2) (And this is just ridiculously unacceptable), going into the UEFI BIOS and disabling one of the cores of the CPU. However, the reports are that 100% of the time, this allows a successful installation of Windows 10.

    99% of Pentium G3258 owners who want to install Windows 10 (and perhaps selfishly want to use both cores), we are out of luck for the foreseeable future.

    A lot of reports are that a couple of the Windows 10 Preview versions did not have this problem, but the final 29 July 2015 release does.

    There is a large number of motherboard owners who have somehow gotten the mistaken impression that you're golden if you have a Z series motherboard. Mine is a Z87 and the problem is present with it. So don't waste your money thinking you can just buy a new Z87/Z97/Z99 and the problem will magically go away, it won't.

    Note: I will burn in Hades before I disable a CPU core to allow some BS 'fix' to a Microsoft/Intel complete and absolute debacle.

    I'll guess I'll remain a faithful Win 7 x64 user for some time to come, it looks like.


    .
    Last edited by ThinkingMonkey; 03 Aug 2015 at 21:09.
      My Computer


  2. Posts : 236
    Win10 Pro x64
       #2

    My question is if you disable it to upgrade can you re-enable it after the upgrade is finished? Or will it default back to not booting/booting to a black screen?
      My Computers


  3. Posts : 24
    Windows 10 Pro x64
    Thread Starter
       #3

    Carsomyr said:
    My question is if you disable it to upgrade can you re-enable it after the upgrade is finished? Or will it default back to not booting/booting to a black screen?
    Everything I've read in multiple forums so far indicates that you cannot re-enable the core even after a successful Windows 10 install, as doing so will cause the system to not boot.

    Similarly, there are many questions regarding re-applying an overclock after a successful install. Reports are that you cannot as, again, it will cause the system to not boot.

    Note that this has been a known issue for some time now and neither Microsoft nor Intel have provided a fix, each blaming the other.

    Of course the fact is that it's Microsoft.

    Though Intel may provide the microcode update, it's Microsoft who has insisted on applying it first in Windows 7 through update KB3064209, now Windows 10 with that particular update built into it, with no way to elect not to use it.

    Reportedly, Asus (and only Asus) has provided a new BIOS update that allows a Pentium G3258 CPU to work with Windows 10 with the KB3064209 update built into it.

    Certain previous Preview builds of Windows 10 have worked just fine with this CPU, which is drawing anger from users who are trying unsuccessfully to use the final build. It's extremely obvious that the builds that worked did not have the KB3064209 update code built in.

    .
    .

    .
      My Computer


  4. McD
    Posts : 1
    Windows 7 x64
       #4

    ThinkingMonkey said:
    Everything I've read in multiple forums so far indicates that you cannot re-enable the core even after a successful Windows 10 install, as doing so will cause the system to not boot.

    Similarly, there are many questions regarding re-applying an overclock after a successful install. Reports are that you cannot as, again, it will cause the system to not boot.

    Note that this has been a known issue for some time now and neither Microsoft nor Intel have provided a fix, each blaming the other.

    Of course the fact is that it's Microsoft.

    Though Intel may provide the microcode update, it's Microsoft who has insisted on applying it first in Windows 7 through update KB3064209, now Windows 10 with that particular update built into it, with no way to elect not to use it.

    Reportedly, Asus (and only Asus) has provided a new BIOS update that allows a Pentium G3258 CPU to work with Windows 10 with the KB3064209 update built into it.

    Certain previous Preview builds of Windows 10 have worked just fine with this CPU, which is drawing anger from users who are trying unsuccessfully to use the final build. It's extremely obvious that the builds that worked did not have the KB3064209 update code built in.

    .
    .

    .
    I've registered here to reply to this.

    I managed to successfully install 10 at the weekend, only after taking my G3258 back to stock speed. Previously I experienced all the same headaches everyone else has. This is on a B board. It installed flawlessly. Once up and running I tried to apply the overclock profile in my BIOS back to 4.2Ghz, and ended up with an infinite looping boot sequence. I can't comment on whether the same thing happens when attempting to re-enable a core, but my guess would be yes.
      My Computer


  5. Posts : 24
    Windows 10 Pro x64
    Thread Starter
       #5

    McD said:
    I've registered here to reply to this.

    I managed to successfully install 10 at the weekend, only after taking my G3258 back to stock speed. Previously I experienced all the same headaches everyone else has. This is on a B board. It installed flawlessly. Once up and running I tried to apply the overclock profile in my BIOS back to 4.2Ghz, and ended up with an infinite looping boot sequence. I can't comment on whether the same thing happens when attempting to re-enable a core, but my guess would be yes.
    Hi McD,

    I've found a 'solution' (until Intel and Microsoft get off their a** and fix it) and it's amazingly simple, no registry editing, changing Windows settings to try to disable the core for a second then re-enable it, or anything.

    It's simply changing the name of a single file. Hard to believe but true.

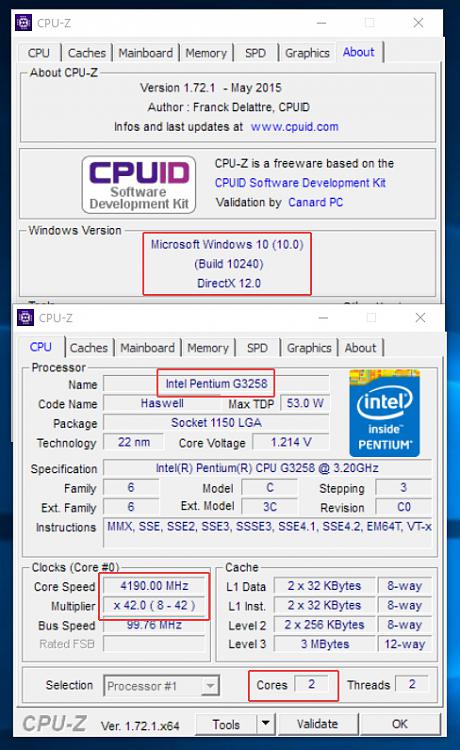
    I not only re-enabled the 2nd CPU core (now I have both, as it should be) but I re-applied my overclock and have experienced no problems whatsoever. It appeared that the only way G3258 CPU owners were getting Windows 10 to install were either disabling 1 core in the BIOS or removing all overclocking settings (using 3.20GHz with Adaptive voltage (all stock, in other words))

    Here's how to fix the problem for now:

    1) Either disable one core of the CPU in the BIOS or remove all OC and return to stock settings or both. Whatever it takes to install Windows 10 successfully.

    2) Once booted into Windows 10, navigate to C:\Windows\System32 and find the file named 'mcupdate_GenuineIntel.dll'.

    3) All you have to do is rename it (most posts I've read say it's safe to just delete it but I prefer renaming it), such as adding .old or .bak to the end of the filename. So it would look like 'mcupdate_GenuineIntel.dll.OLD' or 'mcupdate_GenuineIntel.dll.BAK' (or 'mcupdate_GenuineIntel.dll.MyStupidCat' will also work :) )

    4) You will have to temporarily change permissions on the file to change the name since it's a system file and will say 'File Access Denied' when you try to rename it (or do anything with it, really)

    Change the permissions:
    (Credit: © 2015 Sergey Tkachenko at WinAero.com)

    There are pictures on that site if you prefer to go there and do it that way, but I'll just describe it with steps.

    This may seem like a lot of steps but it's all the steps necessary for someone who has no previous experience working with file permissions. For those who are, just set permissions as usual to allow renaming of the specified file.

    1) Right-click on the file whose permissions you wish to change ('mcupdate_GenuineIntel.dll', in this case)

    2) Select Properties then click on the Security tab.

    3) Click on the Advanced button. A window named 'Advanced Security Settings for Data' will open.

    4) Here you need to change the Owner of the file. Initially it should say the Owner is 'TrustedInstaller'.

    5) Click the blue letters just to the right of that that says 'Change'.

    6) A small window named 'Select User or Group' will open.

    7) You will need to select a User or Group. There are a couple of ways to do this and this step may cause some confusion but here's how I do it:
    a) Type your name or whatever the name is of the current user (click the Start button at the very lower left of the Desktop and the name is at the very top of the left column) into the box that is named 'Enter the object name to select'. The spelling must be exact.
    b) Click on the Check Names button. It should then show the name of your computer plus the name you just entered.
    c) Click OK.

    8) Now you will provide yourself full access to the file. (which will allow the renaming of the file without the Access Denied message)

    9) Close all open dialog boxes by clicking OK on each of them.

    10) Right-click the file (mcupdate_GenuineIntel.dll) once more. Select Properties then click on the Security tab.

    11) Click the Add button and the box from before named 'Permission Entry for Data' will open.

    12) Click on the blue letters that say 'Select a Principal'. Once again the small Select User or Group box will open.

    13) Again type in your name or the name of the current user (same as before) and click Check Names then OK.

    14) This will take you back to the box named 'Permission Entry for Data'.

    15) Make sure there is a check mark in Full Control then click OK and OK again to close all open dialog boxes.

    You can now rename the file.

    After renaming it, reboot the computer and enter the BIOS to re-enable the CPU core that was disabled which allowed the installation of Windows 10.

    You can now also re-apply any overclocking settings that you wish if you do so inside the BIOS. I prefer this method but it's not necessary at this time if you use a utility such as Intel XTU (Intel Extreme Overclocking Utility) to set overclock settings from within Windows.

    That's it.

    Windows 10 will now boot normally with both cores of the G3258 CPU enabled and any overclocking you wish to add.


    Windows 10 will not install on a system with a Pentium G3258 CPU-cpu-z_screenshot.jpg
    .
    Last edited by ThinkingMonkey; 03 Aug 2015 at 22:41.
      My Computer


  6. Posts : 1
    win10
       #6

    ThinkingMonkey said:
    fix
    I registered to say this fix worked for me, thanks so much for posting it! Win10 installed and both cores running now.
      My Computer


  7. Posts : 1
    Win 10 Pro
       #7

    Thanks


    also registered just for this post.

    thinking monkey you are my saviour.

    i reset bios to stock, then disabled 1 core, and renamed that damn .dll file as per your instructions and it worked!

    now i have windows 10. thank you!
      My Computer


  8. Posts : 1
    Windows 10 pro
       #8

    I was pulling my hair (and all expansion cards) out trying to figure this out. Back at stock speeds/voltage and win 10 is finally installing on my nephews PC. Not tried the file rename workaround for reenabling the OC yet but you have my undying gratitude.

    I'll report back if all goes well and I can fully install win 10 and get back to 4.2ghz.
      My Computer


  9. Posts : 24
    Windows 10 Pro x64
    Thread Starter
       #9

    dgrona44 said:
    also registered just for this post.

    thinking monkey you are my saviour.

    i reset bios to stock, then disabled 1 core, and renamed that damn .dll file as per your instructions and it worked!

    now i have windows 10. thank you!
    I'm glad that helped you. To this date, 10/10/2015, after many, many updates automatically installed by Windows 10, I still don't know if they have somehow fixed something or the other so that Windows 10 can install without disabling a CPU core, renaming a DLL file, then re-enabling the core.

    It's completely ridiculous.

    .
      My Computer


  10. Posts : 3
    Windows 10
       #10

    Hi,

    This fix worked for me too.

    Thanks a lot!
      My Computer


  Related Discussions
Our Sites
Site Links
About Us
Windows 10 Forums is an independent web site and has not been authorized, sponsored, or otherwise approved by Microsoft Corporation. "Windows 10" and related materials are trademarks of Microsoft Corp.

© Designer Media Ltd
All times are GMT -5. The time now is 12:00.
Find Us


Windows 10 Forums